Store OS Bindings
The Store OS Bindings feature allows developers to integrate their extension functions directly into Store OS through an embedded web view. With these customizations, merchants can tailor the UI to meet their specific needs for functions beyond the core capabilities of the Store OS application. Bindings are essential for making extensions accessible within the Store OS UI. It configures how and where an extension will appear.
This guide gives step-by-step instructions for creating bindings and testing your extension in the Store OS app. It helps you set up, customize, handle events, test, and ensure a smooth integration with the Store OS ecosystem.
Prerequisites
- Make sure you have created an extension before you start Store OS binding. Refer to Get Started for a step-by-step guide.
Types of Bindings
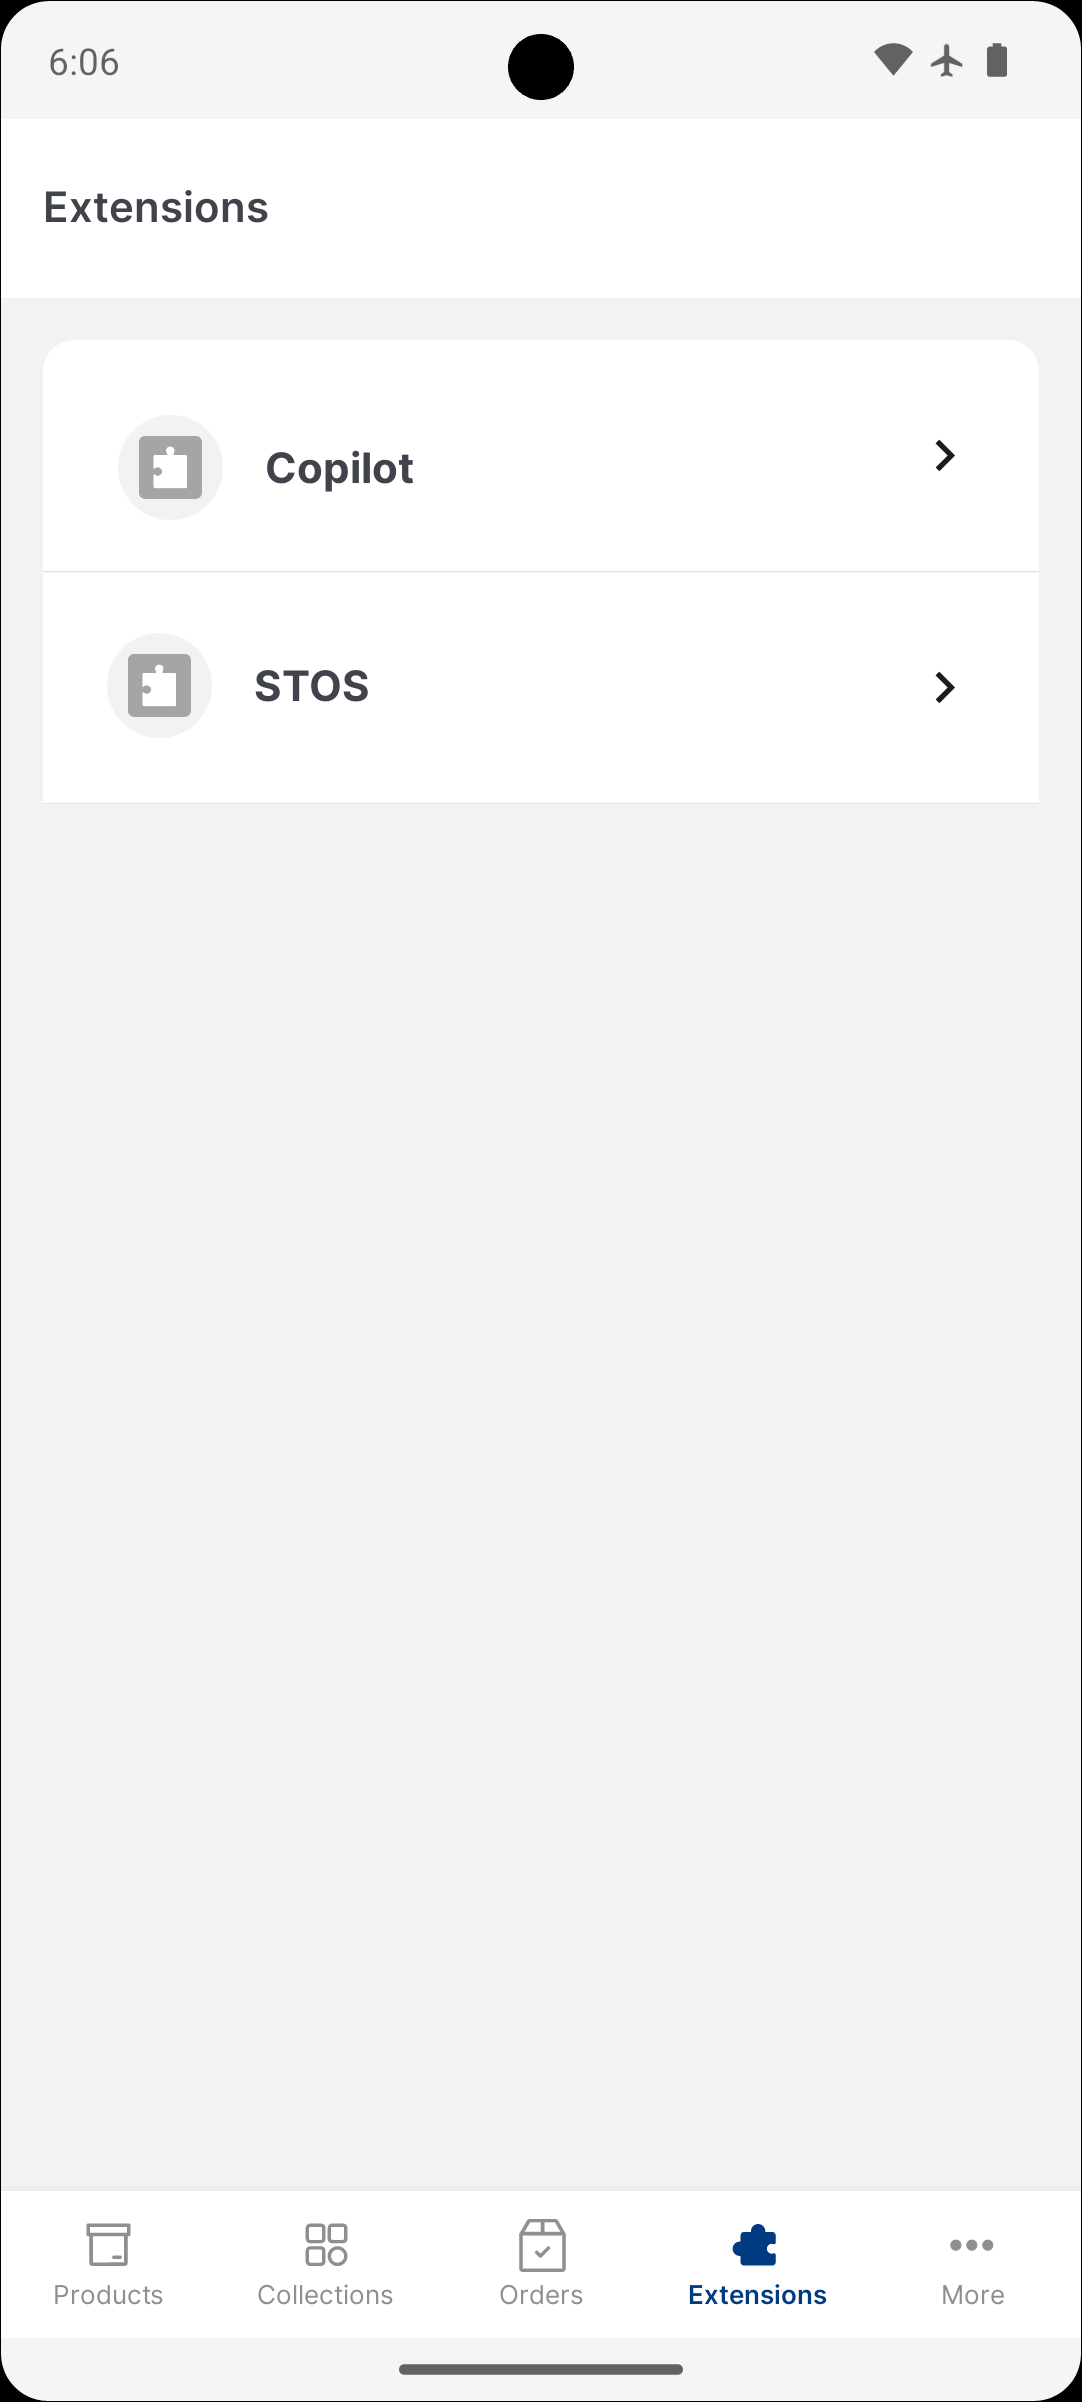
1. Connected App Bindings
Accessed via a dedicated navigation tab and occupies the entire screen.
Steps
Do the following steps to create a Connected App Bindings
- Go to the Fynd Partner panel.
- In the left pane, click Extensions and open the extension.
- Go to Extension Setup and ensure the extension URL and permissions are correct.
- In the Bindings section, click Manage.
- In the upper-right of the window, click Add to create a new binding.
- Select Store OS in the Interface Area dropdown.
- Select Connected App from the Binding Type dropdown.
- Enter a name for the binding and specify the target URL where it is hosted.
- Click Add.
The binding will appear in the Extension tab as shown in the image below:
2. Page Specific Bindings
Page Specific Bindings can be accessed from contextual menus, such as "More Actions" or dropdowns in Store OS.
Steps
Do the following steps to create Page Specific Bindings
- Go to the Fynd Partner panel.
- In the left pane, click Extensions and open the extension.
- Go to Extension Setup and ensure the extension URL and permissions are correct.
- In the Bindings section, click Manage.
- In the upper-right of the window, click Add to create a new binding.
- Select Store OS in the Interface Area dropdown.
- Select Page Specific from the Binding Type dropdown.
- Enter a name for the binding.
- Specify the target URL where the binding is hosted.
- In the Allowed Pages dropdown, select pages where the extension will be available as an entry point.
- In the User Interaction dropdown, specify how the user will interact with the screen.
The user can interact in two formats:- Modal: Opens as a side drawer on tablets or as a bottom sheet on mobile.
- Full page: Opens as a dedicated full-screen page on both tablets and mobile.
- Click Add.
Fynd Store OS Interface (FSI)
FSI is a communication and state‑management layer between a host application (Store OS) and an embedded extension (rendered in an iframe/webview). It enables both sides to:
- Emit and listen to events
- Share and react to state changes
FSI standardizes how extensions communicate with Store OS. Both the host and the extension load the FSI script. The extension must initialize in extension mode, after which it can start sending and receiving events and state updates.
FSI uses postMessage under the hood for cross‑context messaging. When loaded, it is attached to the global object and is available as window.FSI.
Steps to Initialize FSI
Load the FSI script in your extension and then initialize the extension (run inside an async context):
const loadScript = (src) => {
  return new Promise((resolve, reject) => {
    const script = document.createElement("script");
    script.src = src;
    script.async = true;
    script.onload = () => resolve();
    script.onerror = () => reject(new Error(`Failed to load script: ${src}`));
    document.body.appendChild(script);
  });
};

// Use the environment-appropriate URL for the FSI library
const fsiLibraryPath =
  "https://storeos.fynd.com/fynd-store-os-extensions/v3/fsi.js";
await loadScript(fsiLibraryPath);

window.FSI.initExtensionApplication();

// Announce readiness so the host can begin sending state/events
window.FSI.event.emit("ext.ready", { isReady: true });
As soon as your extension loads, it should emit ext.ready.
Any state or event transfer is available only after the extension emits ext.ready.
The initExtensionApplication call is mandatory to ensure FSI runs in extension mode.
States
A state refers to shared data objects that can change over time and need to be synchronized between Store OS and the extension. This includes dynamic information, such as cart contents, product details, and user selections. When you subscribe to a state, your extension receives updates when new state data is published.
Default URL Parameters
When an extension is launched within Store OS, the platform automatically adds authentication tokens and context parameters to the extension URL. This allows the extension to securely access relevant data and user context without requiring a separate login. These parameters are appended as query strings and are available inside the extension.
Below are the default parameters provided to every extension:
| Query Parameter | Description |
|---|---|
| company_id | Unique identifier for the selected company. |
| application_id | Unique identifier for the selected sales channel (application) within the company. |
| store_id | Unique identifier for the selected store. |
| platform_user_id | Unique identifier of the currently logged-in user on the platform. |
State Structure Reference
The following table outlines the structure of each state object you can subscribe to.
For instance, when you subscribe to the product state, you will receive an object containing the keys listed below.
Refer to the table below to understand the data available for each state and how to access it in your extension:
1. Order/Shipment Detail State
State: orderDetail
| Key | Type | Description |
|---|---|---|
| order_id | string | Order ID for the selected order |
| shipment_id | string | Shipment ID for the selected shipment |
Usage Example
window.FSI.state.orderDetail.subscribe(function(data){
    console.log("FSI.state.orderDetail.subscribe:", JSON.stringify(data));
})
JSON Schema
{
  "$schema":"https://json-schema.org/draft/2020-12/schema",
  "type":"object",
  "properties":{
    "order_id":{"type":"string"},
    "shipment_id":{
      "type":"string",
      "description":"shipemnt id only available for shipment level bindings"
    }
  },
}
Example for Order Detail
{
  "order_id": "order-123",
  "shipment_id": "null",
 }
Shipment ID will be null in case of order detail.
Example for Shipment Detail
{
  "order_id": "order-123",
  "shipment_id": "shipment-123",
 }
2. Cart State
State: cart
| Key | Type | Description |
|---|---|---|
| cart_id | string | Current active cart ID |
| user_id | string | User ID associated with the cart |
| address_id | string | Address ID linked to the cart |
| order_type | string | Type of order ("HomeDelivery", "PickAtStore") |
Usage Example
window.FSI.state.cart.subscribe(function(data){
    console.log("FSI.state.cart.subscribe:", JSON.stringify(data));
})
JSON Schema
{
  "$schema":"https://json-schema.org/draft/2020-12/schema",
  "type":"object",
  "properties":{
    "cart_id":{"type":"string"},
    "user_id":{"type":"string"},
    "address_id":{"type":"string"},
    "order_type":{"type":"string","enum":["HomeDelivery","PickAtStore"]}
  },
}
Example
{ "cart_id": "123456789",
  "user_id": "user_abc123",
  "address_id": "addr_123",
  "order_type": "HomeDelivery"
 }
3. Product State
State: product
| Key | Type | Description |
|---|---|---|
| product_slug | string | Unique slug identifier for the product |
| product_uid | string | Unique product UID |
| seller_identifier | string | Seller UID |
| store_id | string | Store UID |
| product_size | string | Currently selected size of the product |
| quantity | number | Selected quantity |
| cart_id | string | Associated cart ID |
| location | object | Location details (varies by country; e.g., India includes state and pincode, UAE includes area) |
Usage Example
window.FSI.state.product.subscribe(function(data){
    console.log("FSI.state.product.subscribe:", JSON.stringify(data));
})
JSON Schema
{  "$schema":"https://json-schema.org/draft/2020-12/schema",
  "type":"object",
  "properties":{
    "product_slug":{"type":"string"},
    "product_uid":{"type":"integer"},
    "seller_identifier":{"type":"string"},
    "product_size":{"type":"string"},
    "store_id":{"type":"integer"},
    "quantity":{"type":"integer","minimum":1},
    "cart_id":{"type":"string"},
    "fulfilment_slug":{"type":"string"},
    "location":{"type":"object", // This is India location
      "properties":{
        "country_iso_code":{"type":"string"},
        "pincode":{"type":"string"}
      },
    }
  },
}
Example
{
  "product_slug": "product-123",
  "product_uid": 12345,
  "seller_identifier": "seller_xyz",
  "produt_size": "size_xyz",
  "store_id": 1234,
  "quantity": 2,
  "cart_id": "123456789",
  "fulfilment_slug":"standard-delivery",
  "location": {
    "country_iso_code":"IN",
    "pincode":"400067"
  }
}
Syncing State Data
1. Subscribe
To receive updates when cart data changes (such as when items are added or removed), subscribe to the cart state. For example, if the extension is open and a user adds an item to the cart, your extension will automatically receive the updated cart information. This allows your extension to always reflect the latest cart contents by listening for changes to the cart's ID or other properties.
Always use a named function (not an anonymous function) for subscribing to a state because the unsubscribe method requires the same function reference that was used during subscription. Always store and use the named function reference for both subscribing.
Example
function onCartChange(data) {
  const cartId = data?.cart_id;
}
window.FSI.state.cart.subscribe(onCartChange);
2. Unsubscribe
To unsubscribe from updates when you no longer need notifications, call the unsubscribe method with the same function reference you used to subscribe.
Always use a named function (not an anonymous function) for unsubscribing to a state because the unsubscribe method requires the same function reference that was used during subscription. Using anonymous functions will not work for unsubscription, as there is no way to reference the original function.
Example
Suppose you previously subscribed to cart updates and now want to stop receiving notifications (for example, when your extension is being closed or the cart is no longer relevant). To do this, simply call unsubscribe with the same named function reference you used for subscribing:
window.FSI.state.cart.unsubscribe(onCartChange);
Entry Points
Store OS provides several entry points where your extension can appear. Each entry point determines where and how your extension is accessible within the Store OS UI. Below, you'll find a developer-friendly summary of each entry point, including where it appears, display name in the bindings UI, typical use cases, and supported UI formats.
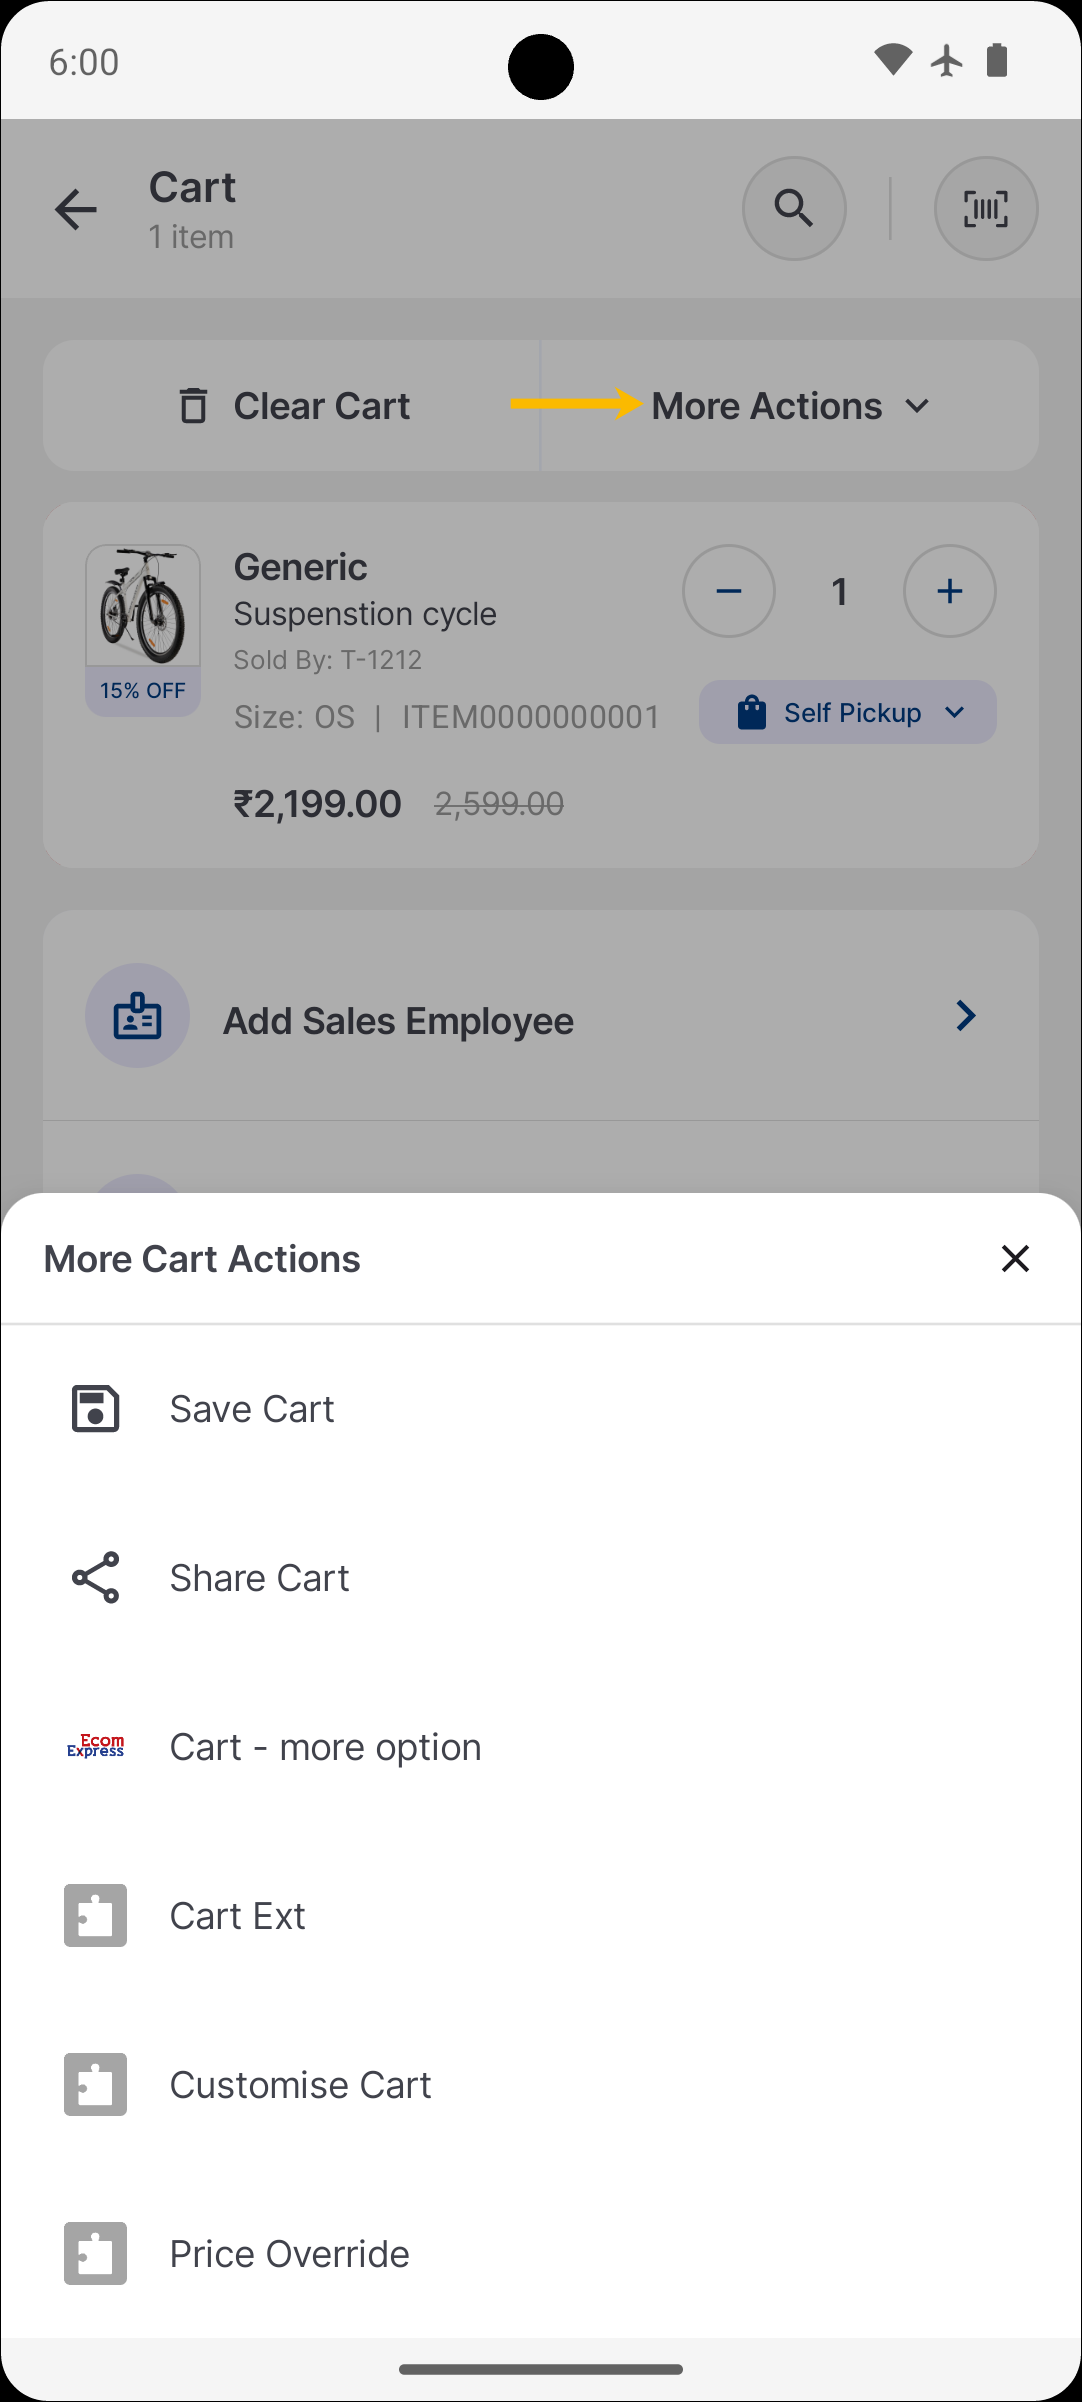
- Cart → More Cart Actions
- Binding Name: "Cart - More Actions"
- Use case: Apply coupons
- User Interaction: FullPage, Modal
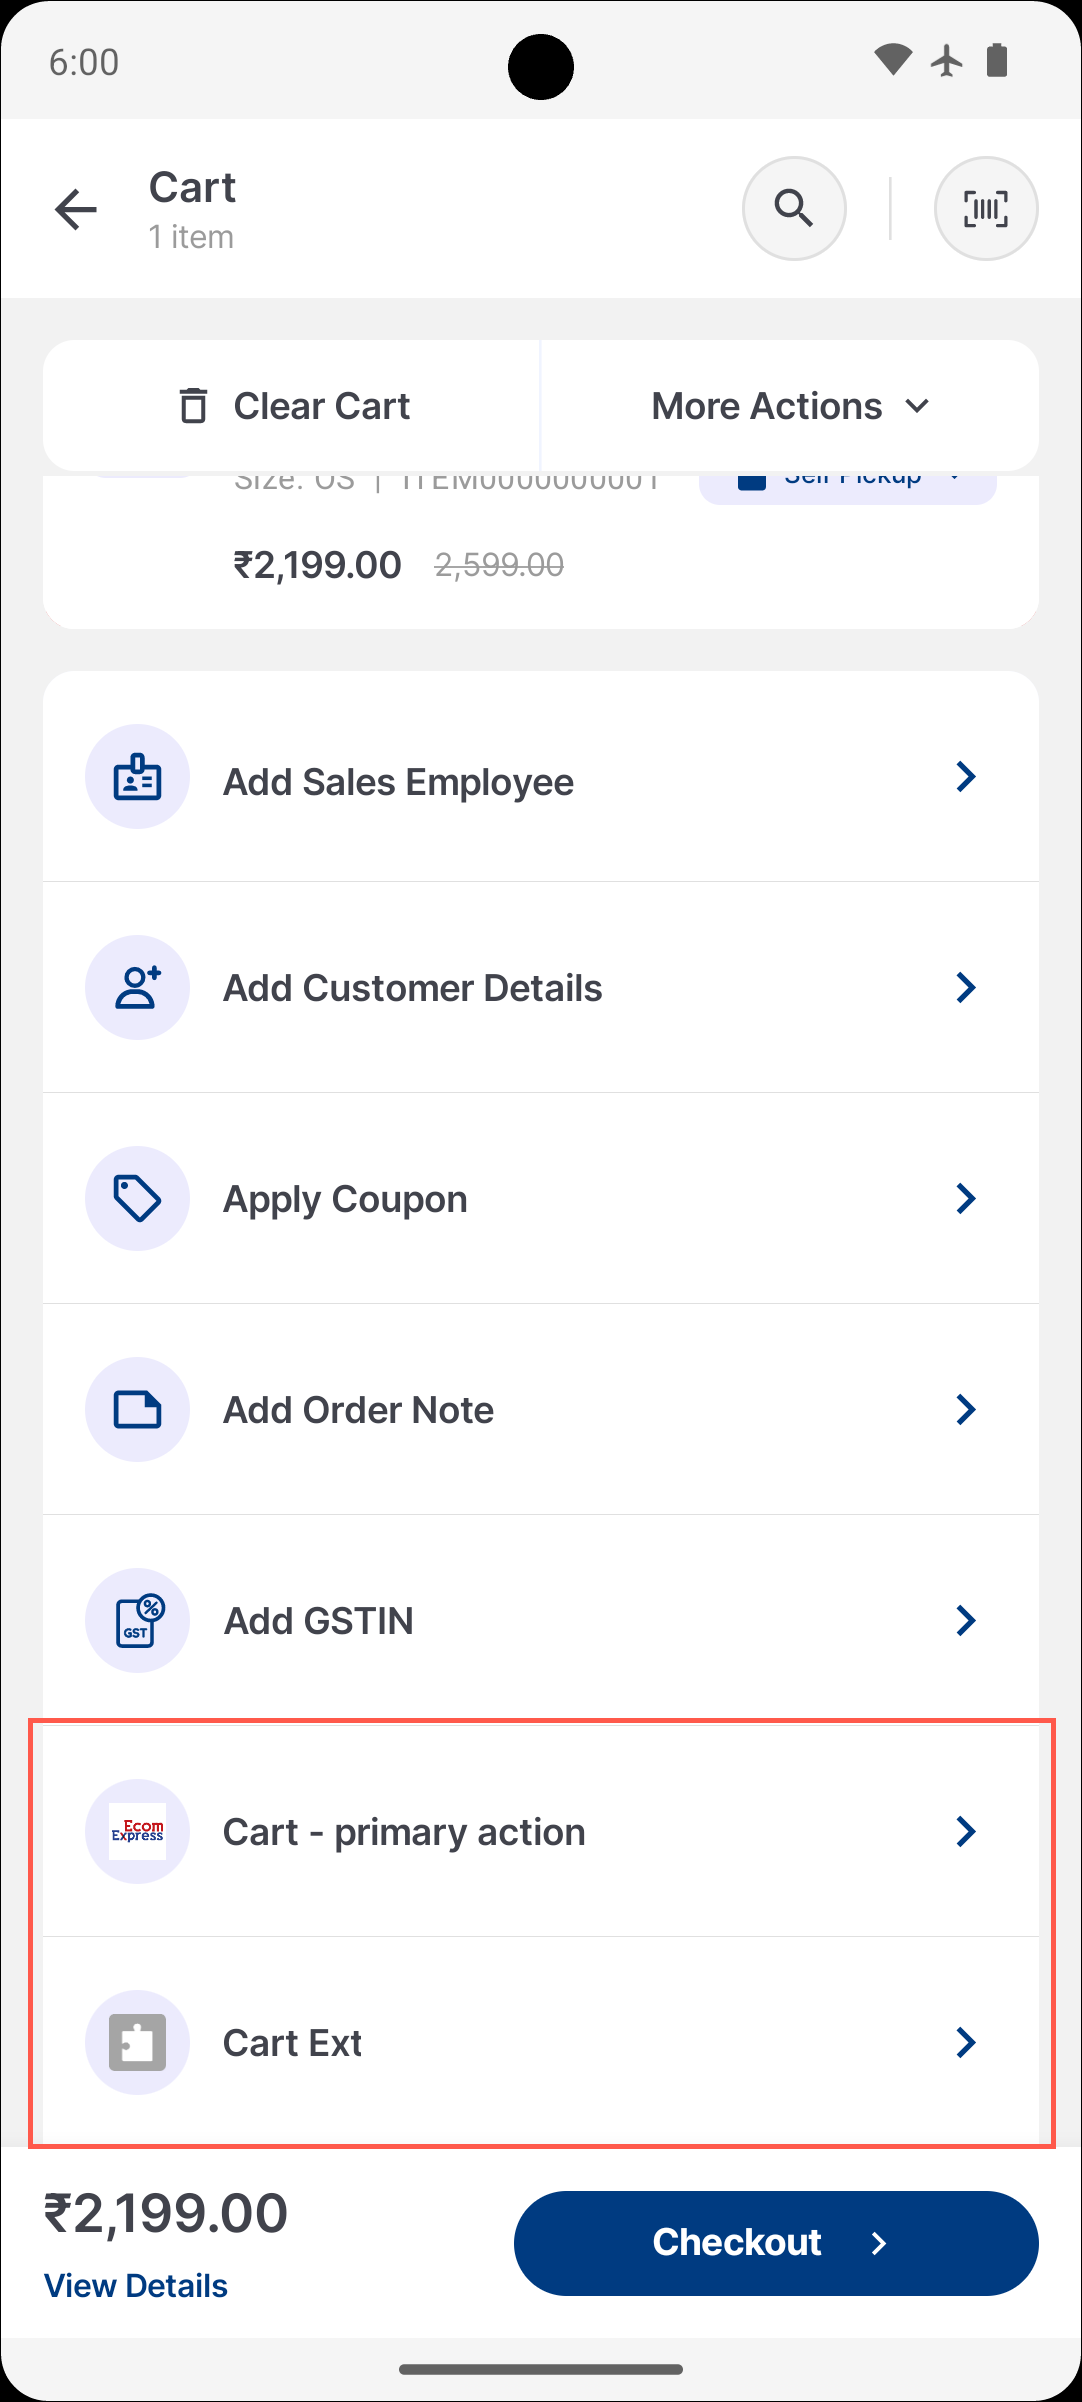
- Cart → Cart Action Card
- Binding Name: "Cart - Primary Action Card"
- Use case: Add custom attributes to customers or to cart/item-level metadata
- User Interaction: FullPage, Modal
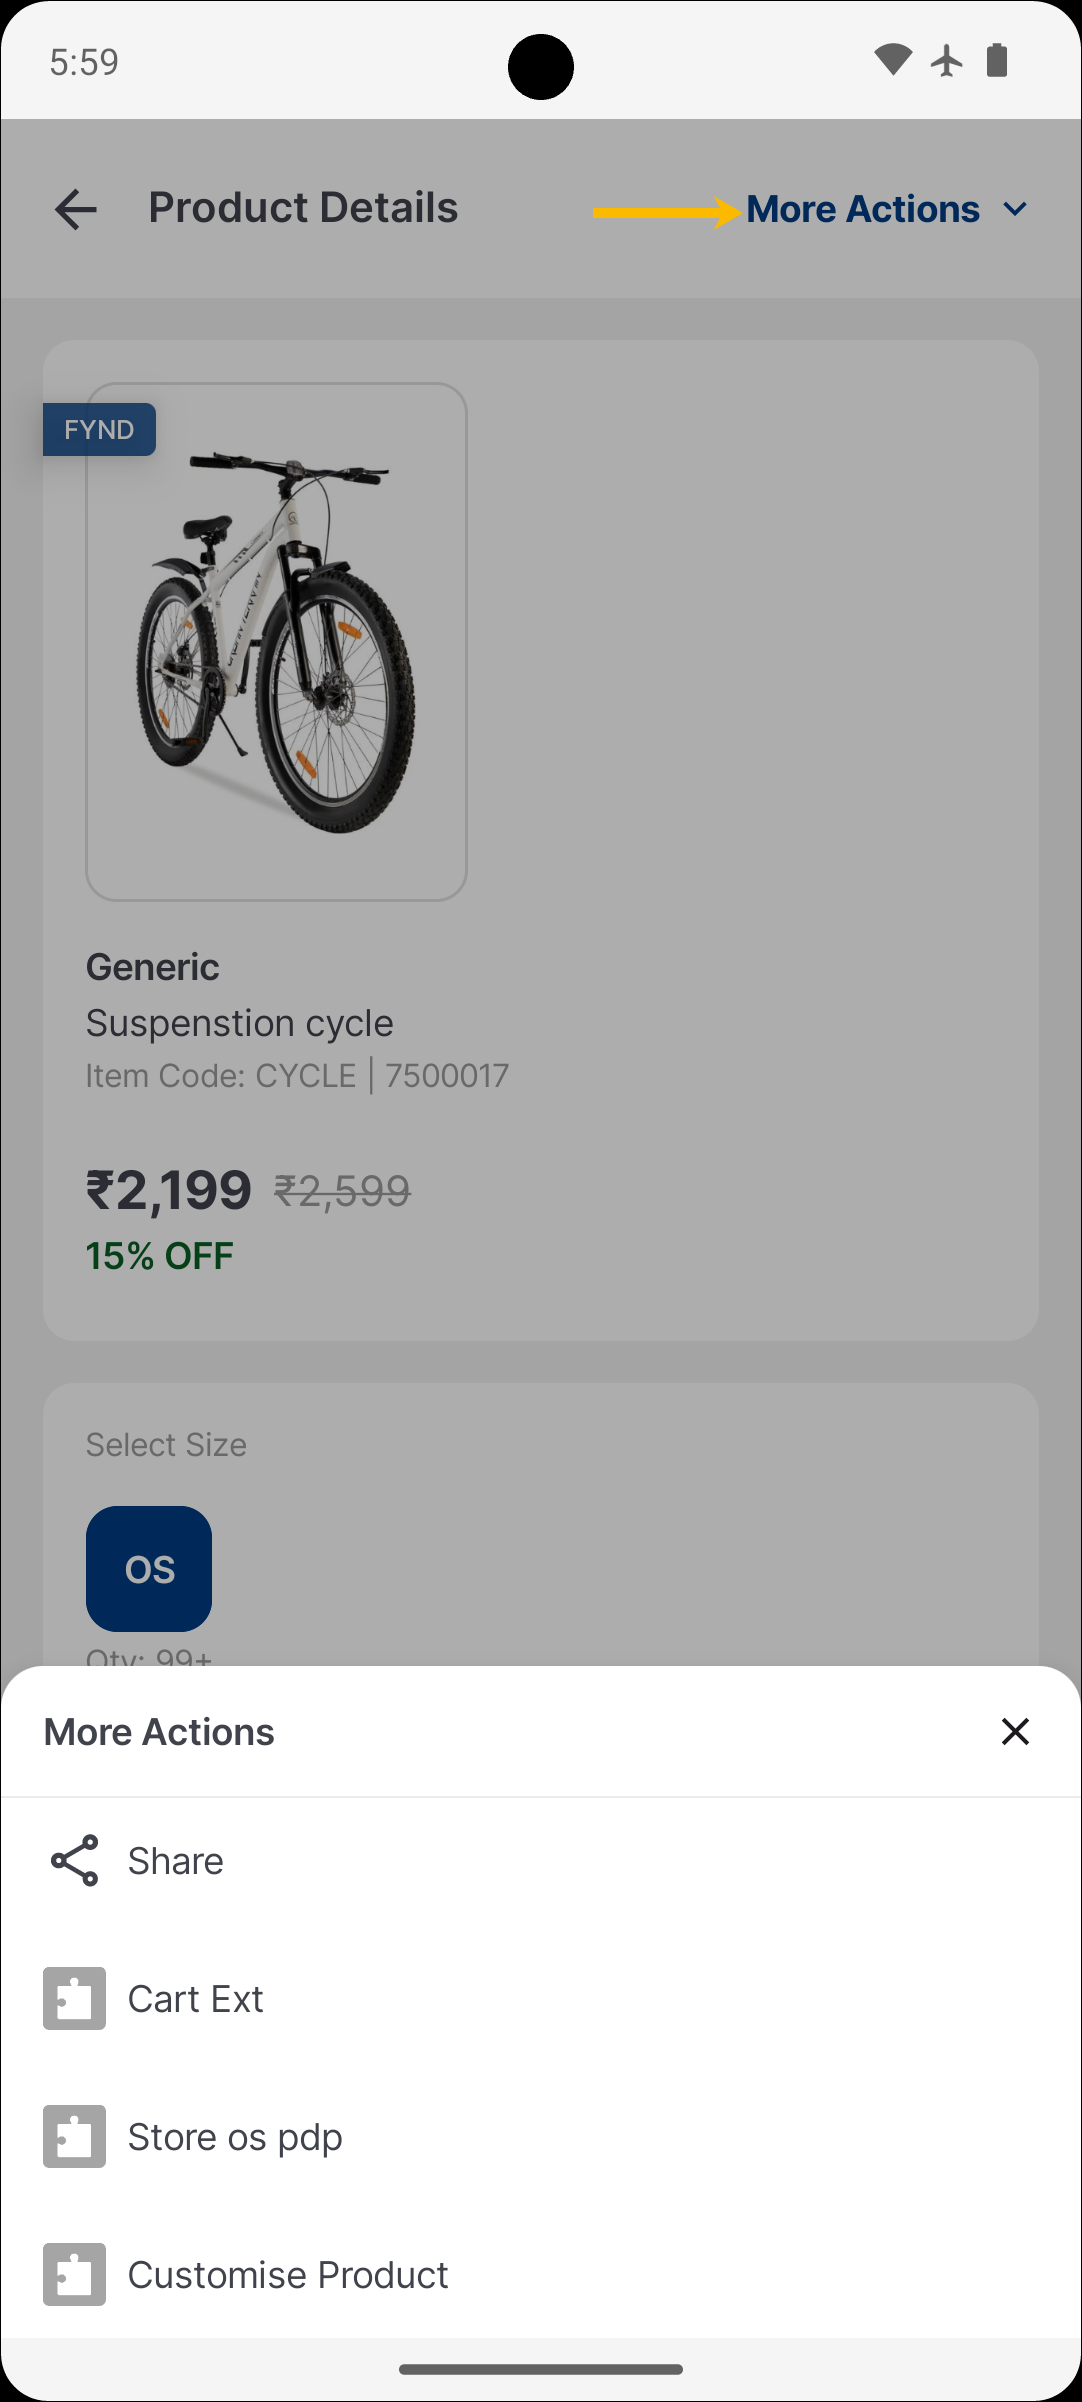
- Product Details Page (PDP) → More Actions
- Binding Name: "Product Details"
- Use case: Show similar products
- User Interaction: Modal
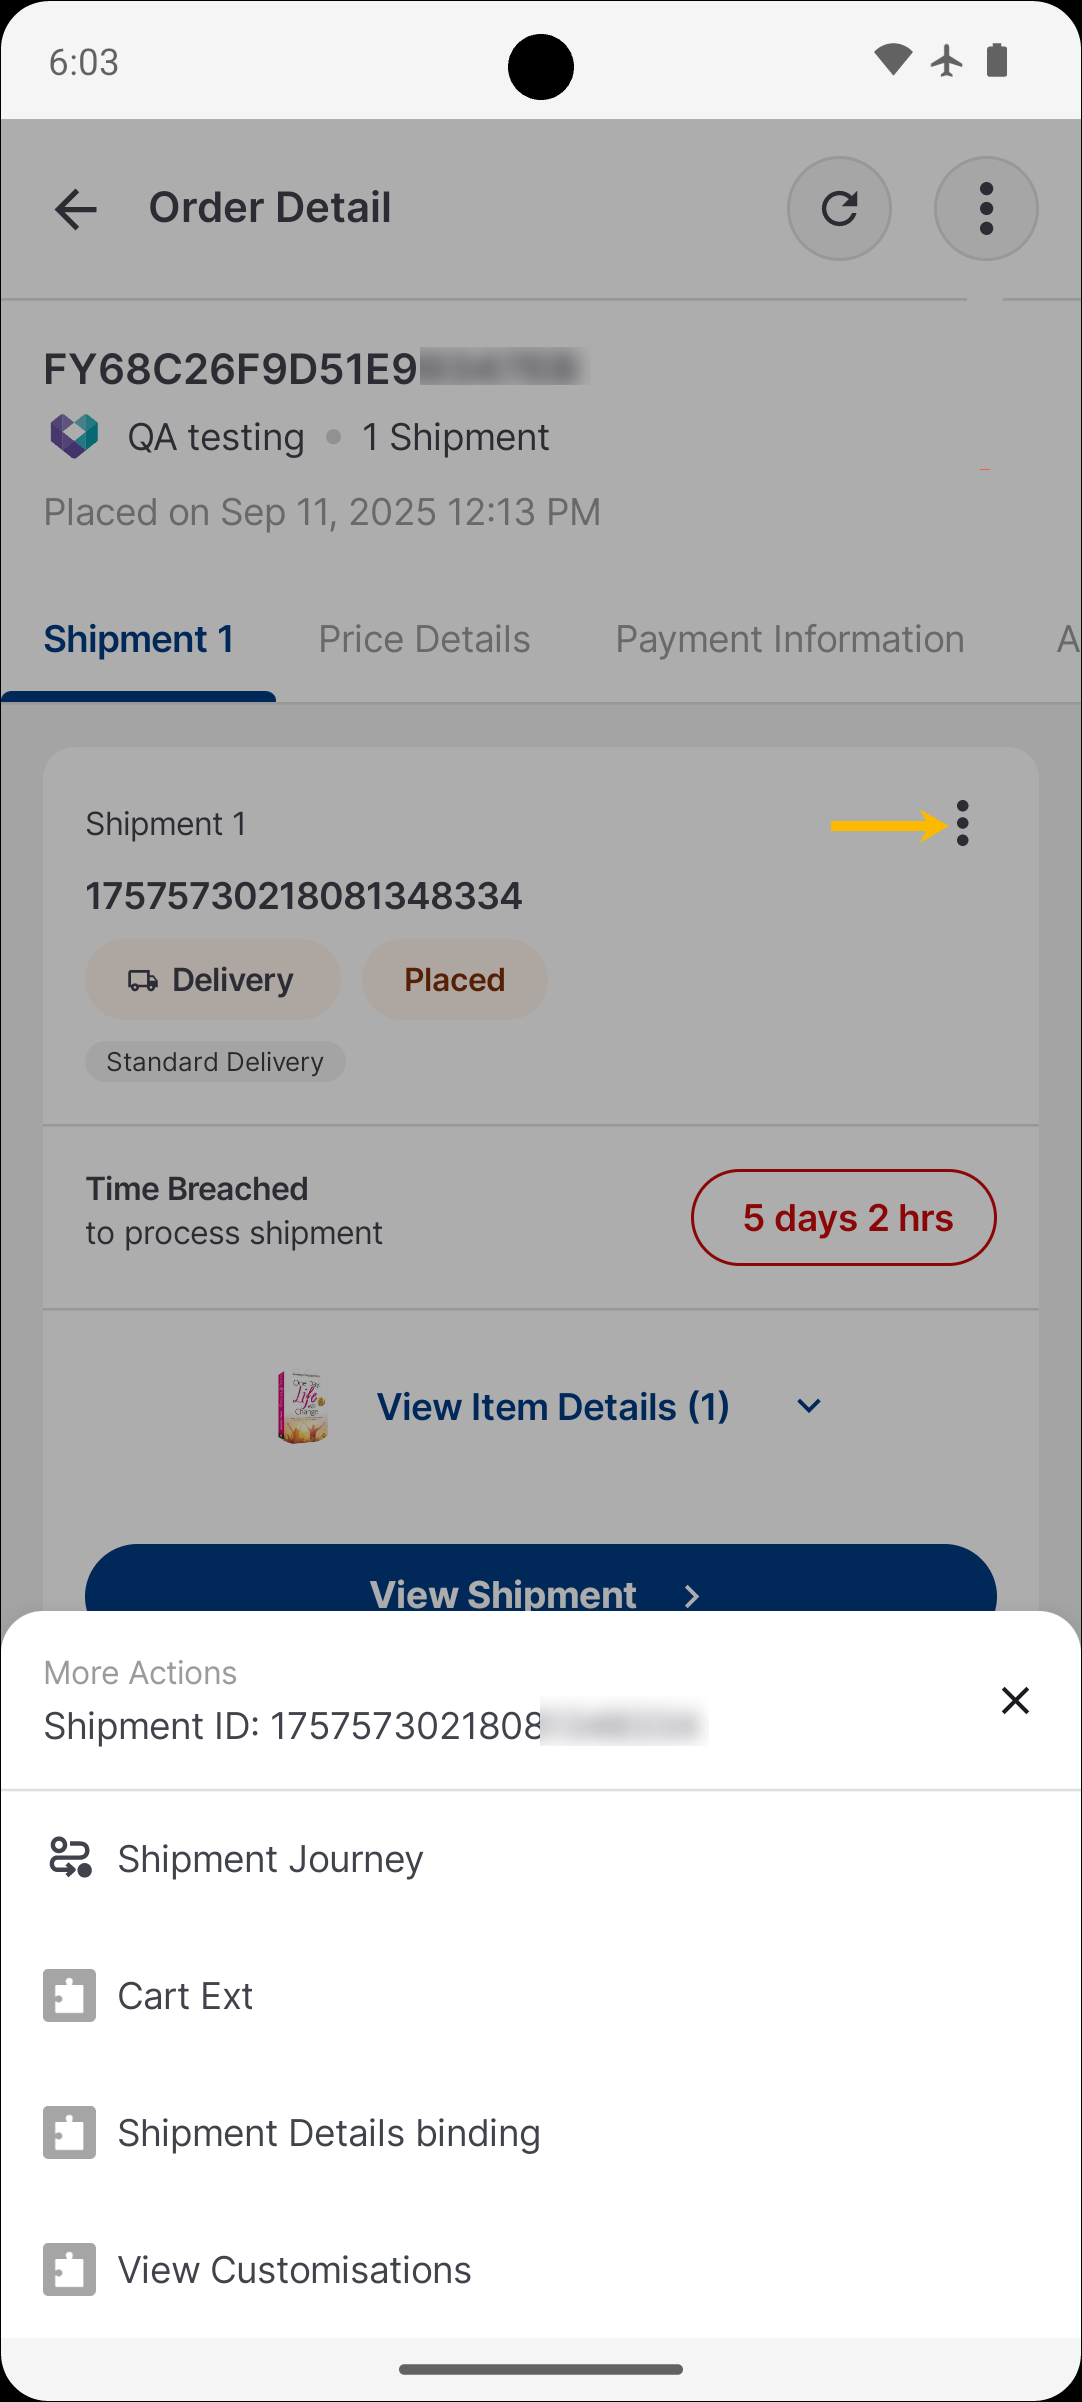
- Orders → Order Details
- Binding Name: "Order Details"
- Use case: Add metadata at the order level
- User Interaction: Modal
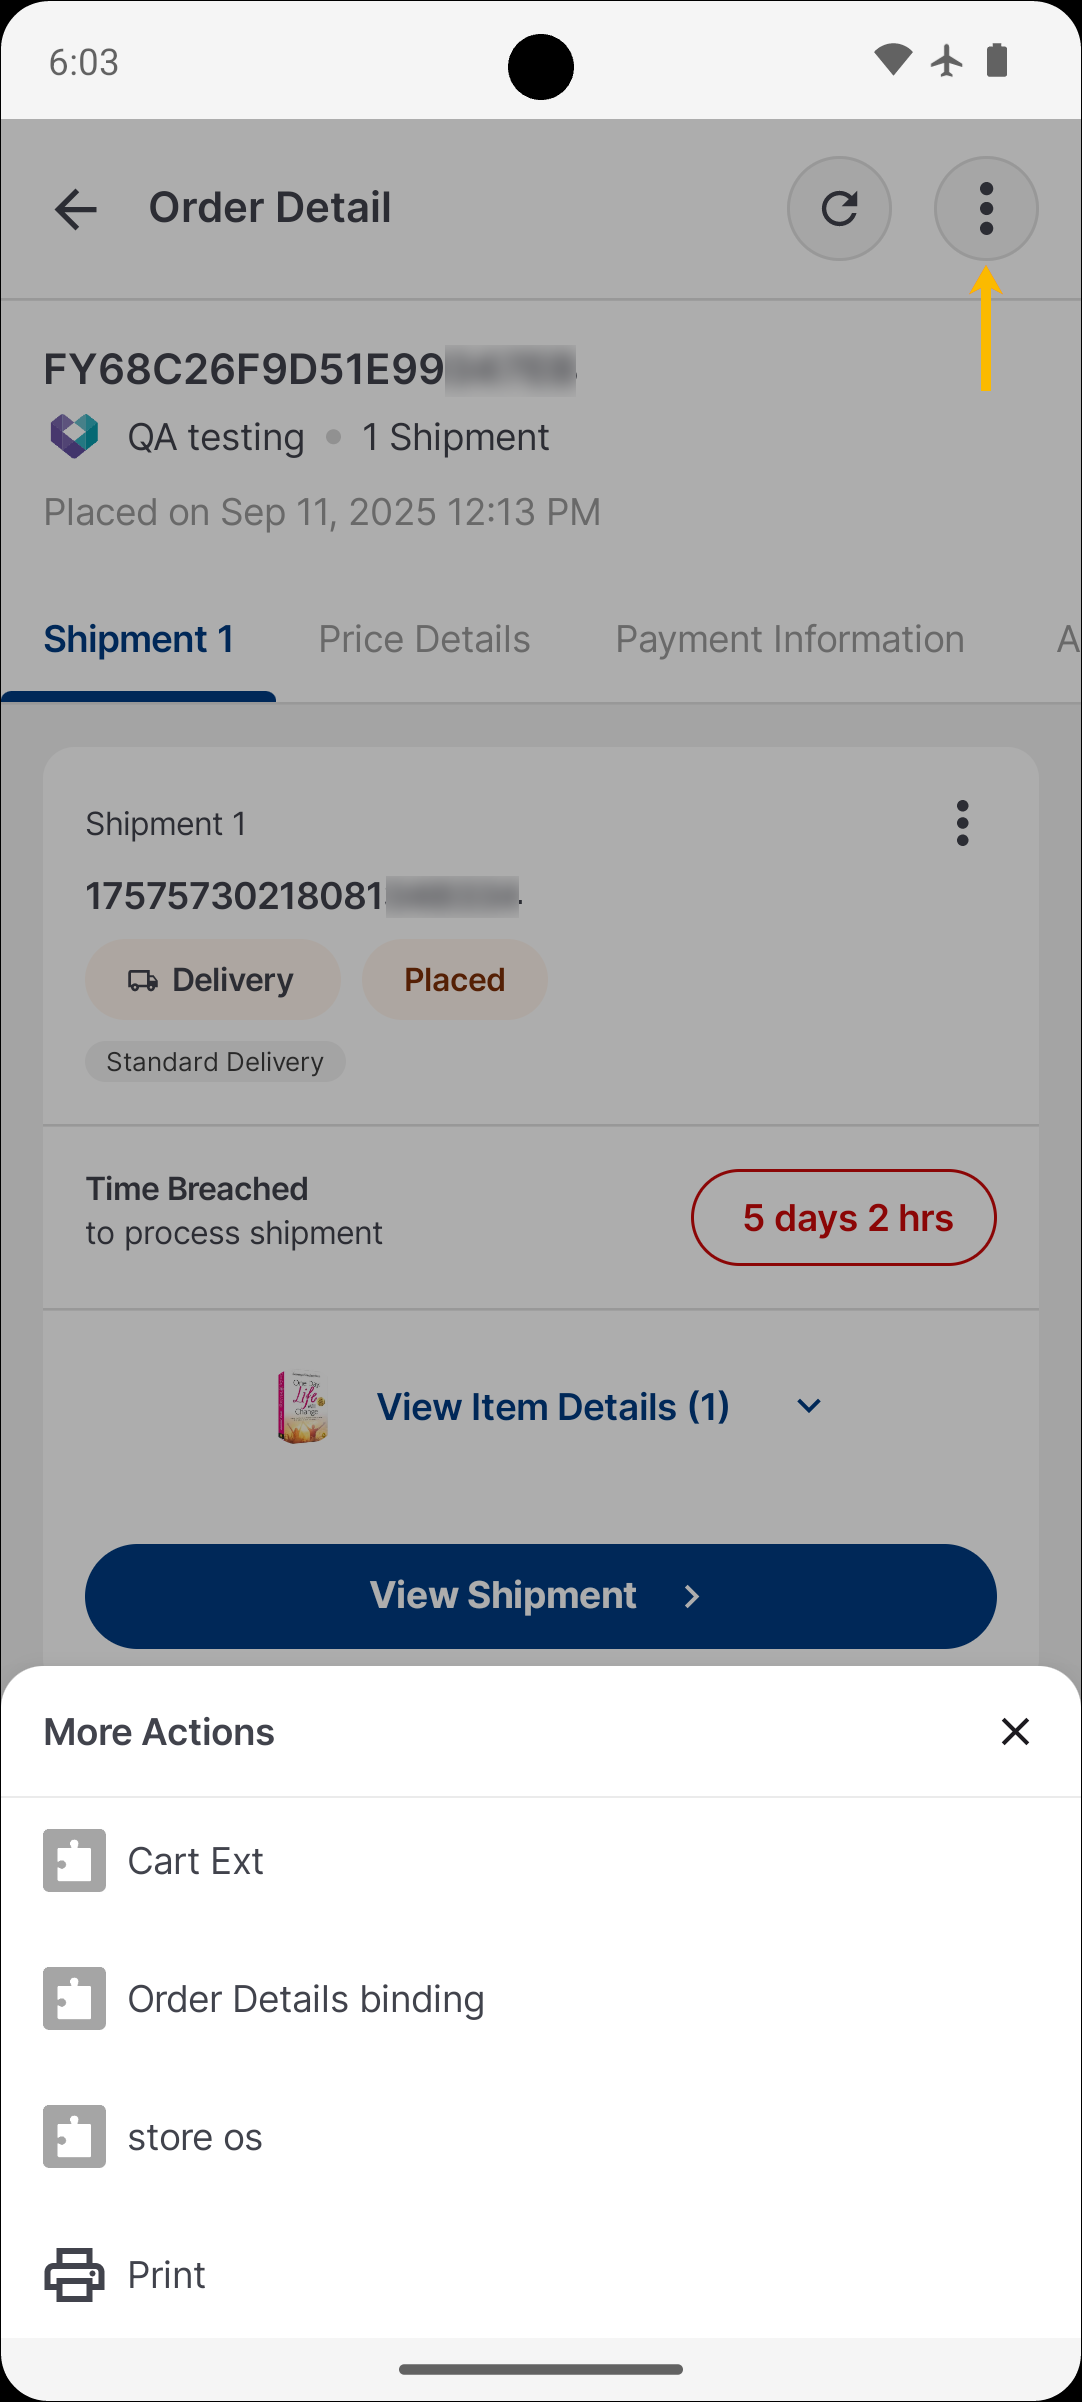
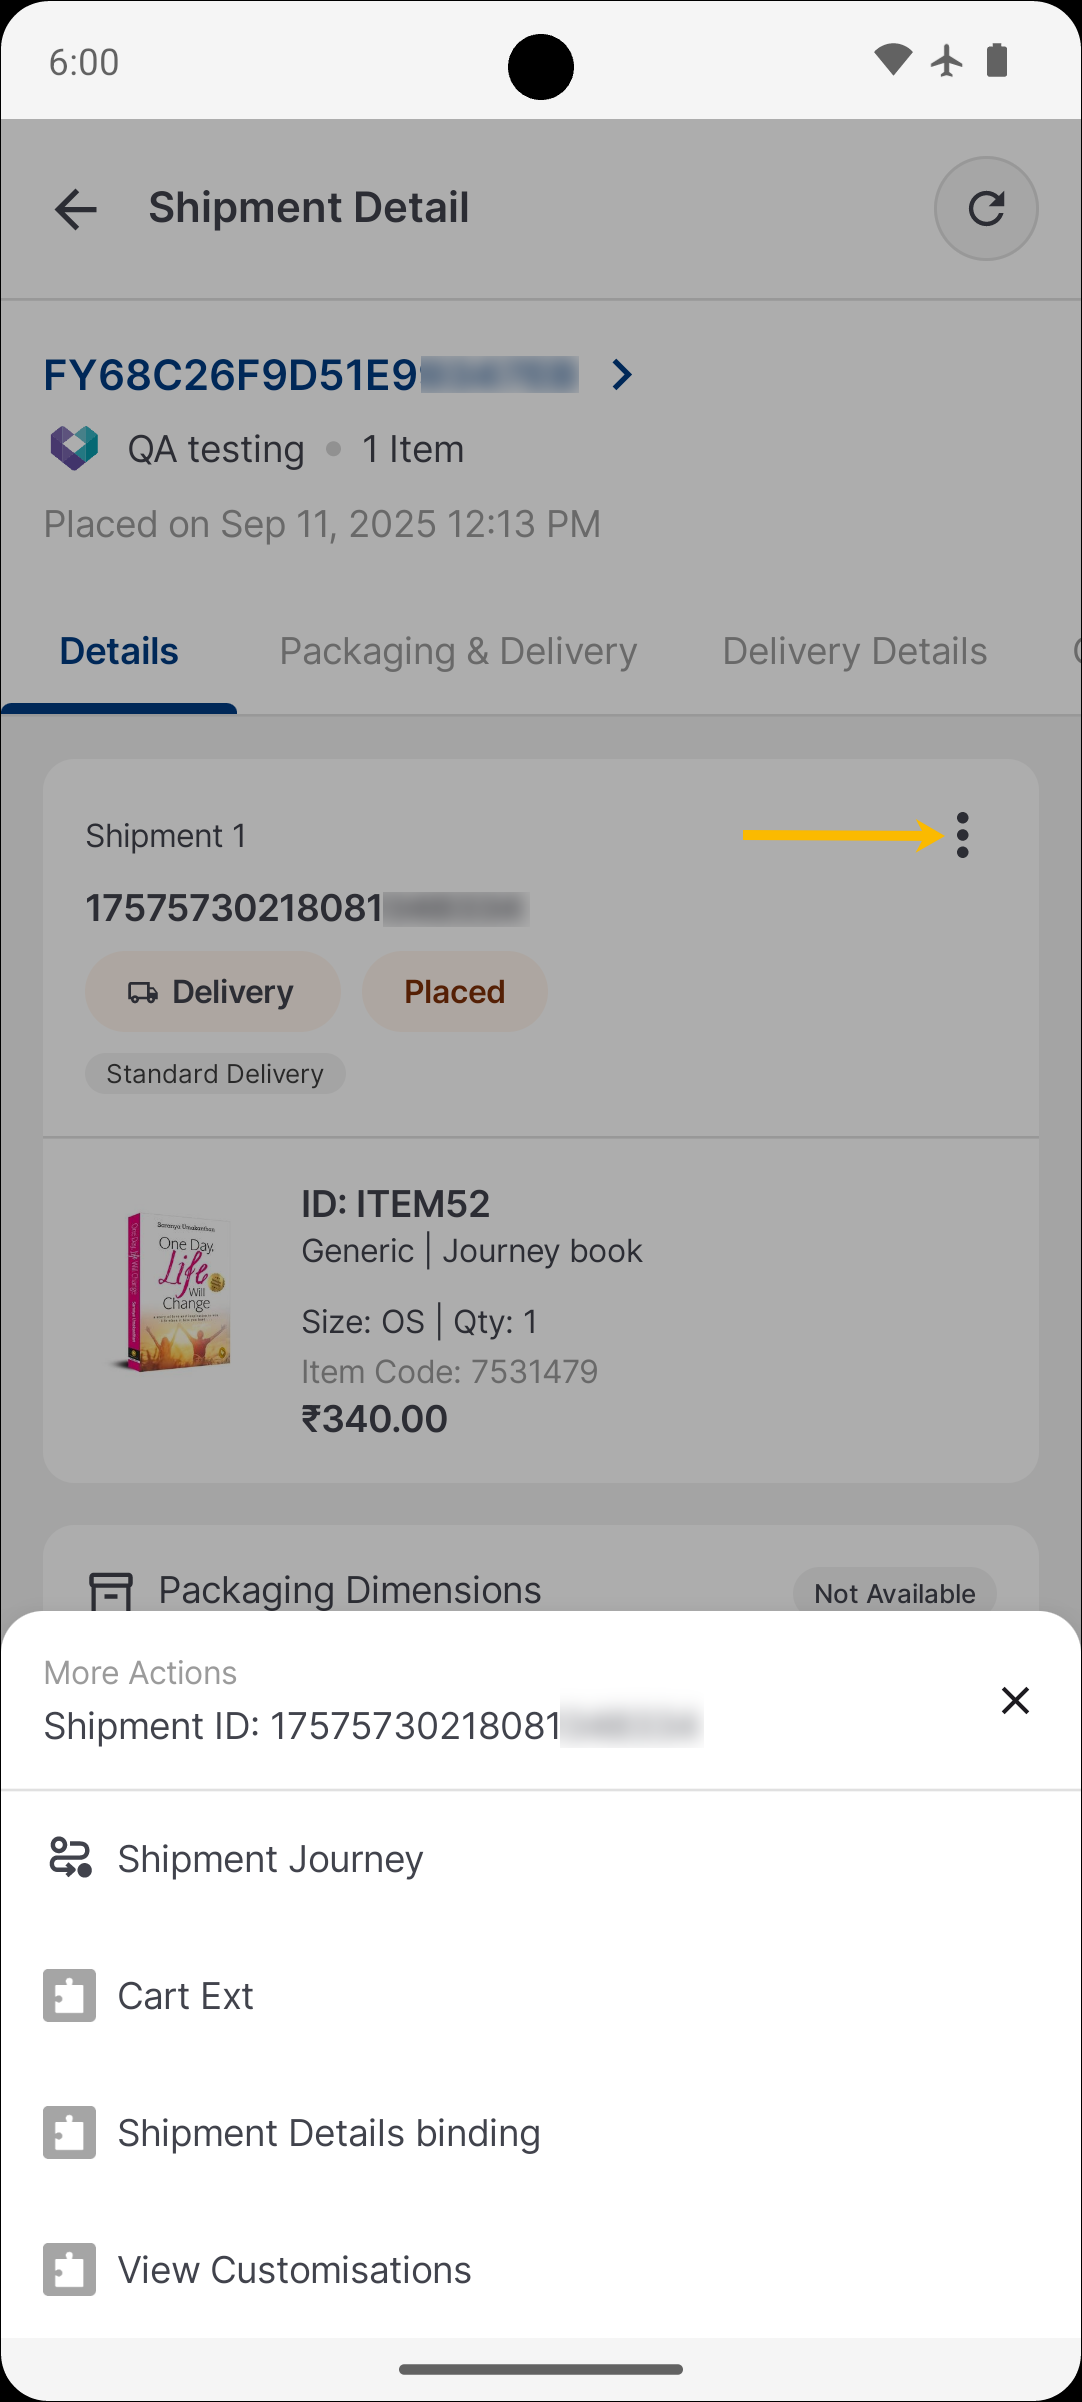
- Orders → Shipment Details
- Binding Name: "Shipment Details"
- Use case: Unlock a shipment extension in Swadesh
- User Interaction: Modal
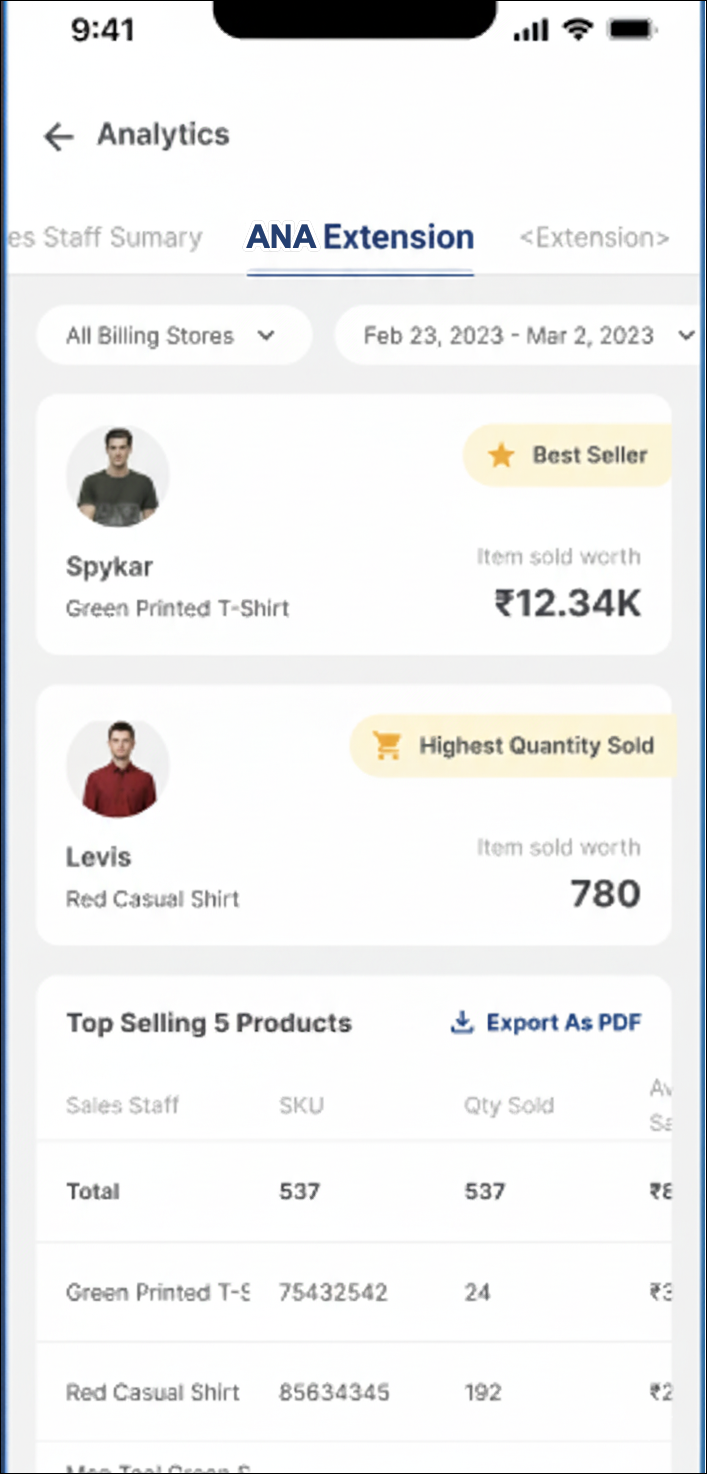
- Analytics
- Binding Name: "Analytics"
- Use case: Show additional reports
- User Interaction: FullPage (In-Built)
- Support → More Actions
- Binding Name: "User Support"
- Use case: Raise support tickets for non-software issues (sent to the brand's support module)
- User Interaction: FullPage, Modal

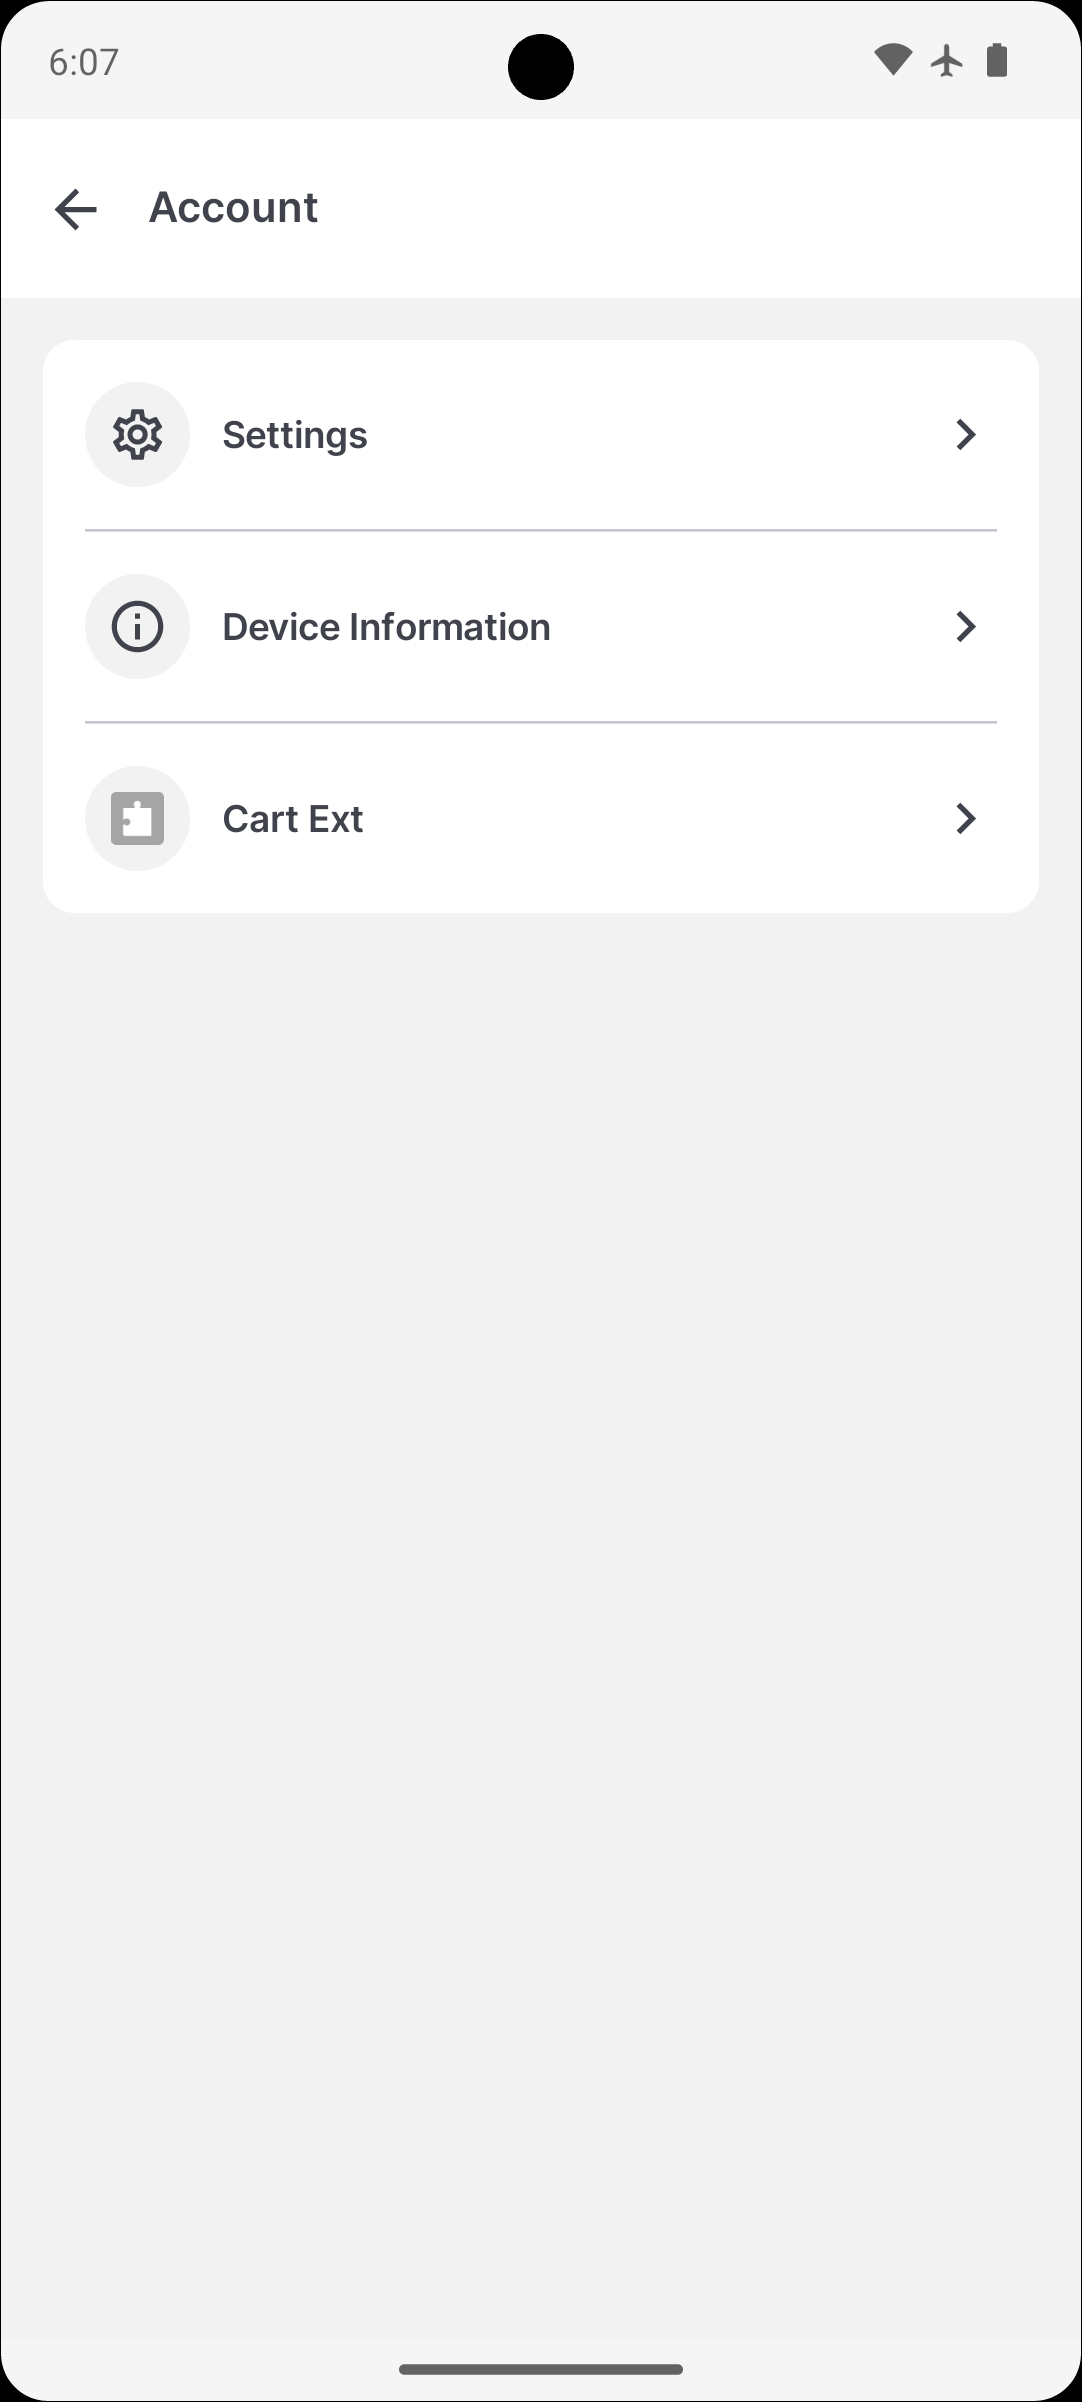
- Account → Action List
- Binding Name: "User Account"
- Use case: Incentives
- User Interaction: FullPage, Modal
Events
Used for emitting and listening to events between the host and the extension. Events are ideal for triggering actions (e.g., refresh, open a page, show a toast) and complement state updates, which are for shared data.
1. Subscribe Event
Events allow your extension to respond to user actions or system triggers in real time.
The event.on(eventName, handler) method allows your extension to listen for specific events and react in real time. When you subscribe to an event, the method returns an eventId that you should store if you plan to unsubscribe later.
Subscribing to events enables your extension to respond dynamically to user actions or system changes. Common use cases include:
- Extension Close Event: Perform cleanup tasks or prompt the user to save changes before the extension closes by subscribing to the
"close"event. - Cart Refresh Event: Automatically update your UI when the cart is refreshed by listening to the
"cart.refresh"event. - Toast Error Event: Display error notifications to users by handling the
"toast.error"event.
If you subscribe multiple times to the same event, each subscription gets a unique event ID.
Example
Subscribe to the "close" event to perform cleanup when the extension is closed. Suppose you want to save user data or show a confirmation dialog before the extension closes.
function onCloseExtension() {
  // Perform cleanup actions here, such as saving data or showing a message
  console.log("Extension is closing. Cleaning up resources...");
}
// Subscribe to the "close" event and store the eventId for later unsubscription if needed
const closeEventId = window.FSI.event.on("close", onCloseExtension);
Passing an anonymous function to on will prevent proper removal using off. Always use named functions for event handlers if you plan to unsubscribe them later.
2. Emit Event
Emitting an event is how your extension or the host notifies other parts of the system that something important has occurred. Any listeners (in the host or other extensions) that have subscribed to this event will react accordingly.
event.emit(eventName, data) automatically propagates across the extension/host boundary if needed.
When you emit an event, you're essentially saying: this thing just happened – anyone listening should respond.
Example 1
Suppose you want to refresh the cart when a user clicks a "Refresh Cart" button in your extension. Real-World Flow:
- User Action: User clicks the "refresh cart" button in the extension.
- Extension Emits: The extension calls
emit("cart.refresh"). - Host Receives: The host application is subscribed to
"cart.refresh"events. - Host Responds: The host makes an API call to refresh the cart data.
- Host Publishes: The host publishes the updated cart state.
- Extensions Update: All subscribed extensions receive the new data and update their UI.
// When user clicks the refresh button in your extension
window.FSI.event.emit("cart.refresh", { action: "refresh_cart" });
Example 2
In this example, we indicate that the close action originated from the "pdp" (Product Detail Page). Emitting the "close" event from your extension. This notifies the host application that the extension should be closed. You can also pass additional data (like the source of the close action) as a second argument.
window.FSI.event.emit("close", { source: "pdp" });
3. Unsubscribe Event
Unsubscribing from an event means stopping your subscription to an event using the off method.
event.off(eventName, details, removeAll = false) removes a specific subscription or, when removeAll is true, removes all handlers for that event.
Syntax for Unsubscribing Event
Ensure that you have the event ID you saved while subscribing to an event. FSI needs both the function reference and the specific event ID to know exactly which subscription to remove.
To correctly remove a single handler, provide both name and eventId in the second parameter of off.
name: This refers to the name of the function you originally passed toon.eventId: This is the ID returned when you subscribed to the event usingon.
window.FSI.event.off(eventName, {
  name: functionName,
  eventId: storedEventId
});
Example
// Subscribe and store both values
let eventId = window.FSI.event.on("toast.error", myErrorHandler);
let functionName = myErrorHandler;

// Later, unsubscribe using both
window.FSI.event.off("toast.error", {
  name: functionName,
  eventId: eventId
});
FSI Supported Events
Store OS provides built-in support for a set of events (given below). When an extension emits any of the supported events, Store OS will automatically handle them and perform the corresponding action, such as sending a response.
-
Event name:
ext.ready
Description: Emitted by the extension after initialization to signal readiness
Example:window.FSI.event.emit("ext.ready") -
Event name:
toast.success
Description: Displays a success toast message
Example:window.FSI.event.emit("toast.success", "Completed successfully") -
Event name:
cart.refresh
Description: Refreshes cart data in Store OS for the provided cart ID. When
Example:window.FSI.event.emit("cart.refresh", cart_id) -
Event name:
close
Description: Closes the extension’s webview and returns to the previous screen
Example:window.FSI.event.emit("close") -
Event name:
toast.error
Description: Displays an error toast message when the shipment detail is not found
Example:window.FSI.event.emit("toast.error", "Shipment Details not Found") -
Event name:
plp.open(show-plp)
Description: Opens the Product Listing Page (PLP)
Example:window.FSI.event.emit("plp.open") -
Event name:
pdp.open(show-pdp)
Description: Opens the PDP for the specified product slug
Example:window.FSI.event.emit("pdp.open", "ginesys-test-7554433") -
Event name:
collection.open
Description: Opens a collection page by slug
Example:window.FSI.event.emit("collection.open", "winter-collection") -
Event name:
order_detail.open
Description: Opens the Order Details screen for the given order ID
Example:window.FSI.event.emit("order_detail.open", "FY650169700E054DA248") -
Event name:
shipment_detail.open
Description: Opens the Shipment Details screen for the given shipment ID
Example:window.FSI.event.emit("shipment_detail.open", "12345677886544") -
Event name:
order_detail.refresh
Description: Refreshes Order and Shipment details
Example:window.FSI.event.emit("order_detail.refresh")
Testing
To verify the functionality of the extension, use the Store OS application to open the development company where the extension is installed.
- Access Store OS on your preferred platform (available on iOS, Android, and web).
- Log in to the app.
- Select the development company where the extension is installed.
- Go to the page on which you created the binding.
- Select the binding that you want to test. This will launch your app in the Store OS app within the container.
Design Guidelines
Follow these design guidelines to ensure the Store OS UI is consistent across extensions.
- UI Standard: Refer to the Store OS UI Kit↗ for UI elements, icons, and layout standards.
- Responsiveness:
- Extensions should adapt seamlessly between modal and full-page formats.
- Ensure elements are adjusted for tablet and mobile displays.