Enhancing Cart Functionality: Display Product Details in Store OS for Quick Access
Description
In this document, we will learn how to show product details in cart in Store OS to provide sellers quick access to product details. Clicking View Product Details will shows the product details in Store OS. Strategically placed in the More Cart Actions page, sellers can quickly access product-related information during checkout.
Benefits
- Sellers can quickly access product information in cart.
- Reduces the effort required to search for product details.
- Eliminates the need for sellers to switch between multiple pages to view product details, saving valuable time.
This use case is consists of two sections:
-
Designing the View Details Page: It focuses on designing the View Product Details page.
-
Creation of Bindings: It focuses on how to create Bindings in the Fynd Partners portal and connecting the View Product Details page and with Bindings.
Prerequisite
- Ensure that you have created an extension. Refer to Get Started for more details.
- Ensure that you have installed and logged in to the Store OS apllication.
Design the View Prodct Details Page
To create the View Product Details page in Store OS, developers need to implement HTML and CSS. The upcoming steps explain how to create the structure and styling necessary to build this page.
- Create an index.html file and copy the following code into it:
<!DOCTYPE html>
<html lang="en">
<head>
  <meta charset="UTF-8">
  <meta name="viewport" content="width=device-width, initial-scale=1.0">
  <title>Product Store</title>
  <style>
    body {
      font-family: Arial, sans-serif;
      text-align: center;
      margin-top: 50px;
    }
    #product-details {
      margin-top: 20px;
      padding: 20px;
      border: 1px solid #ddd;
      border-radius: 10px;
      background-color: #f9f9f9;
      text-align: left;
      width: 60%;
      margin-left: auto;
      margin-right: auto;
    }
    img {
      max-width: 200px; /* Resized the image */
      border-radius: 10px;
      display: block;
      margin: 0 auto;
    }
    h2 {
      margin: 10px 0;
    }
    p {
      margin: 5px 0;
      color: #555;
    }
  </style>
</head>
<body>

  <div id="product-details">
    <img id="product-image" src="" alt="Product Image">
    <h2 id="product-name"></h2>
    <p id="product-price"></p>
    <p id="product-description"></p>
    <p id="product-category"></p>
  </div>

  <script>
    const product = {
      image: "https://images-cdn.ubuy.co.in/633b12488d2edc65997f4c20-smart-watch-bluetooth-smartwatch-touch.jpg",
      name: "Smart Watch",
      price: "Rs. 500.00",
      description: "A stylish and modern smartwatch with various features including fitness tracking, heart rate monitoring, and GPS.",
      category: "Electronics"
    };

    // Update the product details
    document.getElementById("product-image").src = product.image;
    document.getElementById("product-name").textContent = `Product Name: ${product.name}`;
    document.getElementById("product-price").textContent = `Price: ${product.price}`;
    document.getElementById("product-description").textContent = `Description: ${product.description}`;
    document.getElementById("product-category").textContent = `Category: ${product.category}`;
  </script>
</body>
</html>
Explanation
The index.html file is designed to display detailed product information when a customer clicks on the View Product Details in the cart. After clicking, the product details page opens and shows details about the product, such as its image, name, price, description, and category. The details are organized within a <div> element and (#product-details) designed to appear after the button is triggered.
The index.html file needs to be hosted in a web server. The hosted link will be added to the target URL when Bindings are created in the extension. Here, we have hosted it in Git. Link↗
Creation of Bindings
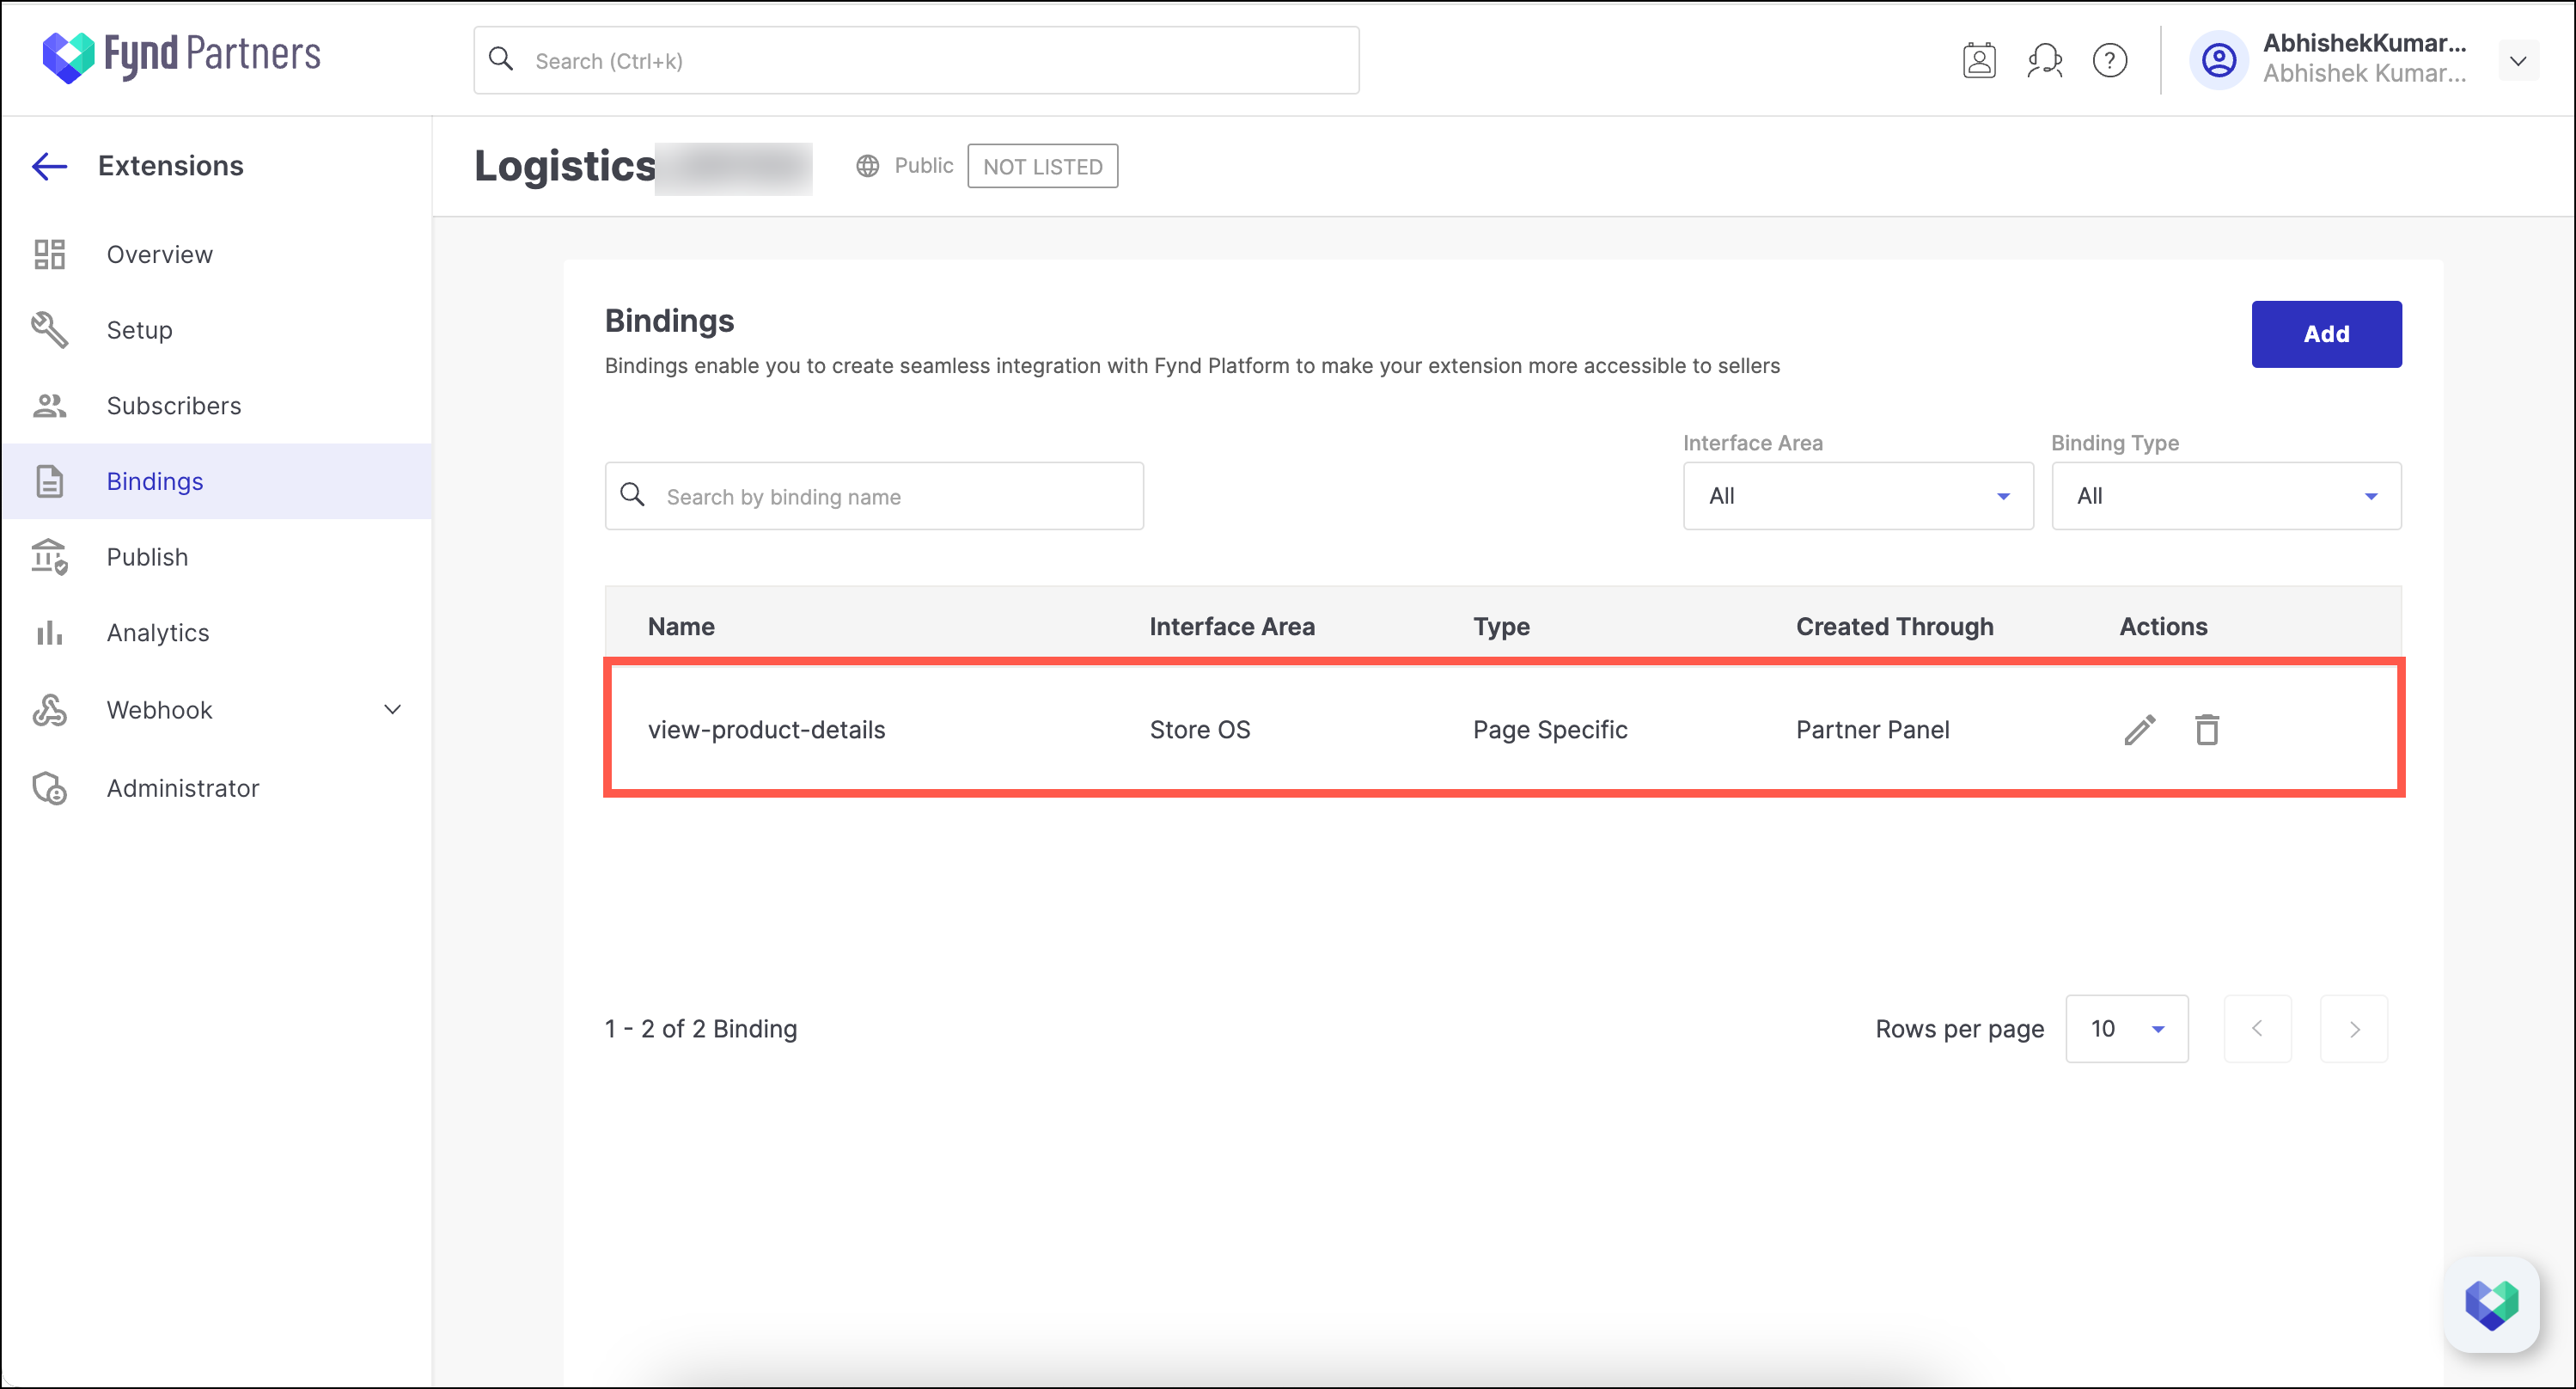
Following these step-by-step instructions, you can create Bindings to view the product details page directly on the cart's page. The Bindings connects the product details option to the target URL, where the product details page is hosted to fetch and display the product information.
- Go to the Fynd Partner panel.
- In the left pane, click Extensions and open the extension.
- Navigate to Extension Setup and ensure the extension URL and permissions are correctly configured.
- In the Bindings section, click Manage.
- In the upper-right corner of the window, click Add to create new Bindings.
- Select Store OS from the Interface Area dropdown list.
- Select Page Specific from the Binding Type dropdown list.
- Enter a name for the bindings. Here, we have entered View Product Details.
- Specify the target URL where the Bindings is hosted. Here, we have shown details of a smartwatch hosted in this Link↗.
- Choose Cart - More Actions from the Allowed Pages.
- Select Modal from the User Interaction dropdown list.
- Click Add.
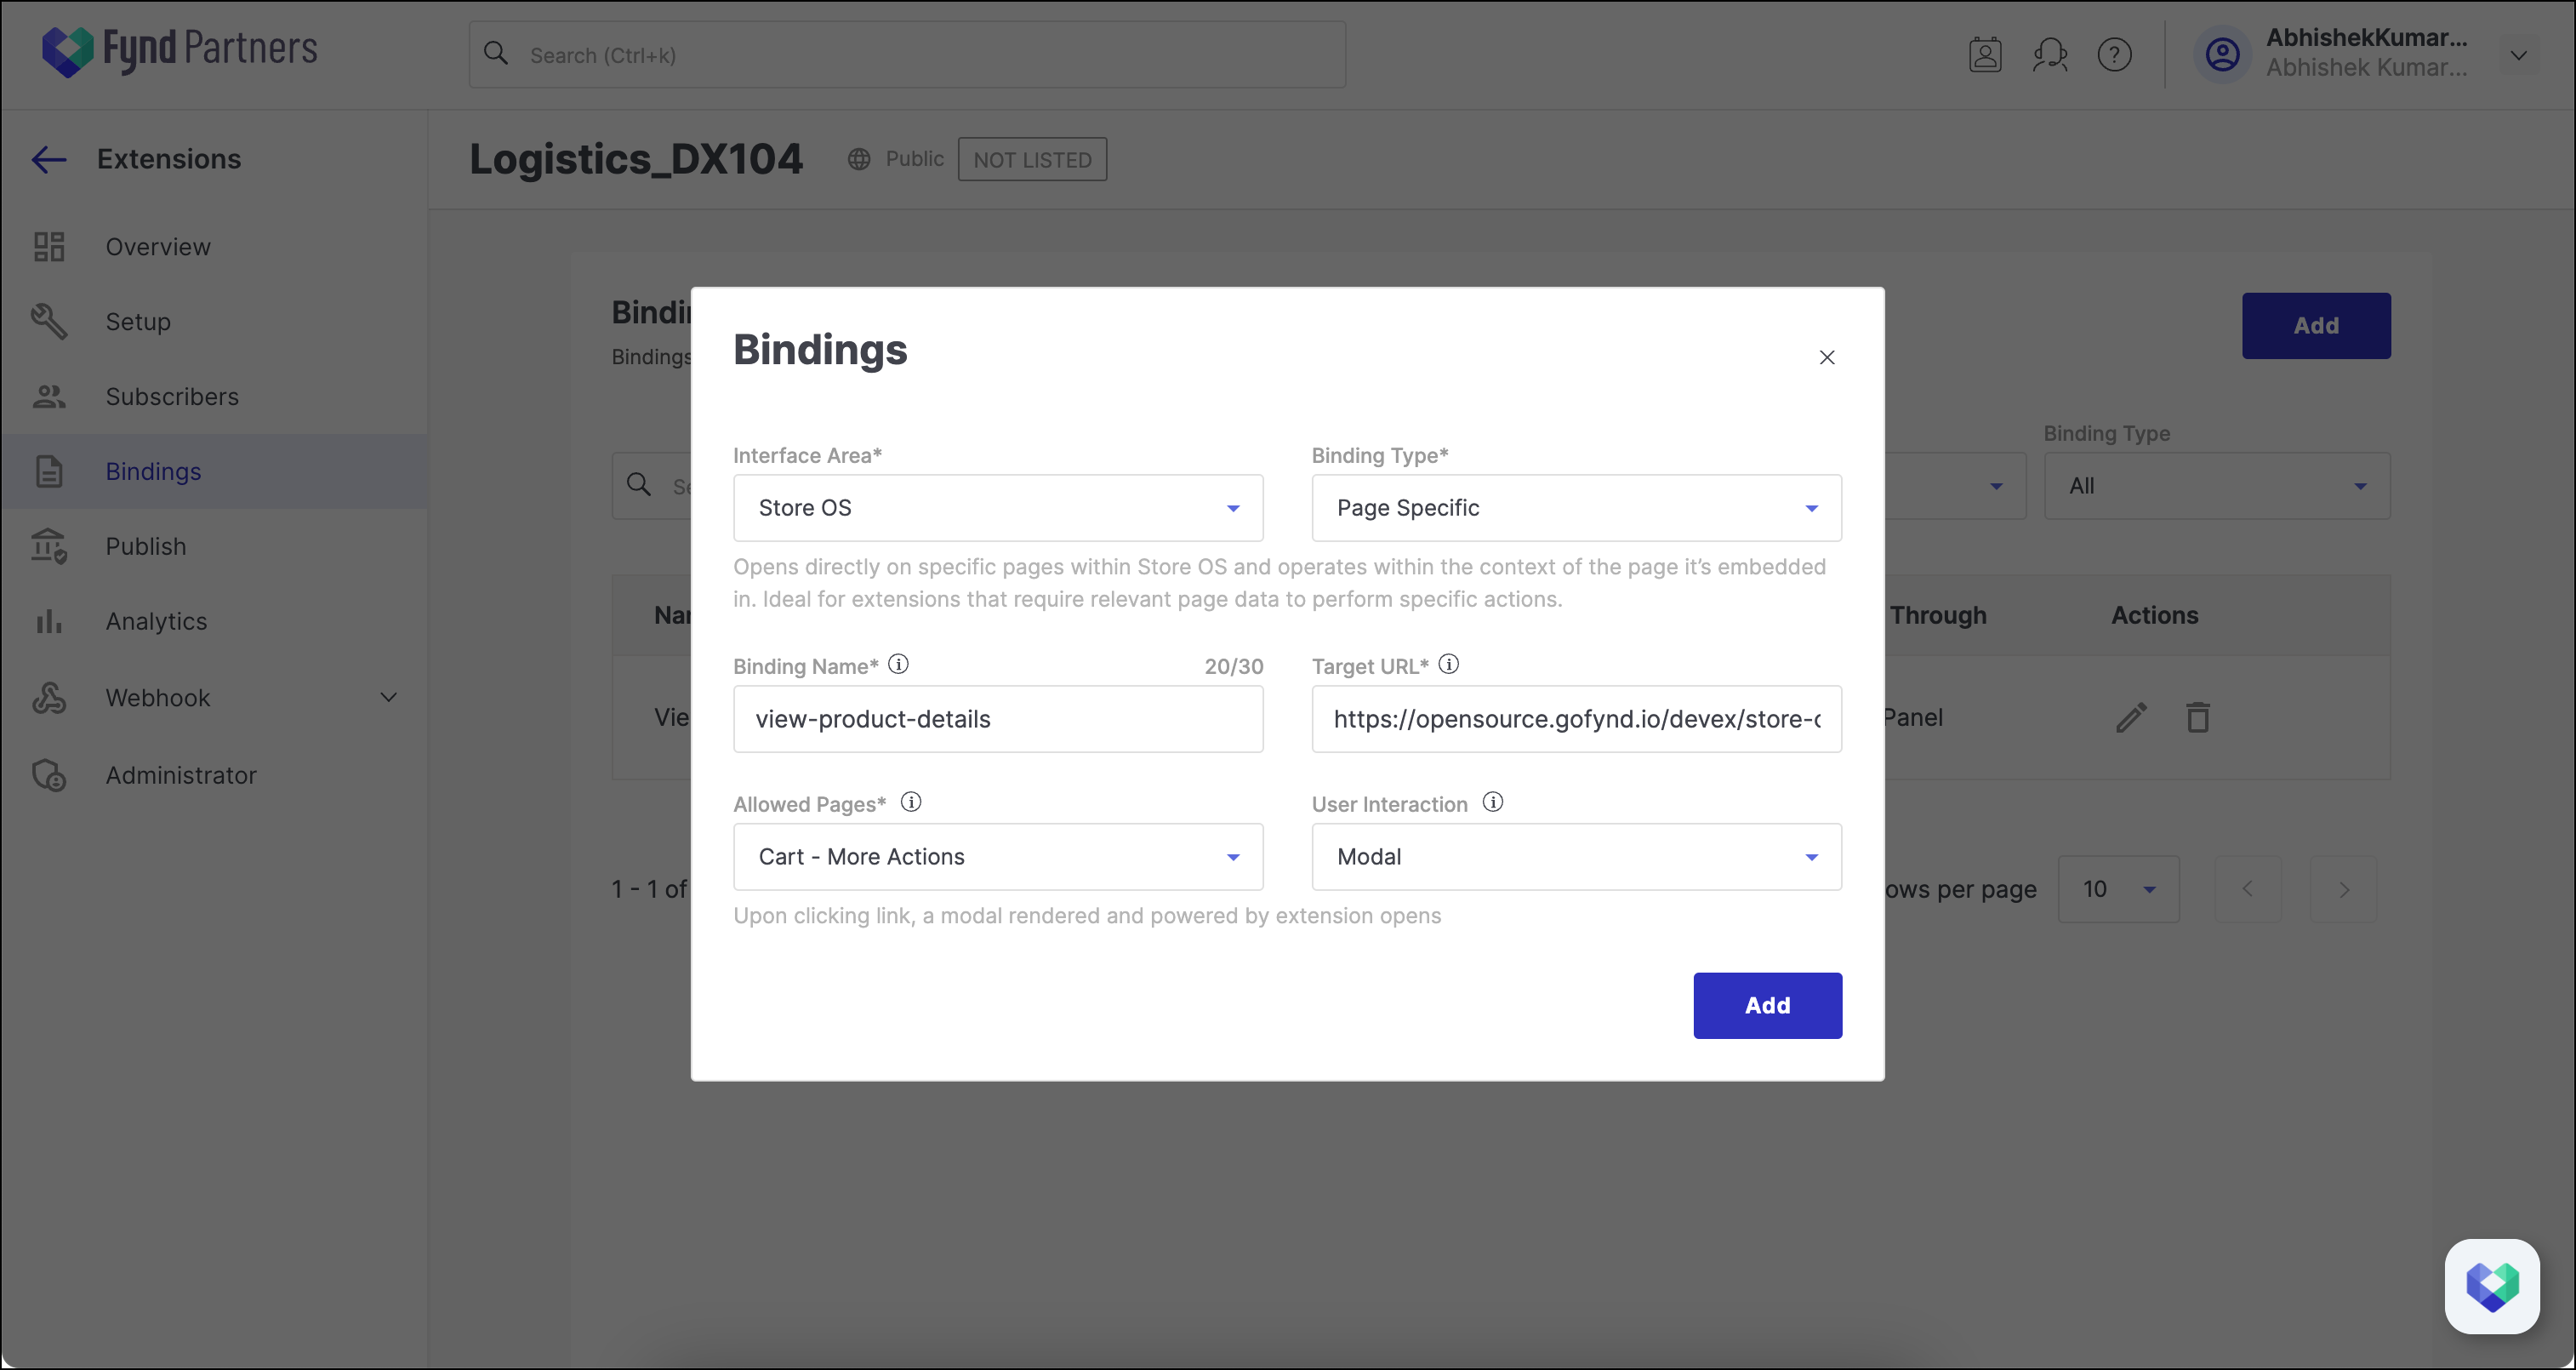
Fill Details in Bindings
Local Testing
To verify the integration of the View Product Details and ensure the Bindings work as per the requirements, follow the steps below:
- Go to the Fynd Store OS application in your mobile device.
- Navigate to a product and add it to your cart.
- Once the product is added, click Go to Cart to open the cart page.
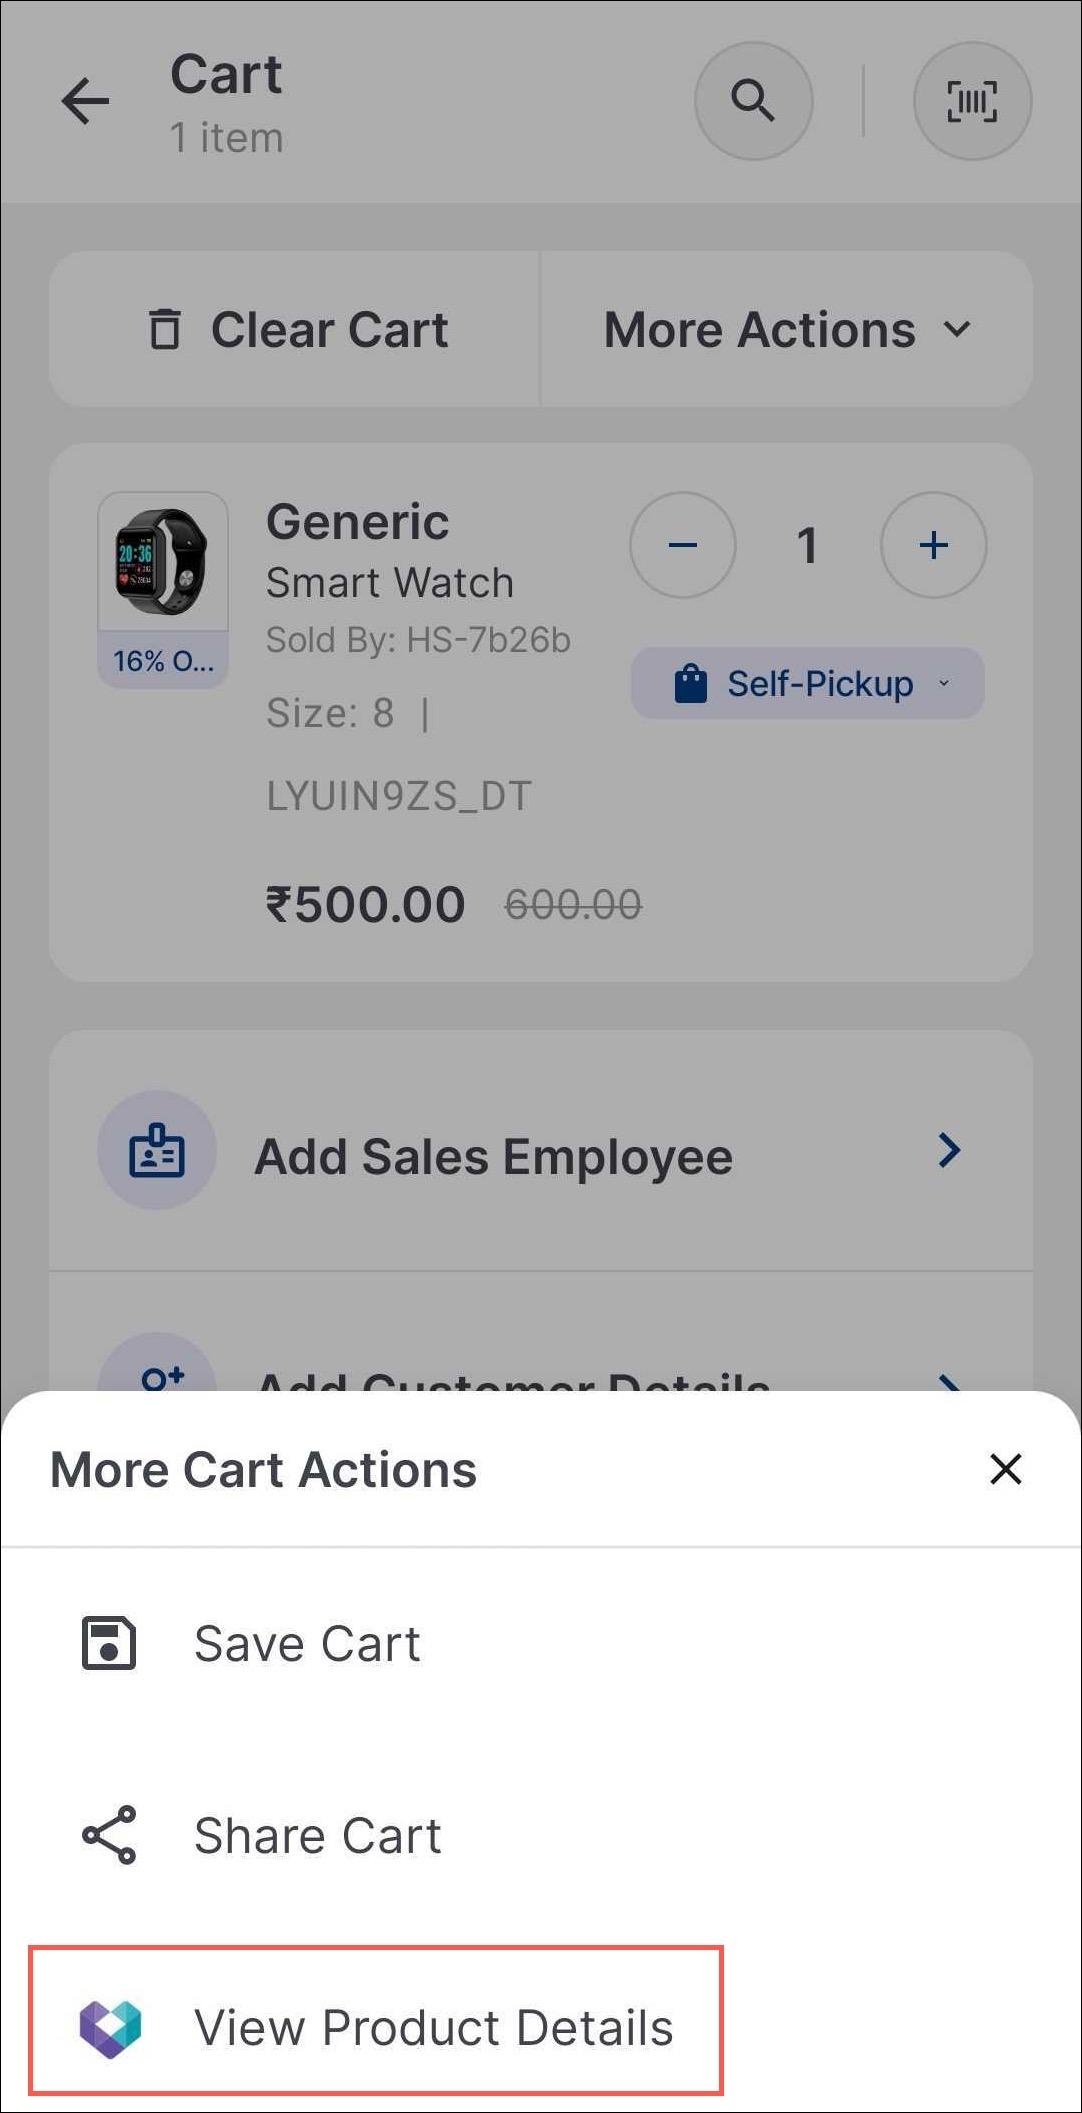
- In the cart page, click More Actions. The More Cart Actions fly-out menu appears.
- Click View Product Details to trigger the Bindings.
Once the product details page opens, ensure the information is displayed correctly.
index.html file.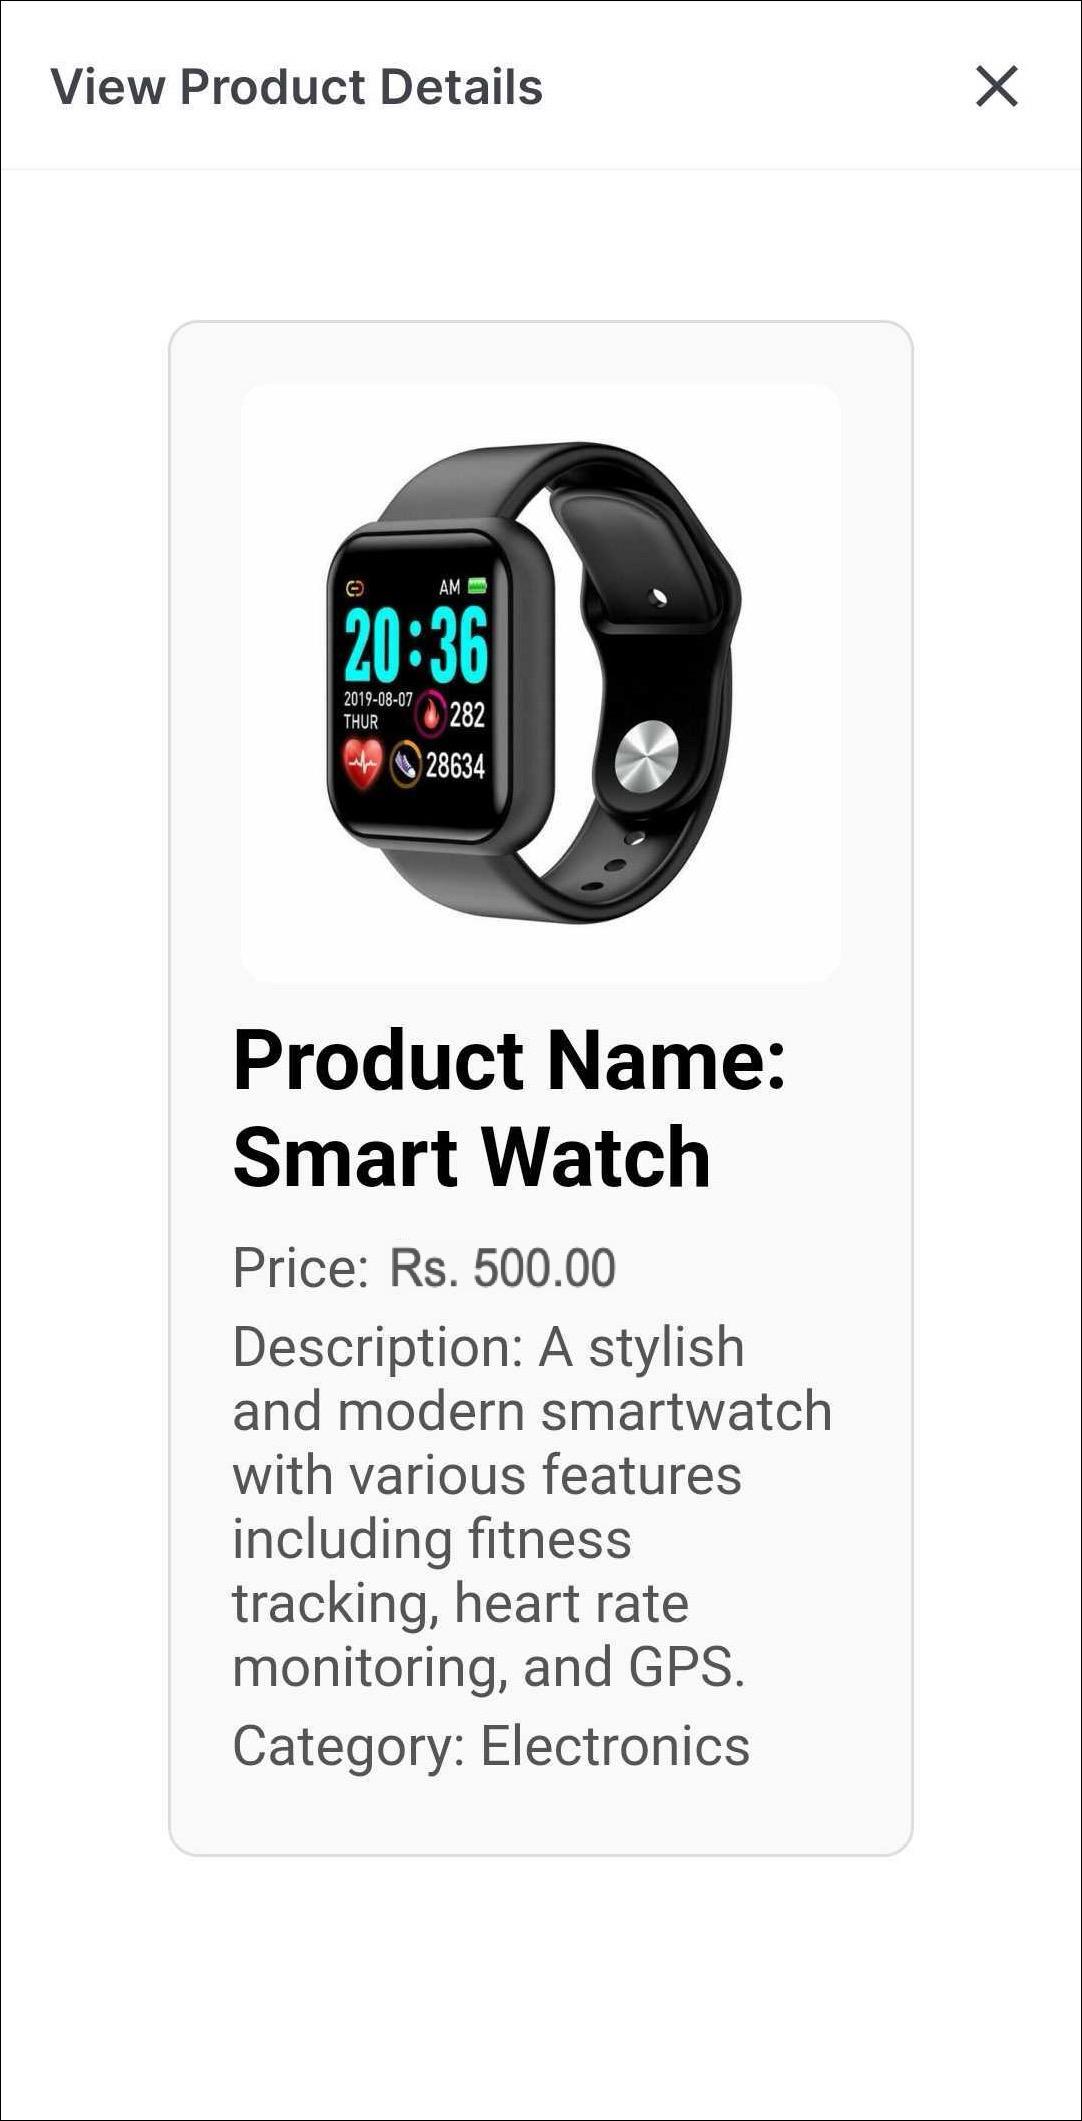
Submission & Review
Go through the steps provided in the Submission-process to submit your extension to the Fynd Extension Marketplace. Once you submit it, we will review and approve it or share feedback.
Please go through our Review Checklist to understand what we evaluate in your extension.
For a customized solution that fits your needs, feel free to set up a meeting with us. Schedule a Meeting.