Import Inventory in Bulk
Click Import.
Select Inventory.
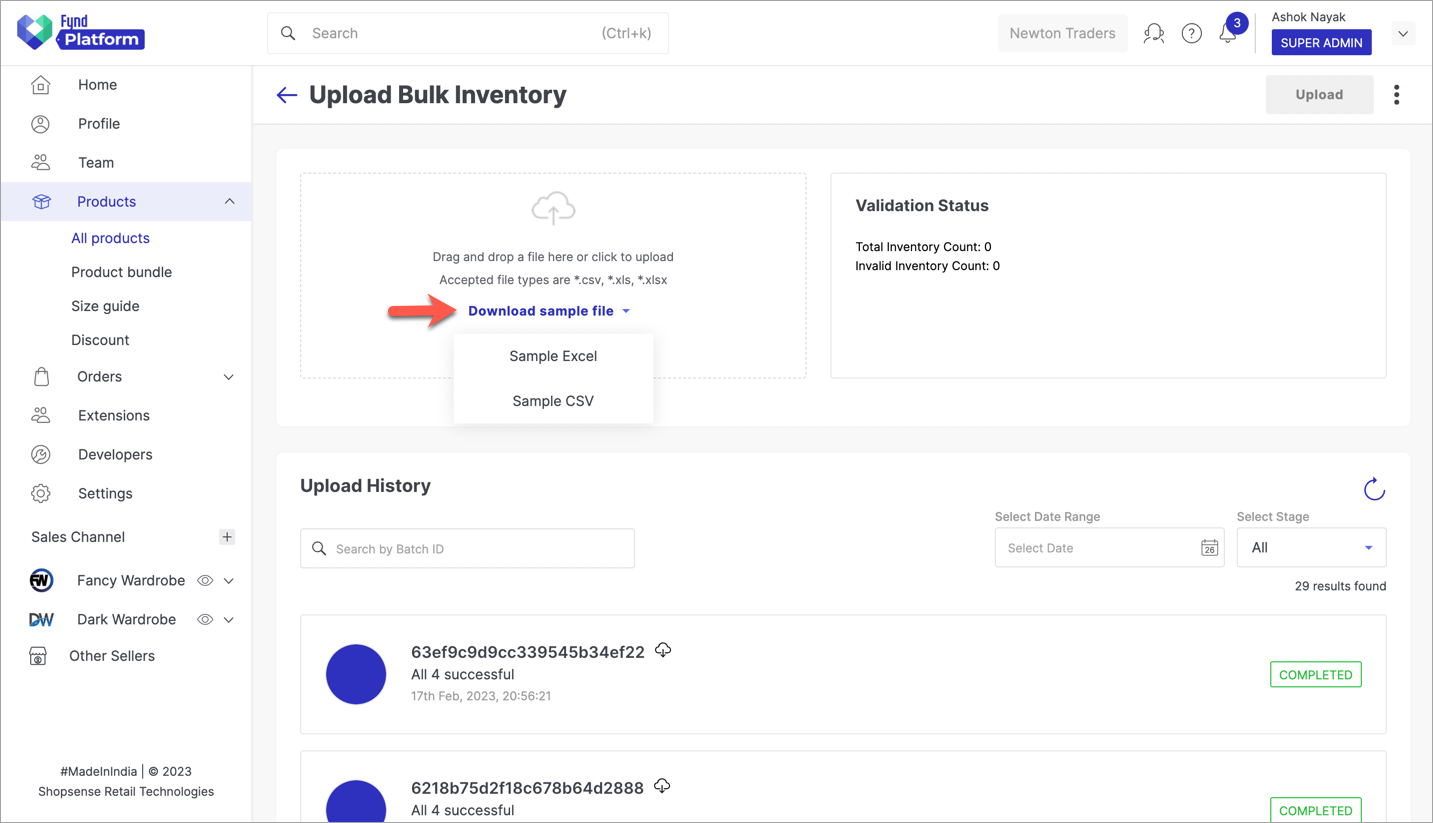
Here, you can download a sample file for adding the inventory of products, either in Excel or CSV format.

Figure 3a: Download Excel Or CSV 
Figure 3b: Sample Excel For Inventory Upload noteThe columns that are highlighted in green are mandatory to fill. You will get drop-down boxes for certain columns in the Excel file. Example: Gtin Type, Currency, etc
You can start filling the inventory details as shown below. This is similar to the Edit Inventory section which you saw before. In this case, add the inventory details of those 3 products which were earlier imported using Excel.

Figure 4: Inventory Details In Excel infoIf you don't fill Actual Price and Selling Price columns, those price values will be taken from the product instead. Click here to know more.
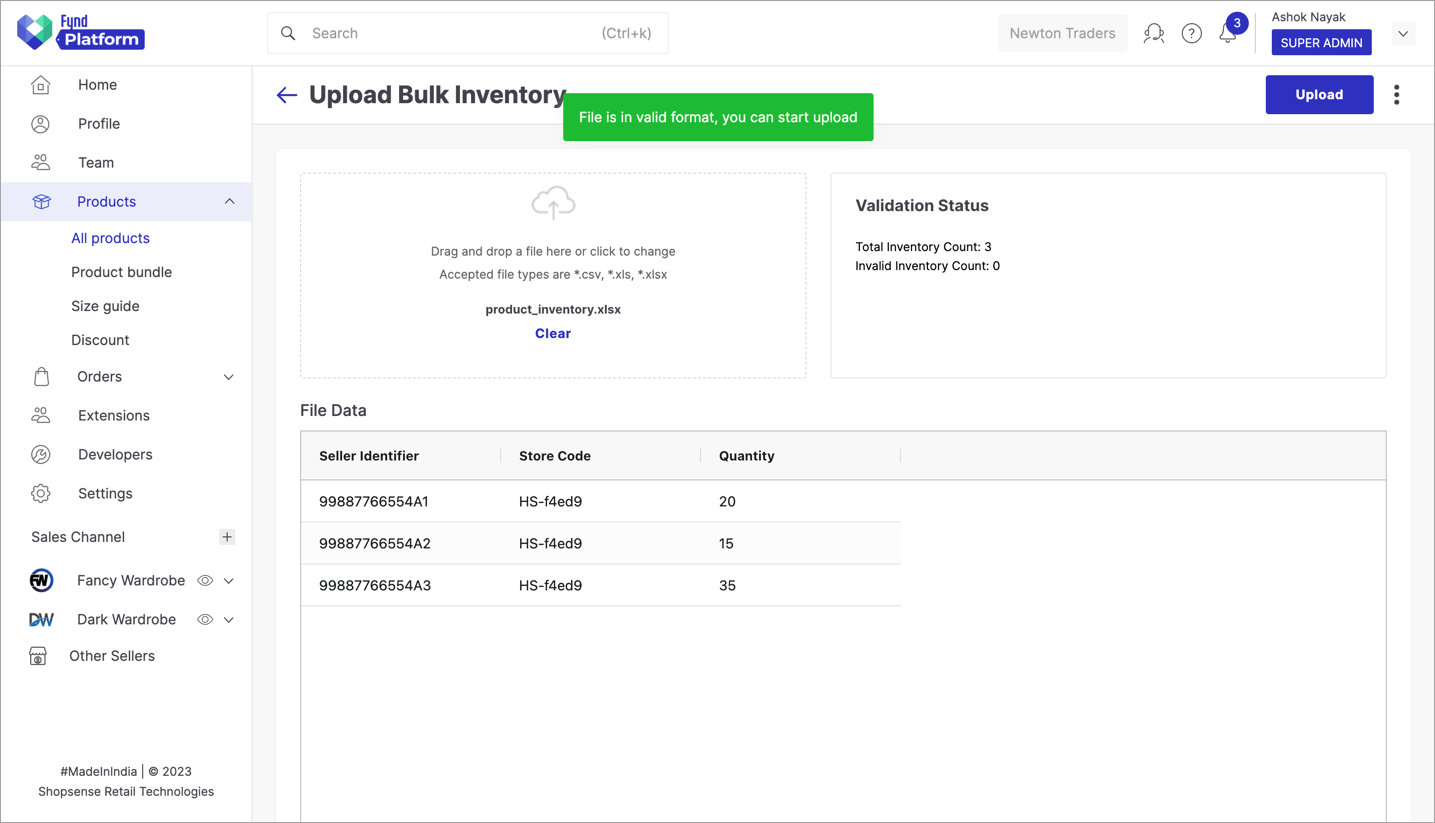
Now, you are ready to validate your Excel file. Upload your Excel file as shown below.

Figure 5: Validating And Uploading Excel File
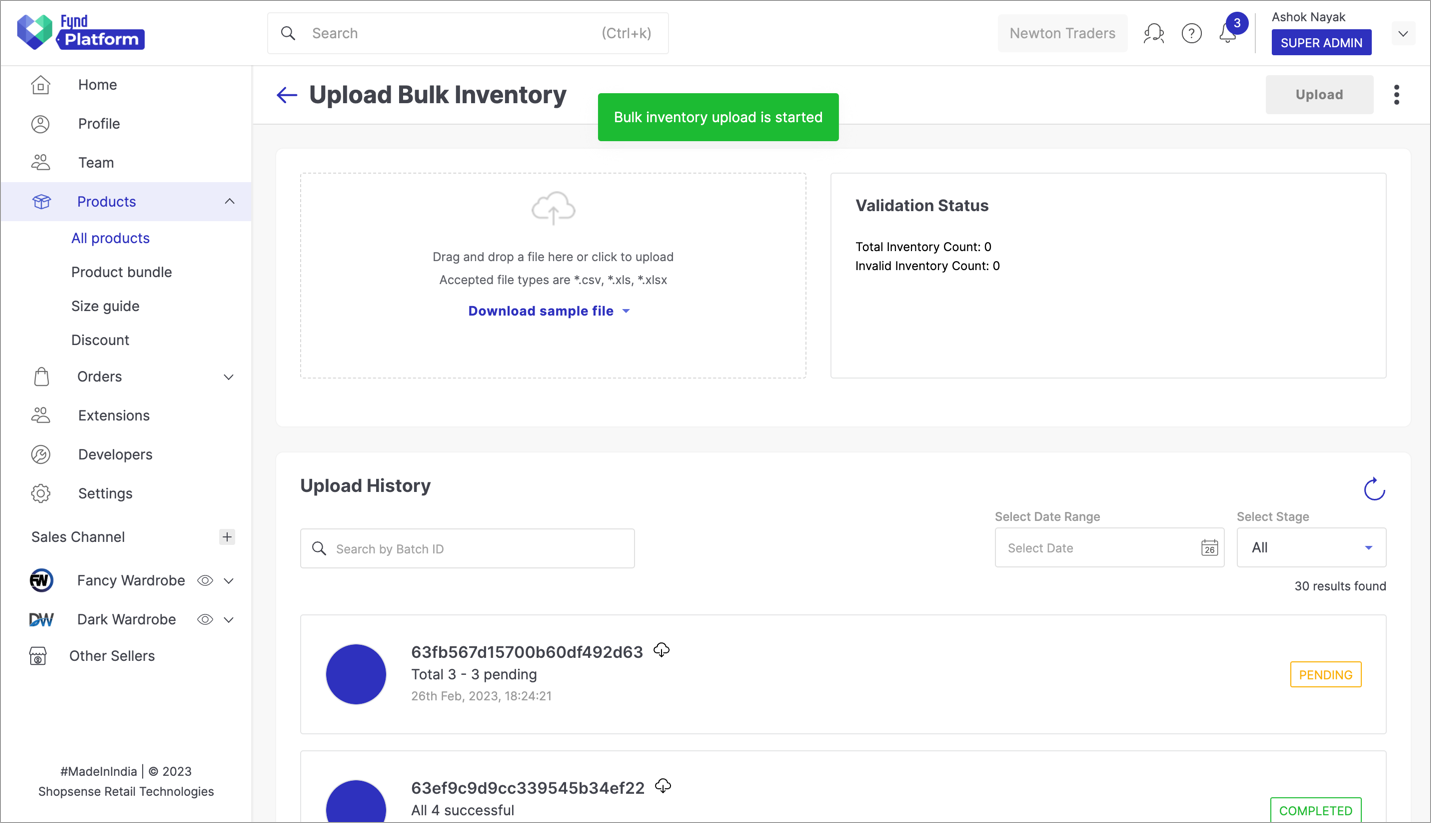
If the file is valid, you can upload your inventory. Click on Upload in the top-right corner. The bulk upload will initiate and it can be viewed under 'Upload History' as shown below. The upload status will be shown as 'Pending'. Wait till the status turns to 'Completed'.

Figure 6a: Batch Job In Progress You have successfully added an inventory to your products.

Figure 6b: Batch Job Successful
Your products will now appear on your website, with positive inventory.
What to do if the Excel file doesn't validate?
Use the Check Errors functionality, to find the issues and rectify them.
![]()
![]()
Importing Bulk Inventory
The Bulk Inventory Import feature lets you update inventory and pricing for multiple products at once using Excel or CSV templates. This saves time and ensures consistency when managing large catalogues. You can import either:
- Inventory data (quantities, stock type, etc.)
- Price data (actual price, selling price, cost price, etc.)
1. Access Bulk Import
Go to Products > All Products.
Click Bulk Action > Import.
Choose from the three available import types:
- Product
- Assets
- Inventory (select this option)
2. Select and download a template
In the Upload Bulk Inventory screen:
- Use the dropdown to choose one of the following:
- Price Template
- Inventory Price Template
- Click Download Template to get a sample file in either
.csvor.xlsxformat.
3. Understanding the templates
Inventory Price Template
This template lets you update stock across different buckets (like damaged, not available, total) and apply logic using commands.
Columns in the template:
| Column | Description |
|---|---|
| Seller Identifier | Unique product identifier (SKU) |
| Store Code | Code of the store where inventory applies |
| Quantity | Quantity value to update |
| Inventory Bucket | Type of stock to update: Total Quantity, Damaged, Not Available |
| Command | Instruction for how to apply the quantity |
| Expiration Date | Optional – set product expiry date (if needed) |
Supported Commands:
| Command Type | Function |
|---|---|
| Add | Adds quantity to the existing value in the specified bucket |
| Remove | Subtracts quantity from the specified bucket |
| Set Total Quantity | Replaces the current total quantity with the specified value |
| Set Damaged | Replaces the damaged quantity and deducts it from total quantity |
| Remove Damaged | Subtracts from damaged quantity and adds it back to total quantity |
| Set Not Available | Replaces not available quantity and deducts from total quantity |
| Remove Not Available | Subtracts from not available quantity and adds it back to total quantity |
Price Template
This template updates the pricing details for multiple SKUs.
Columns in the template:
| Column | Description |
|---|---|
| Seller Identifier | SKU of the product |
| Store Code | Code of the relevant store |
| Actual Price | Original base price |
| Selling Price | Discounted or final price |
| Currency | Currency format (e.g., INR) |
| Command | Use Set to apply the prices |
| Cost Price | Internal cost of the product |
| Total Quantity | Optional – update total quantity along with pricing |
| Expiration Date | Optional – set expiry if relevant |
4. Uploading your file
- Click Select File or drag and drop your completed
.csv,.xls, or.xlsxfile. - Add any additional comments if needed (e.g., context, instructions).
- Click Upload.
Make sure your file matches the template structure exactly to avoid errors.
5. Validation Summary
After the upload completes, a Validation Summary appears:
- Displays Total Records, Success, and Errors count.
- If there are errors, click View Summary to inspect them in detail.
6. View Summary
Clicking View Summary opens a pop-up showing:
| Column | Description |
|---|---|
| Seller Identifier | The SKU with issue |
| Store Code | Related store |
| Total Quantity | Submitted value |
| Damaged | Submitted value |
| Not Available | Submitted value |
| Command | Instruction applied |
Rows with red highlight indicate invalid entries (e.g., logic mismatch, missing fields).
You can use this insight to correct the template and reupload only the failed records.
7. Review and validate
Once uploaded:
- The Validation Summary displays:
- Total records
- Successful and failed records
- If any errors are found, click View Summary to see:
- Failure reasons
- Problematic rows
- Batch and uploader details
You can also:
- Download the source file
- View upload history
- Filter by date range or upload status (
Completed,Partial,Failed)
8. Upload status definitions
| Status | Meaning |
|---|---|
| Completed | All records were processed successfully |
| Partial | Some records had errors |
| Failed | No records were uploaded |
9. Track Upload History
At the bottom of the screen, the Upload History section lists all past uploads with filters for:
- Batch ID
- Date range
- Upload stage/status
Status types:
| Status | Meaning |
|---|---|
| Complete | All entries uploaded successfully |
| Partial | Some entries failed |
| Failed | Entire upload unsuccessful |
Click any record to view its full summary, including the source file, errors, and batch details like uploader name and processing time.