Import Product
Introduction
More often than not, products are created in bulk, and so is its inventory. Describing your product and all its attribute will thereby form a catalogue. Maintaining its price and quantity will constitute an inventory.
Instead of manually taking the efforts to create your products one-by-one, you can choose to do it all together in bulk.
Access the bulk import panel
When you'll click on Import, you’ll see three import options:
- Product – for importing product listings
- Assets – for uploading product media (images)
- Inventory – for uploading stock quantities
We’ll begin with Product.
Steps to Import product listings in bulk
Step 1: Select import type
Click Product under the Bulk Import section.
On the upload screen, select the following:
- Product Type (Standard, Set, Composite, or Digital)
- Department
- Template based on the department and product category
Click Download Template (choose CSV or Excel) to get the file format you need to fill.
Step 2: Fill in product details
Let's assume you have downloaded an Excel file for creating a product, start filling all the product details, similar to what we saw in the previous section.
You will get drop-down boxes for certain columns in the Excel file. Example: Brands, Tax Rule Name, GTIN type, Country of Origin, Currency, etc.
| Field | Description | Example |
|---|---|---|
Name | Product name | Black Cotton Shirt |
Item Code | Unique product identifier | SHIRT-1001 |
Brand | Brand name associated with the product | FashionPlus |
Category | Product category | T-Shirts |
Description | Full product description | A breathable cotton shirt for men. |
Short Description | A brief summary of product | Cotton shirt with slim fit |
Tax Rule Name | Select tax rule from the dropdown | 5%,12%, etc. |
HS Code | Enter HS/HSN code of product | 6109, 55101190 |
Country of Origin | Country of manufacture | India, Bangladesh |
Media | URLs or filenames of product images | image1.jpg,image2.jpg |
Gtin Type | Type of product identifier (EAN, UPC, etc.) | EAN |
Gtin Value | Value of the identifier | 8901234567890 |
Selling Price | Sale price shown to customers | 999 |
Actual Price | Original price before discount | 1299 |
Size | Size value if applicable | M |
Available | Quantity available | 50 |
Highlights | Key features (comma separated) | 100% cotton, Slim fit |
Variant Type | If product has variants like colour or size | Additional Colours |
Marketer Name | Legal marketer name | FashionPlus Marketing Pvt. Ltd. |
Package Contents | What's included in the package | 1 Shirt |

The first row highlights the headers. Hovering over any of them with your mouse pointer will show a brief description. The columns that are highlighted in red are mandatory to fill. It's recommended that you also fill the optional fields (field that has no colour - highlighed in blue) as it enhances the product description.
Guide to Tax Rule Name
When filling in the Tax Rule Name field:
- Click the dropdown to see the tax rules you have already created. Similar to what do while creating individual product
- You can select an existing tax rule from the list, or create a new one and then repeat the bulk import process for the product.
- To learn how to create a new tax rule, click here.
Guide to Product identifier (GTIN Type)
If product has more than one identifier, e.g. EAN, SKU, UPC, etc, we have seen in the previous section that if a product has multiple identifiers, one of the identifier has to be made PRIMARY.
In the Excel file, primary identifier is known as Seller Identifier.
- Product Dead Weight is the actual weight of the product in grams.
- If you want to add slug for each product manually, you can enter a Slug attribute at the end (preferably) of the file. Refer Adding Slug Attribute section to learn more.
Step 3: Upload the file
- After filling in your template file, return to the Upload Bulk Products screen.
- Click Select File and upload your spreadsheet.
- Your file will be validated and displayed under File Data.
- Click Upload to initiate the import.
Step 4: Check status in upload history
Once submitted:
- Go to the Upload History section.
- View the status of your batch:
- Pending – Processing
- Completed – Successfully imported
- Failed – Errors encountered (click to view)
You can filter uploads by template name, date range, or stage.
Adding Slug Attribute
Fynd Commerce allows you to manually add slug for all the products while importing a catalogue. Please refer the table below to understand the use cases while entering slug value in a file.
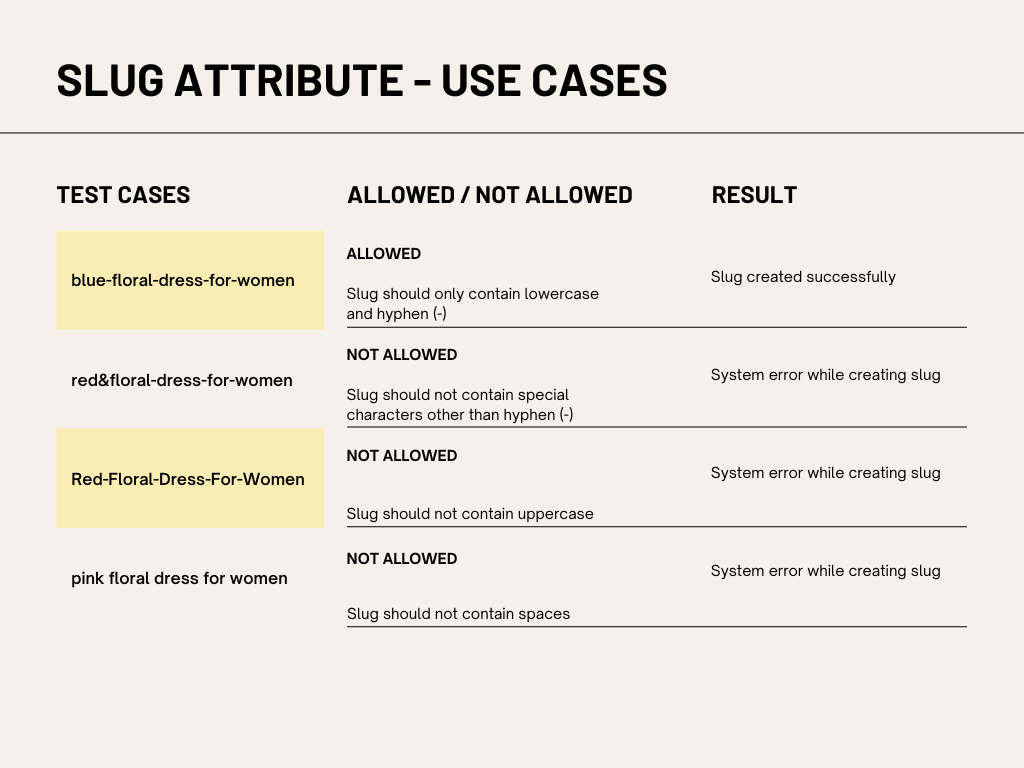
- Attribute name should be Slug, not slug or SLUG. It is a case-sensitive.
- If you add Slug column in a file then you should not keep it blank while uploading catalogue.
- Duplicate slug values are allowed. System will append product UID at the end of each slug converting it to a unique value.