Create a Single Product
Use the Product module in the Commerce dashboard to add, manage, and publish your products. This guide shows you how to add a new fashion item, such as a Black Casual Shirt, to your online store.
Add a new product
Step 1: Go to the Products section
- Under the My Products tab, select Create Product.
Step 2: Check for duplicate products
- In the Search Product pop-up, use the dropdown to search by Name, Brand, or Item Code.
- Type the product name, such as Black Casual Shirt.
- If the product already exists, select it and choose Add Sizes.
- If it doesn't exist, select Skip & Create.
Step 3: Enter product details
Product Type: Select one of the following:
- Standard: A regular, standalone item (e.g. a shirt or lipstick).
- Set: A grouped item sold together (e.g. top and bottom set).
- Composite: A bundle with optional combinations (e.g. lipsticks with different shades).
- Digital: For downloadable products (e.g. fashion design templates).
Product Name: Enter a descriptive name, such as Black Casual Shirt.
Slug: This is the product URL identifier, like
black-casual-shirt.Department: Select the relevant department. For fashion, choose Fashion.
Category: Choose an appropriate category, such as Casual Shirts or Cosmetics > Lipsticks.
Item Code: Enter a unique code, e.g.
BLACK-123.Brand: Choose or add the product’s brand. For example, Kylie Cosmetic or Urban Glam.
Net Quantity & Unit: Set the quantity (e.g. 1) and unit (e.g. piece, number).
No. of boxes: Enter the packaging quantity, typically 1.
Badge (optional): Add tags like On Sale or Bestseller.
Step 4: Add product media
- Scroll to the Media section.
- Select Image and upload a product photo.
- You can drag and drop files or paste an image URL.
- Accepted formats:
.png,.jpeg,.gif,.webp,.bmp - Minimum resolution: 200x200 px, max size: 3 MB
- To enhance product appeal, you can also:
- Add a Video (upload or YouTube link).
- Attach a 3D model.
- Link a YouTube demo (e.g. makeup tutorial or styling video).
Step 5: Add product description and highlights
- Short description
Provide a concise summary of the product.
Example: A classic black cotton shirt ideal for casual and office wear.
- Maximum 50 characters.
- Displayed on product listings and search cards.
- Long description
Use this field to describe the product in detail. Include key features, styling suggestions, and usage. Format your content using the editor tools for bold, bullets, headings, and links.
Example: This black casual shirt for men features a breathable cotton fabric ideal for day-long comfort. Pair it with blue jeans or chinos for an easy smart-casual look. Designed with buttoned cuffs and a regular fit, it works well in both relaxed and semi-formal settings.
- Highlights
Summarise key selling points in bullet format.
Examples:
- Black cotton shirt
- Breathable fabric
- Ideal for all seasons
- Easy to care
Click the + icon to add more highlights. Use the bin icon to remove.
Step 6: Tax
Applying Tax Rules to products. In the Tax section:
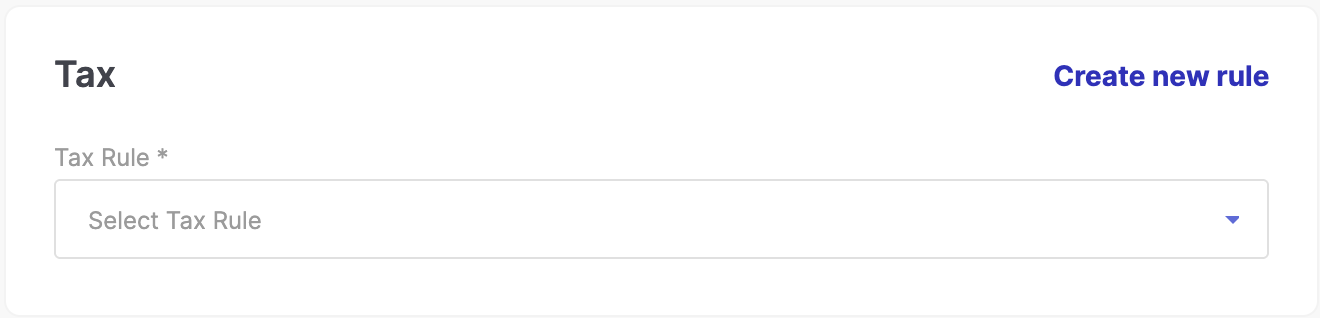
- Choose the Tax Rule from the dropdown
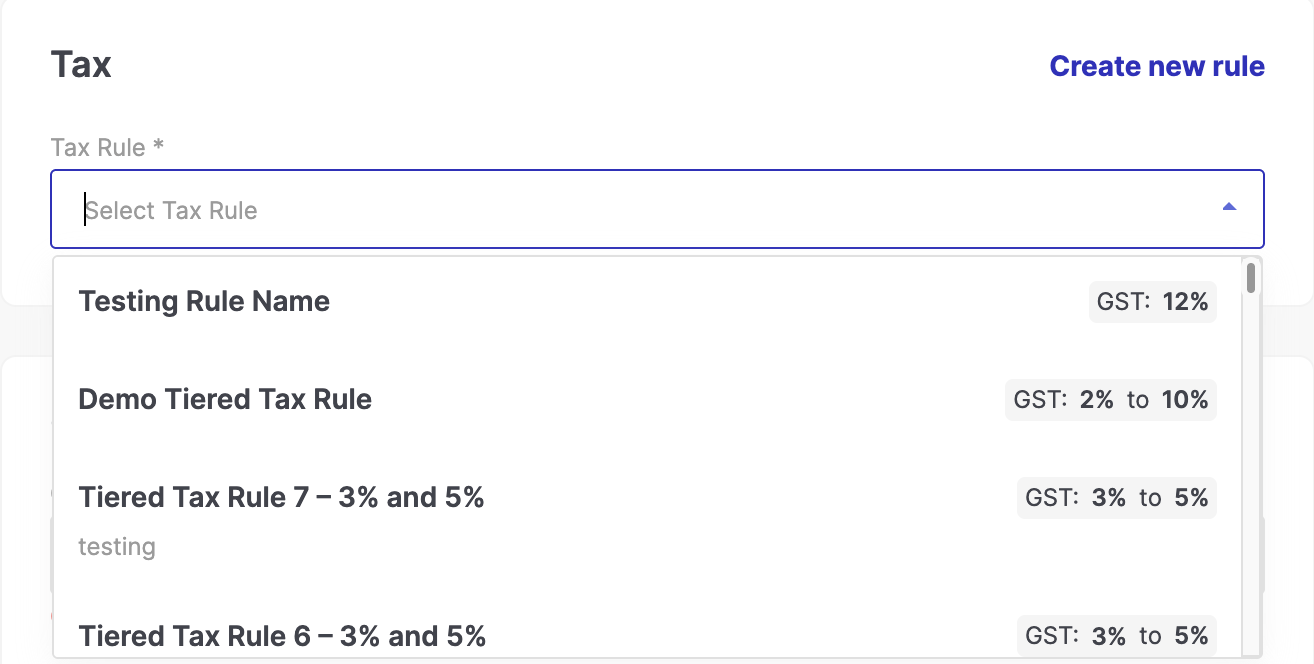
To learn how to create a new tax rule, click here.
Step 7: Custom Information
In the Custom Information section:
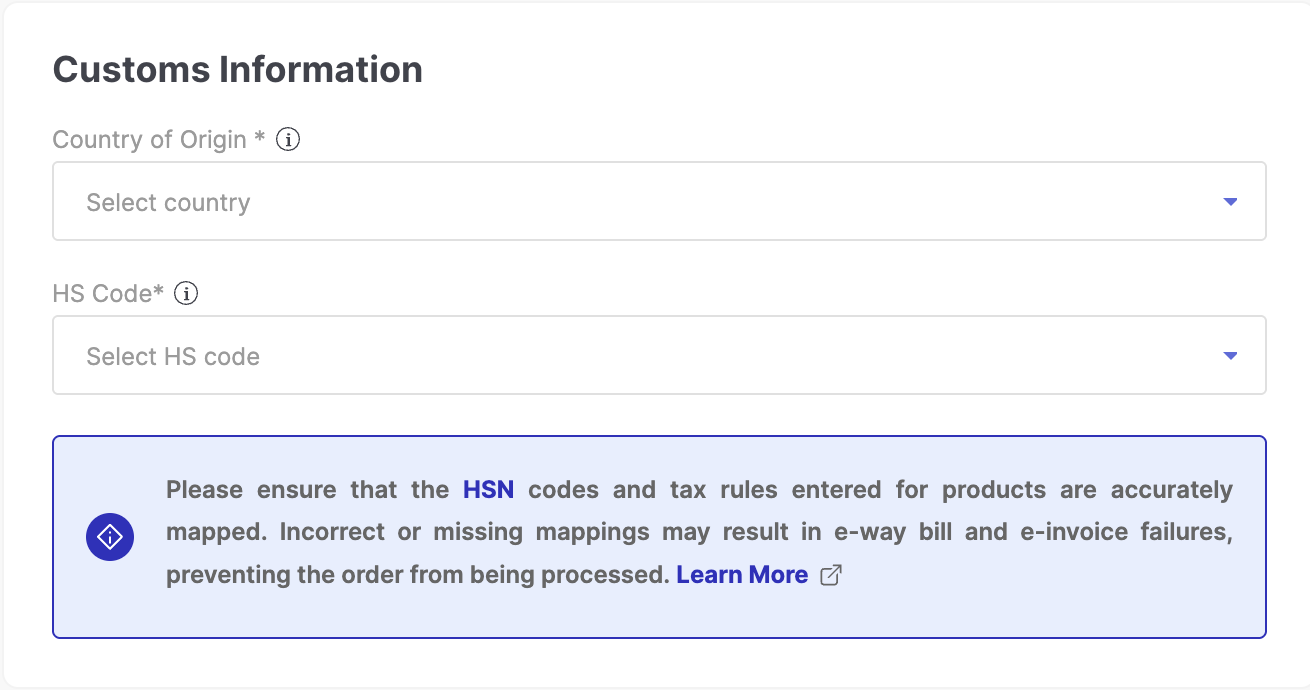
- Select the HS Code:
- If the HS exists in the dropdown, search and select it
- If not, you can Add new HS code with description
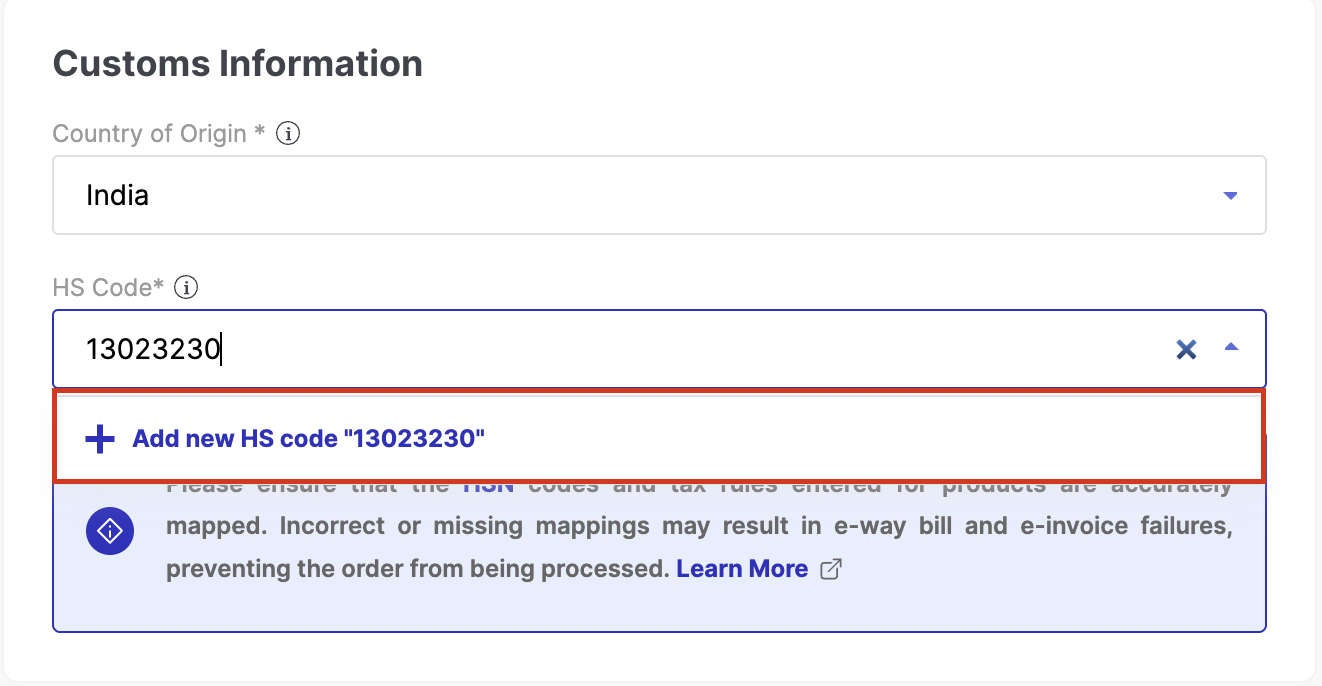
Ensure correct tax rule and HS mapping to avoid invoice/e-way bill failures.
Step 8: Add size and pricing
- Enable the Multi Size switch if the product comes in more than one size (e.g. S, M, L). Turn it off for single-size or one-size products (like cosmetics or free-size scarves).
- Click Add to open the size entry form.
- Enter size name is missing.
- Under Identifiers, select the type of identifier from the dropdown, such as SKU (Stock Keeping Unit), EAN (European Article Number), UPC (Universal Product Code), ALU (Associate Lookup Unit), or ISBN (International Standard Book Number). These help you track inventory and uniquely identify each variant.
- Identifiers are standardised codes that help you uniquely identify each product variant and track inventory across systems. You can use one or more of the supported identifiers based on your business or industry needs. Example:
- SKU: 1000000
- EAN: 2134313212
- In the Pricing section, fill in:
- Selling Price – the price customers pay (e.g. ₹1000)
- Actual Price – the original or MRP (e.g. ₹2000)
- The system auto-calculates and shows the discount (e.g. 50% off)
- In the Packaging Measurements, enter the length, width, and height in cm.
This is used for logistics and calculating volumetric weight.Example:
- Length: 150 cm
- Width: 120 cm
- Height: 150 cm
- Dead Weight: 200 g
- Click Save to store this size.
- The size entry will now be listed under the Sizes section, showing SKU, tax rate, price, and discount info.
Step 9. Add trader information
Trader information helps identify the source of the product and is required for regulatory, compliance, and fulfilment purposes. This includes the entity responsible for manufacturing, packaging, or importing the product.
- In the Trader Information section, select Add.
- In the Add Trader popup:
- Product Type is preselected (e.g. Manufacturer).
- Enter the Name of the trader (for example, Bombay Fashion).
- Enter the Address of the trader (for example, Bombay Fashion, MIDC, Noida).
- You can add another address if required using Add Another Address.
- Select Add to save the details.
- The trader details now display in the Trader Information section with edit and delete options.
Trader Information is mandatory. It identifies who is legally and commercially responsible for the product—such as a manufacturer, importer, or distributor. This is important for tax compliance, legal records, and transparency to customers.
Step 10: Enter product attributes and details
Attributes describe the physical and stylistic properties of a product. They are determined by the product category selected by the merchant. Attributes help in proper cataloguing and improve product discoverability for customers.
- In the Attributes section, fill out as many fields as applicable. Some fields may be mandatory (like Essential, Primary Colour, and Primary Material).
- Key attributes include:
- Material, Pattern, Fit, Sleeve Type, Neck Type, Collar Style, Closure Type, Lining, etc.
- Primary Colour and Primary Material are required attributes that must be selected from the dropdown options. As attributes are category-specific, for example, in the case of a black shirt, key attributes would include Primary Colour (Black), Primary Material (Cotton or Polyester), Fit, Sleeve Length, and Neck Type.
- Use Custom Attribute fields if you have additional, unique specifications to define.
- Under Product Details, provide:
- Gender, Marketer Name, Marketer Address, Net Quantity – all of which are mandatory.
- Optional fields include Season, Style, Collection, Occasion, and Colour.
- Make sure to complete the required fields to proceed further. Errors will be flagged in red if a required field is missing.
💡 Attributes are critical for accurate product filtering, discoverability, and comparison by customers. Especially in fashion and cosmetics, shoppers rely on detailed filters to find what they want.
Step 11: Add product variants (if applicable)
Variants let you list multiple options of the same product (e.g. colour, size, material) under one listing.
Enable the Variants toggle.
Select the Variant Type such as Additional Colours, Fit, or Material.
If selecting Additional Colours:
- Upload a Swatch Image for each colour variant using supported formats (PNG, JPEG, WebP, max 2MB, 100x100px minimum).
- You can either select an image from product images or upload a new file.
The selected variant appears under the Product Variants section.
If variants are enabled, it is mandatory to link an existing product as a variant. Select Add and use the search feature to find a product by name or code. If no match is found, the system will display “No product”.
Step 12: Configure product availability and settings
This section lets you control when a product becomes available to customers. If you want the product to go live in the future, enter the desired availability date.
Set product availability
- Toggle on Product Available.
- Use the calendar picker to select the publish date and time when the product should go live.
This controls when the product is visible and purchasable by customers.
Add product tags
- Open the Tags dropdown.
- You can create a new tag or choose form the dropdown.
- Select one or more tags from the list (e.g. “10% OFF”, “Limited-Edition”).
Tags help organise, filter, and promote products on various listing pages and campaigns.
Configure made-to-order option
- Toggle on Made to Order if the product is manufactured or customised only after purchase.
- Enter the required manufacturing time (e.g. 3 Hours or 3 Days).
This helps set realistic shipping expectations for custom or non-stocked items.
Set return configuration
- Toggle on Return Configuration.
- Enter the return window (e.g. 3 Days).
This specifies for how long customers can raise a return request from the date of delivery.
Set dependable product (optional)
- Enable Dependable Product only if this product is used as a dependency or add-on to another.
- Note: Dependable products cannot be sold individually
This is useful for accessories, spares, or components sold alongside main products.
Link to product bundle (optional)
- Use the Product Bundle dropdown to link the product to one or more bundles.
- You can also select Add Product Bundle if the bundle is not listed.
Product bundles help promote combined purchases and unlock discounts or special offers.
Attach a size guide
- Select a guide from the Size Guide dropdown.
- Click Preview to view the table format (e.g. sizes A and B for measurement units).
Size guide help customers in selecting the right size and reduce returns due to fitting issues.
Step 13: Preview and create the product
Before publishing your product, it’s important to verify how it will appear to customers.
Preview the product
- Click Preview in the top-right corner of the product setup page.
- A product preview modal opens showing:
- Product name and brand (e.g. "Black Casual Shirt", "Generic")
- Pricing, discount, and size options
- Product image on the left
- Description and highlights (e.g. "Black cotton shirt", "Breathable fabric")
- Action buttons for Add to cart and Buy now
Use this to visually confirm the product's content, formatting, and customer experience before going live.
Create the product
- After reviewing, click Save or Create Product to publish the product.
This completes the listing process and makes the product available based on the chosen availability settings.