Order Processing
| Super-Lane Name | Description |
|---|---|
| All | Displays all orders, whether they are new, processed, returned, or require attention. This acts as a complete history of all your orders. |
| Unfulfilled | Shows newly placed orders by customers that are yet to be picked, packed, or shipped. Orders appear here immediately after a customer places them. |
| Processed | Contains orders that have been picked, packed, shipped, or delivered. These are successfully fulfilled orders. |
| Returns | Includes orders that are currently being returned, have been returned already, or have refunds initiated/completed. |
| Action Centre | Highlights orders that need immediate attention due to issues such as delays, errors, or buyer complaints. |
1. New Order in Unfulfilled Lane
Once a customer places an order, it would appear under the Unfulfilled super-lane in the OMS.
Your Next Task: Proceed towards confirming or cancelling the shipment.
2. Cancelling a Shipment
For ease of shipping, an order might get divided into multiple shipments, and each shipment can have products or multiple quantities of a product.
As a seller, you have to determine if you can fulfil an order present in the New sub-lane. If you can’t, there are two types of shipment cancellation you can perform on Fynd Commerce OMS:
Full Cancellation
If you cannot fulfil any of the items in the shipment, you have the option to cancel all of them. This is known as Full Cancellation.
How to Cancel All Items in an Shipment
To cancel an entire order that contains multiple items, follow these steps:
- Open the order from the My Orders page.
- Click on the Cancel All button. This option appears only when the order has more than one item.
- A Cancellation Summary screen will appear, listing all the items in that order.
- For each item, select a rejection reason from the dropdown—do this one by one for all items.
- Once you've added reasons for all items, click Submit.
- The shipment status will now update to Cancelled.
Partial Cancellation
If you can fulfil a few items or partial quantities of an item in a shipment, you must cancel the ones you cannot fulfil. This is known as Partial Cancellation. Please note, the remaining uncancelled ones are left untouched (neither cancelled nor confirmed).
If you cancel any product/quantity in the shipment (either fully or partially), the OMS will move the cancelled quantities to the Cancelled sub-lane provided that there are no other selling locations (stores) that can fulfil it. Else, the cancelled ones get reassigned to other selling locations (if any) of your company.
How to Cancel Specific Items in a Shipment (Partial Cancellation)
Follow the steps below to cancel only a few items from an order (instead of the entire order):
Open the order from the My Orders page.
Scroll down to the Item Details section.
You will see a table view with item information such as:
- Item image
- Seller Identifier
- Initial Quantity
- Final Quantity
- Cancel Quantity
- Actual Price
- Selling Price
In the Cancel Qty row:
Enter the number of units you want to cancel for each item.
Example: If the customer ordered:
- 2 black t-shirts
- 1 blue jeans
- 1 shirt And you can only fulfill 1 black t-shirt, update:
- Cancel Qty for black t-shirt = 1
- Cancel Qty for blue jeans and shirt = 0
Once you've set the correct Cancel Qty values:
- Scroll back up to the Shipment Details section.
- Click the Cancel button in the Actions menu. This button will display the total number of items selected for cancellation (it updates dynamically).
A prompt will appear:
- Select a rejection reason for each item you're cancelling.
- Click Submit to confirm.
The shipment status will update accordingly, reflecting the partial cancellation.
What Happens After Partial Cancellation
- A new Shipment ID is generated for the cancelled items.
- Scroll down to the bottom of the order page to view the cancelled items.
- The shipment status of the cancelled items will be marked as Cancelled.
- The main Shipment ID (displayed at the top of the page) will now show only the remaining items that are still active and fulfillable.
3. Confirming a Shipment
If can fulfil an order in the Unfulfilled lane, you can confirm the shipment(s) within the order. There are two types of shipment confirmation you can perform on Fynd Commerce OMS:
Full Confirmation
It is the opposite of Full Cancellation we saw earlier. Here you can confirm all the items within a shipment at once.
How to Confirm a Full Shipment
To confirm all items in a shipment together:
Open the shipment from the My Orders page.
Click on the Confirm All button to confirm the entire order.
A prompt will appear asking you to check the Customer Note (if added at the product level).
- Click Yes, Continue if you've reviewed it.
A Confirmation Summary will be displayed.
Click Submit to finalize the confirmation.
The shipment status will change to Confirmed.
Partial Confirmation
While it may seem that Partial Confirmation is the opposite of Partial Cancellation, it’s not true. If you can fulfil a few items, or partial quantities of items in a shipment, you must confirm the ones you can fulfil. This is known as Partial Confirmation. The remaining ones in the shipment get automatically cancelled.
Whereas in Partial Cancellation, the remaining uncancelled ones were left untouched (neither cancelled nor confirmed).
How to Confirm Specific Items in a Shipment (Partial Confirmation)
To confirm only selected items from a shipment:
Open the shipment from the My Orders page.
Scroll down to the Item Details section.
In the table view, you’ll see columns such as:
- Item Image
- Seller Identifier
- Initial Quantity
- Final Quantity
- Confirm Quantity
- Cancel Quantity
Under the Confirm Qty column:
Enter the number of units you want to confirm for each item.
For items you do not want to confirm, leave the Confirm Qty as 0.
Example:
If the customer ordered 2 t-shirts and 1 jeans, and you want to confirm only the jeans:
- Confirm Qty for t-shirts = 0
- Confirm Qty for jeans = 1
Once done, scroll back up to the Shipment Details section.
Click the Confirm button from the Actions menu.
- The button will dynamically show the number of items selected for confirmation.
A confirmation prompt may appear. Click Yes and then Submit.
The shipment status for the confirmed items will update to Confirmed.
Your Next Task: Proceed towards invoicing the confirmed shipments
4. Invoicing and Packing a Shipment
Entering the Invoice Number
If you have auto-invoicing enabled in your Fynd Commerce account, this step is not applicable to you. In other words, the auto-invoicing mechanism allows Fynd Commerce to fetch the invoice number directly from your invoicing system after you have confirmed a shipment.
Here you need to enter the invoice number for the confirmed shipment. Once you enter the invoice number, the system would automatically assign a Delivery Partner (DP).
How to Enter the Invoice Number After a Shipment is Confirmed
Once a shipment has been confirmed, follow these steps to enter the invoice number:
- Go to the My Orders page on the platform.
- Navigate to the Confirmed sub-lane. This lane contains all shipments that have already been confirmed.
- Open the shipment you want to update.
- In the Actions section at the top of the shipment details, you'll see a field to enter the invoice number.
- Type in the invoice number and click Update.
- Optionally, you can click the Refresh button to reload the shipment page and check the updated status.
- Once the invoice number is successfully added, the shipment status will change to DP Assigned (Delivery Partner Assigned).
You can repeat the same steps for any confirmed shipment that requires an invoice number to be added.
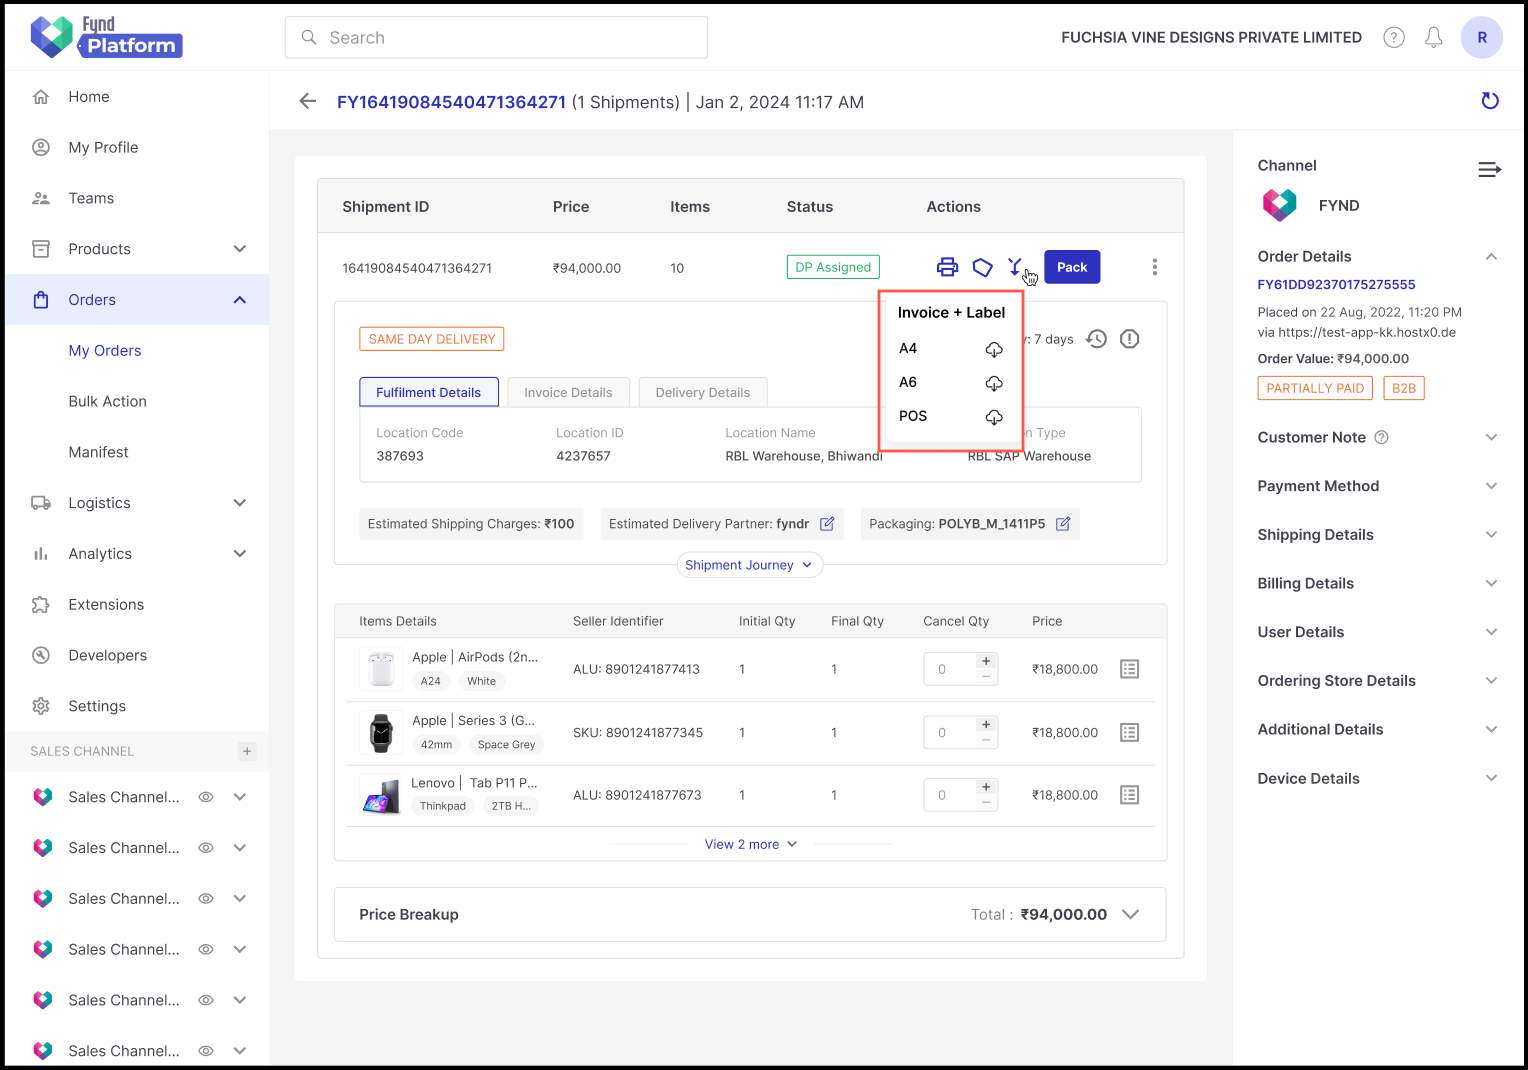
Attaching Invoice and Label
After submitting the invoice number, you get the option to download the invoice (for the customer) and label (for the DP). Pack the shipment and the printed invoice together inside the packaging material. Once done, stick the printed label on the packaged shipment, and click the Pack button.
How to Pack a Shipment After a Delivery Partner (DP) is Assigned
Once a Delivery Partner (DP) is assigned to a shipment, follow these steps to complete the packing process:
Step-by-Step Process
- Go to the My Orders page.
- Navigate to the Unfulfilled super-lane and open the To Be Packed sub-lane. This section lists all shipments for which a DP has been assigned and are ready to be packed.
- Open the shipment you want to process.
Download and Print the Tax Invoice
Locate and click on the Invoice (printer) button.
Choose your preferred format from the available sizes:
- A4
- A6
- POS
Click the Download button in front of the chosen format.
Print the downloaded invoice. This printed invoice should be placed inside the shipment for the customer.
Download and Print the Shipping Label
Click on the Label button next to the shipment.
Select the required label format:
- A4
- A6
- POS
Click the Download button in front of the selected format.
Print and attach the label on the outer packaging material of the shipment.
Final Step: Mark the Shipment as Packed
Once the invoice and label are attached:
- Go to the Actions section at the top of the shipment page.
- Click the Pack button.
The shipment status will be updated to Packed.
Sellers can generate a merged PDF of the invoice and shipping label. The Invoice + Label feature simplifies order processing by allowing sellers to easily print or download the merged PDF. This feature can be used for both bulk and individual order processing.
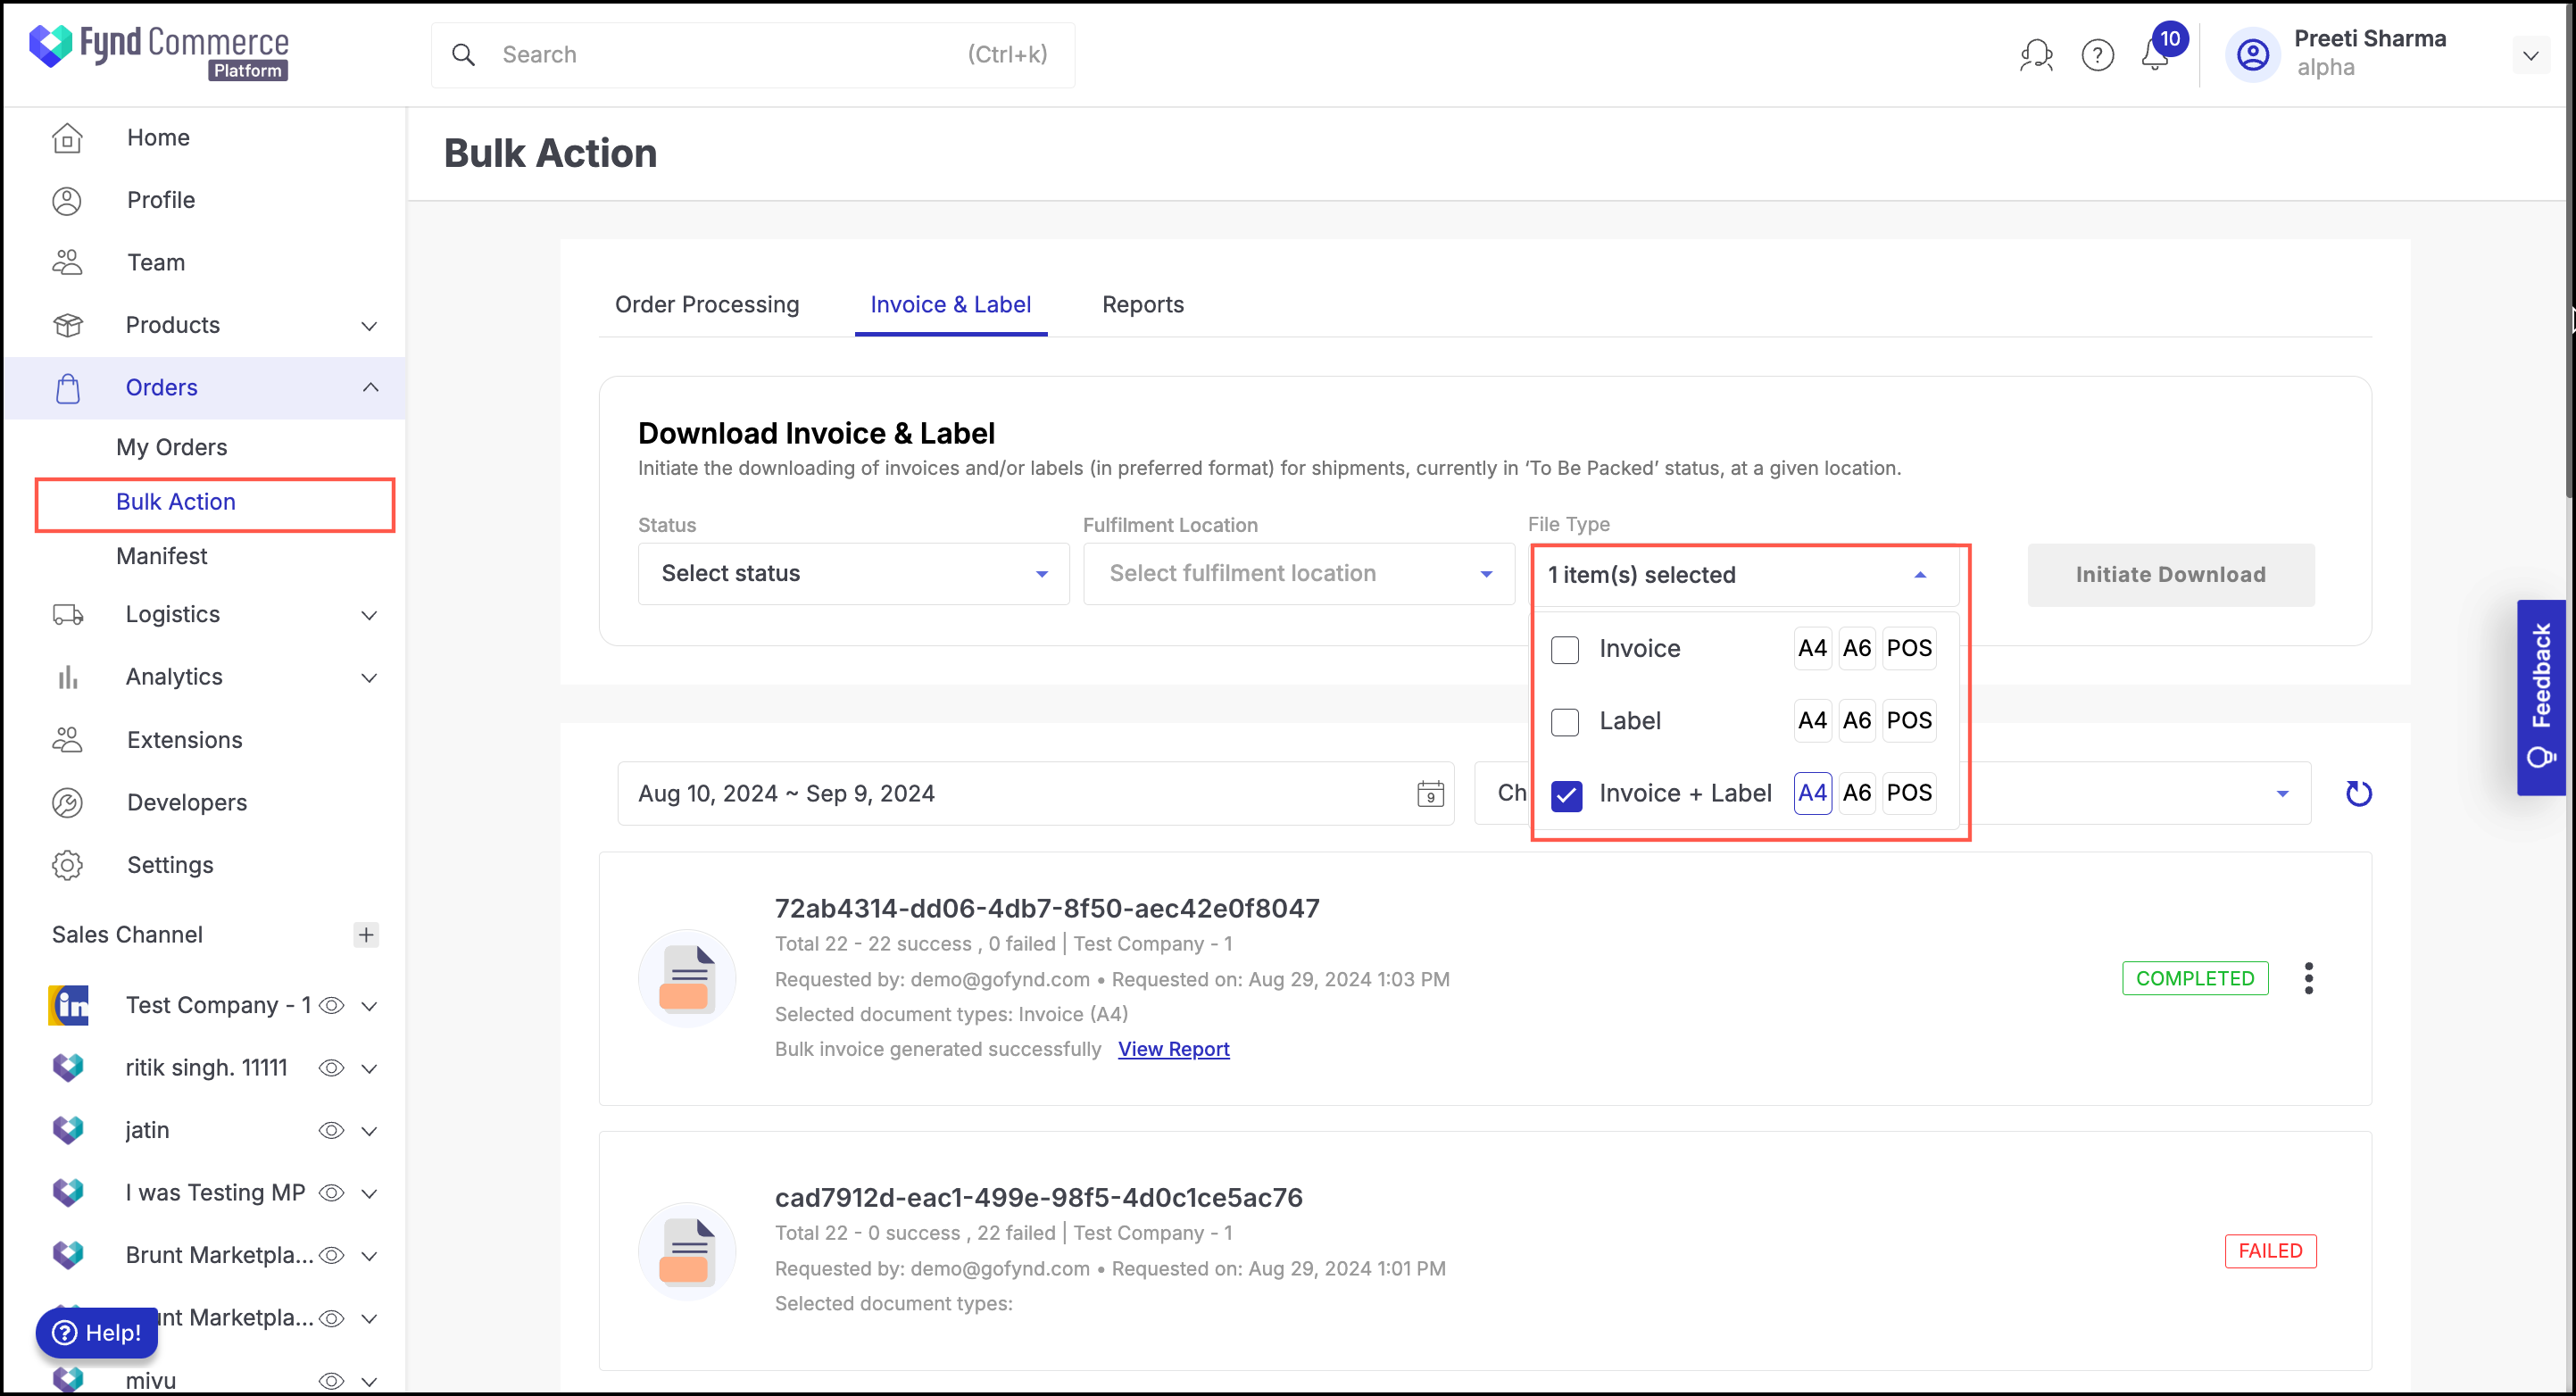
B2B Invoice for Shipment
Merchants can download B2B (Business) invoices in A4, format for shipments through the Order Management System (OMS). The invoice download panel separates invoice types into two tabs-Customer (for B2C invoices) and Business (for B2B invoices) - to simplify access and improve clarity.
How it works
Download a B2B invoice for a single shipment
- Go to My Orders.
- Click on a specific order to open the Order Details screen.
- In the Actions column of a shipment, click the Download icon.
- In the pop-up, switch to the Business tab.
- Select Invoice.
- Choose the format (A4) for the invoice.
- Click Download to save the file to your device.
The Business tab will only appear if both B2B and B2C invoices have been generated for a shipment.
Your Next Task: Proceed towards generating a manifest.
5. Generating a Manifest
After packing your shipment(s), you can generate a manifest. Manifest is a document that stands as proof of handing over the shipment(s) to the delivery guy.
How to Dispatch a Packed Shipment Using the Manifest Page
After a shipment is marked as Packed, it will move to the Ready to Dispatch sub-lane under the Unfulfilled super-lane. However, dispatching must be completed through the Manifest page.
Step 1: Go to the Manifest Page
- From the left sidebar of the platform, click on Manifest.
Step 2: Generate a Manifest
Click on the Generate Manifest button.
In the filter section, choose the appropriate values:
- Delivery Partner (DP) – select the same partner assigned in your shipment.
- Fulfillment Location – select the location assigned in your shipment.
All shipments matching your selected Delivery Partner and Fulfillment Location will be listed and auto-selected (checked).
- You can uncheck any shipments that you do not want to include in the manifest.
Click Save to generate the manifest.
- This creates the manifest in advance and saves it under the Active Manifests tab.
Step 3: Process the Manifest
You can process the manifest in either of the following ways:
- Option A: Go to the Active Manifests tab later and click Process.
- Option B: Instead of saving, directly click Process while generating the manifest.
Step 4: Upload Consent and Dispatch
After clicking Process, a Consent Upload screen will appear.
You have two options here:
Option 1: Upload Signed Manifest
- Click Download to download the generated manifest.
- Print and get the signatures of the Delivery Agent and Store Manager (if applicable).
- Upload the signed manifest file.
Option 2: Declare Consent
- If you don’t want to upload the signed document, tick the checkbox: “I declare that the signed manifest provided by me is genuine and I am liable for dispatch.”
Click Dispatch once the shipments are handed over to the delivery agent.
Step 5: Track Manifest Status
- The manifest will now appear in the Closed Manifests tab.
- The shipment status will automatically move from Unfulfilled to Processed in the OMS (Order Management System).
The Manifest generation supports two formats for PDF generation: A4 and POS. You can choose between these formats based on your operational needs.
After this, the DP takes care of the shipment(s) till it's delivered to your customer.