Customizing Your HTML Invoice Template
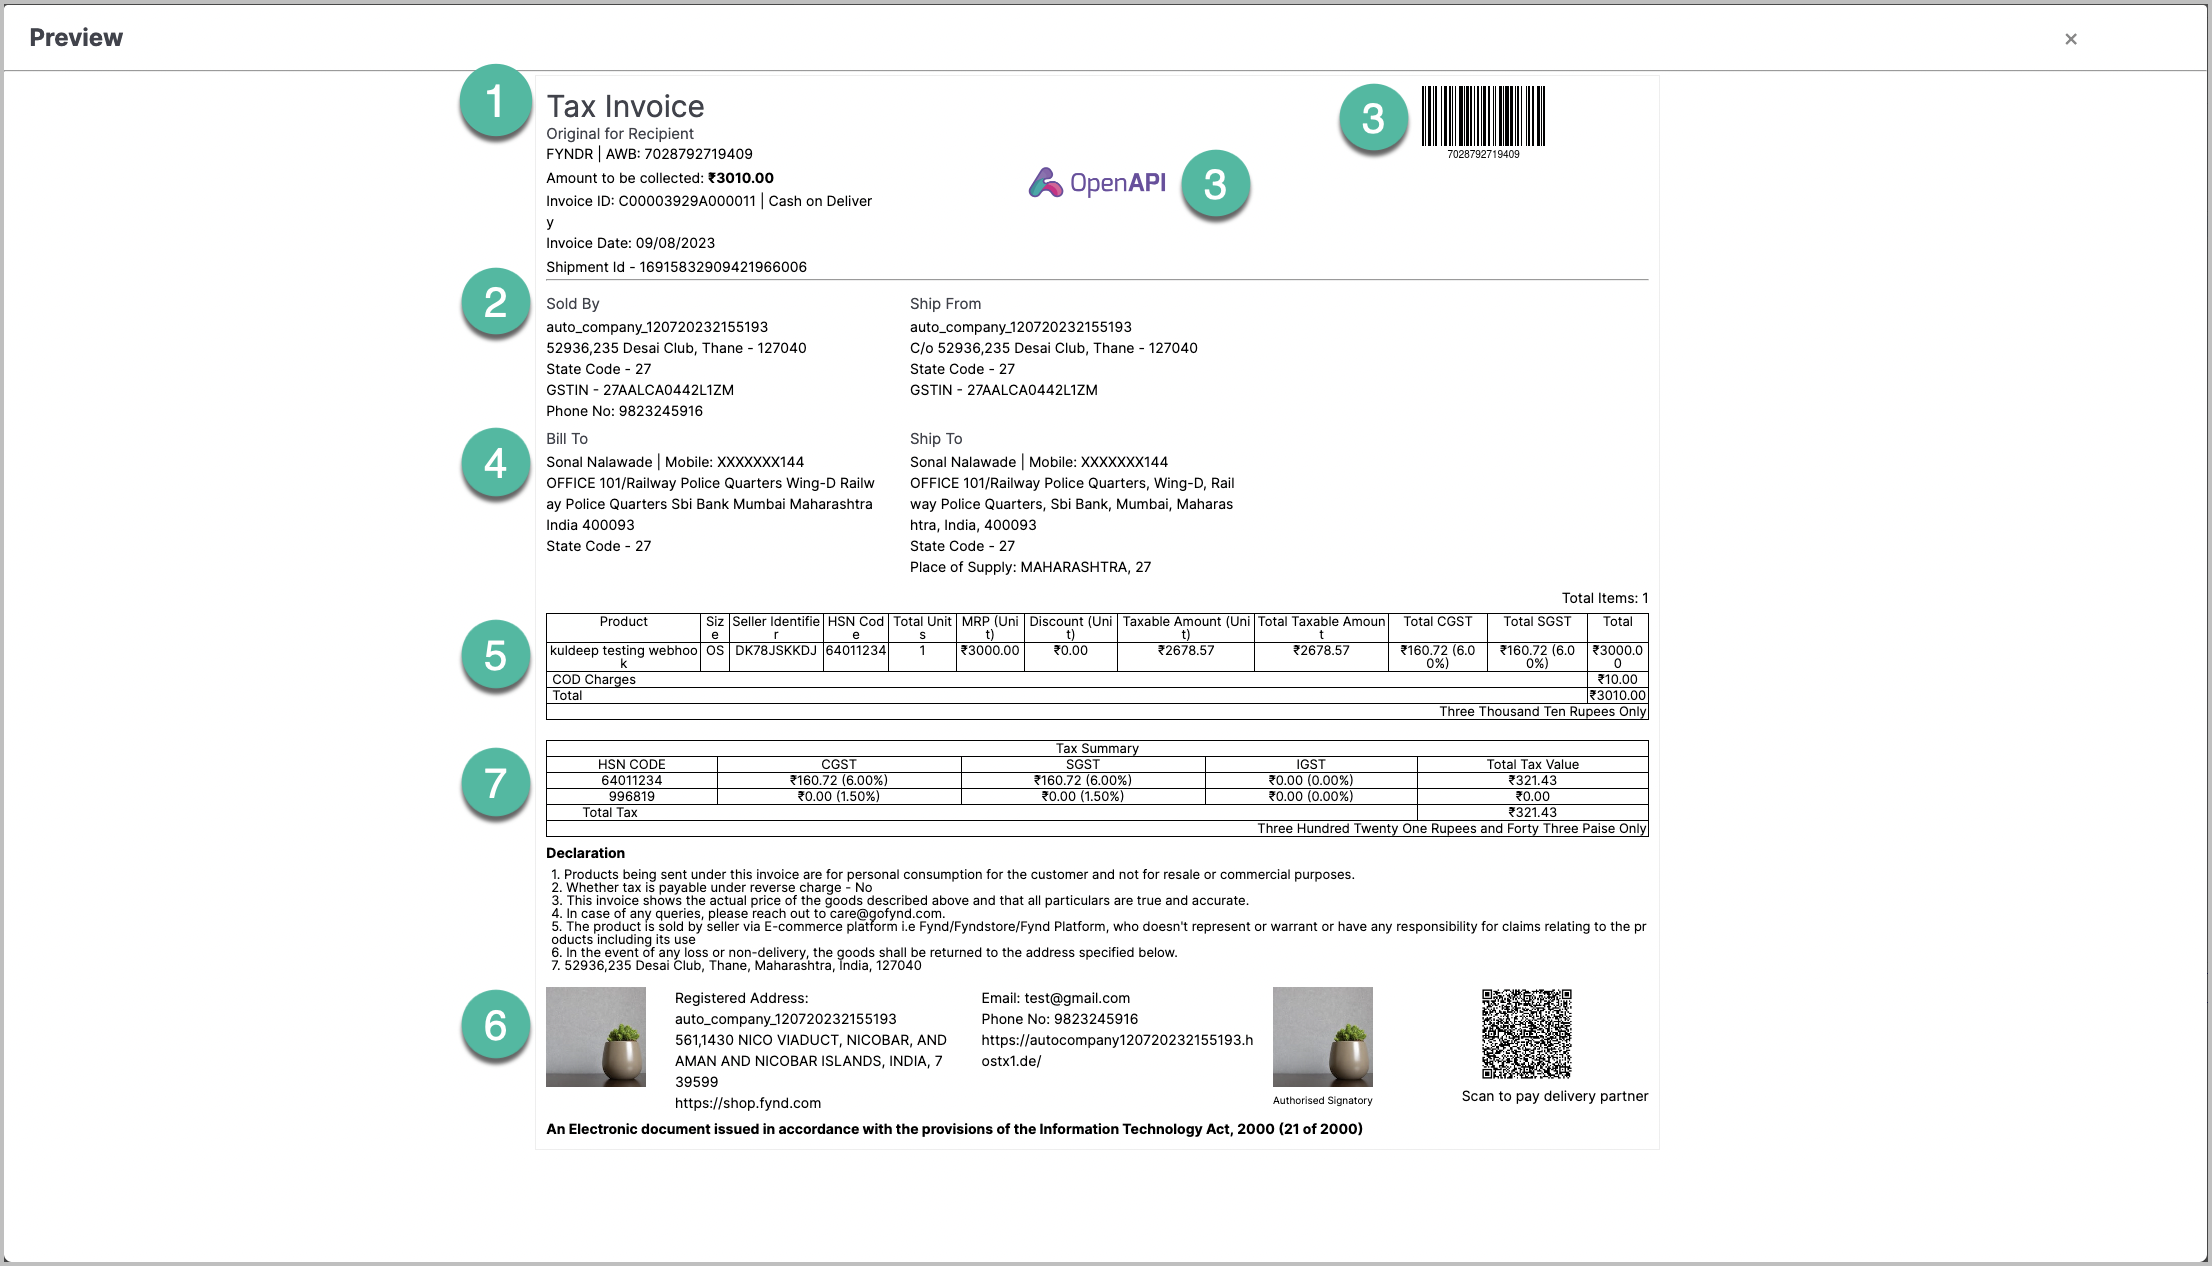
This guide will help you customize your invoice template using the HTML editor given below to make it look the way you want it to. To customize the content and structure of the invoice template, you can make the following modifications to the provided code:
1. Change the Invoice Title
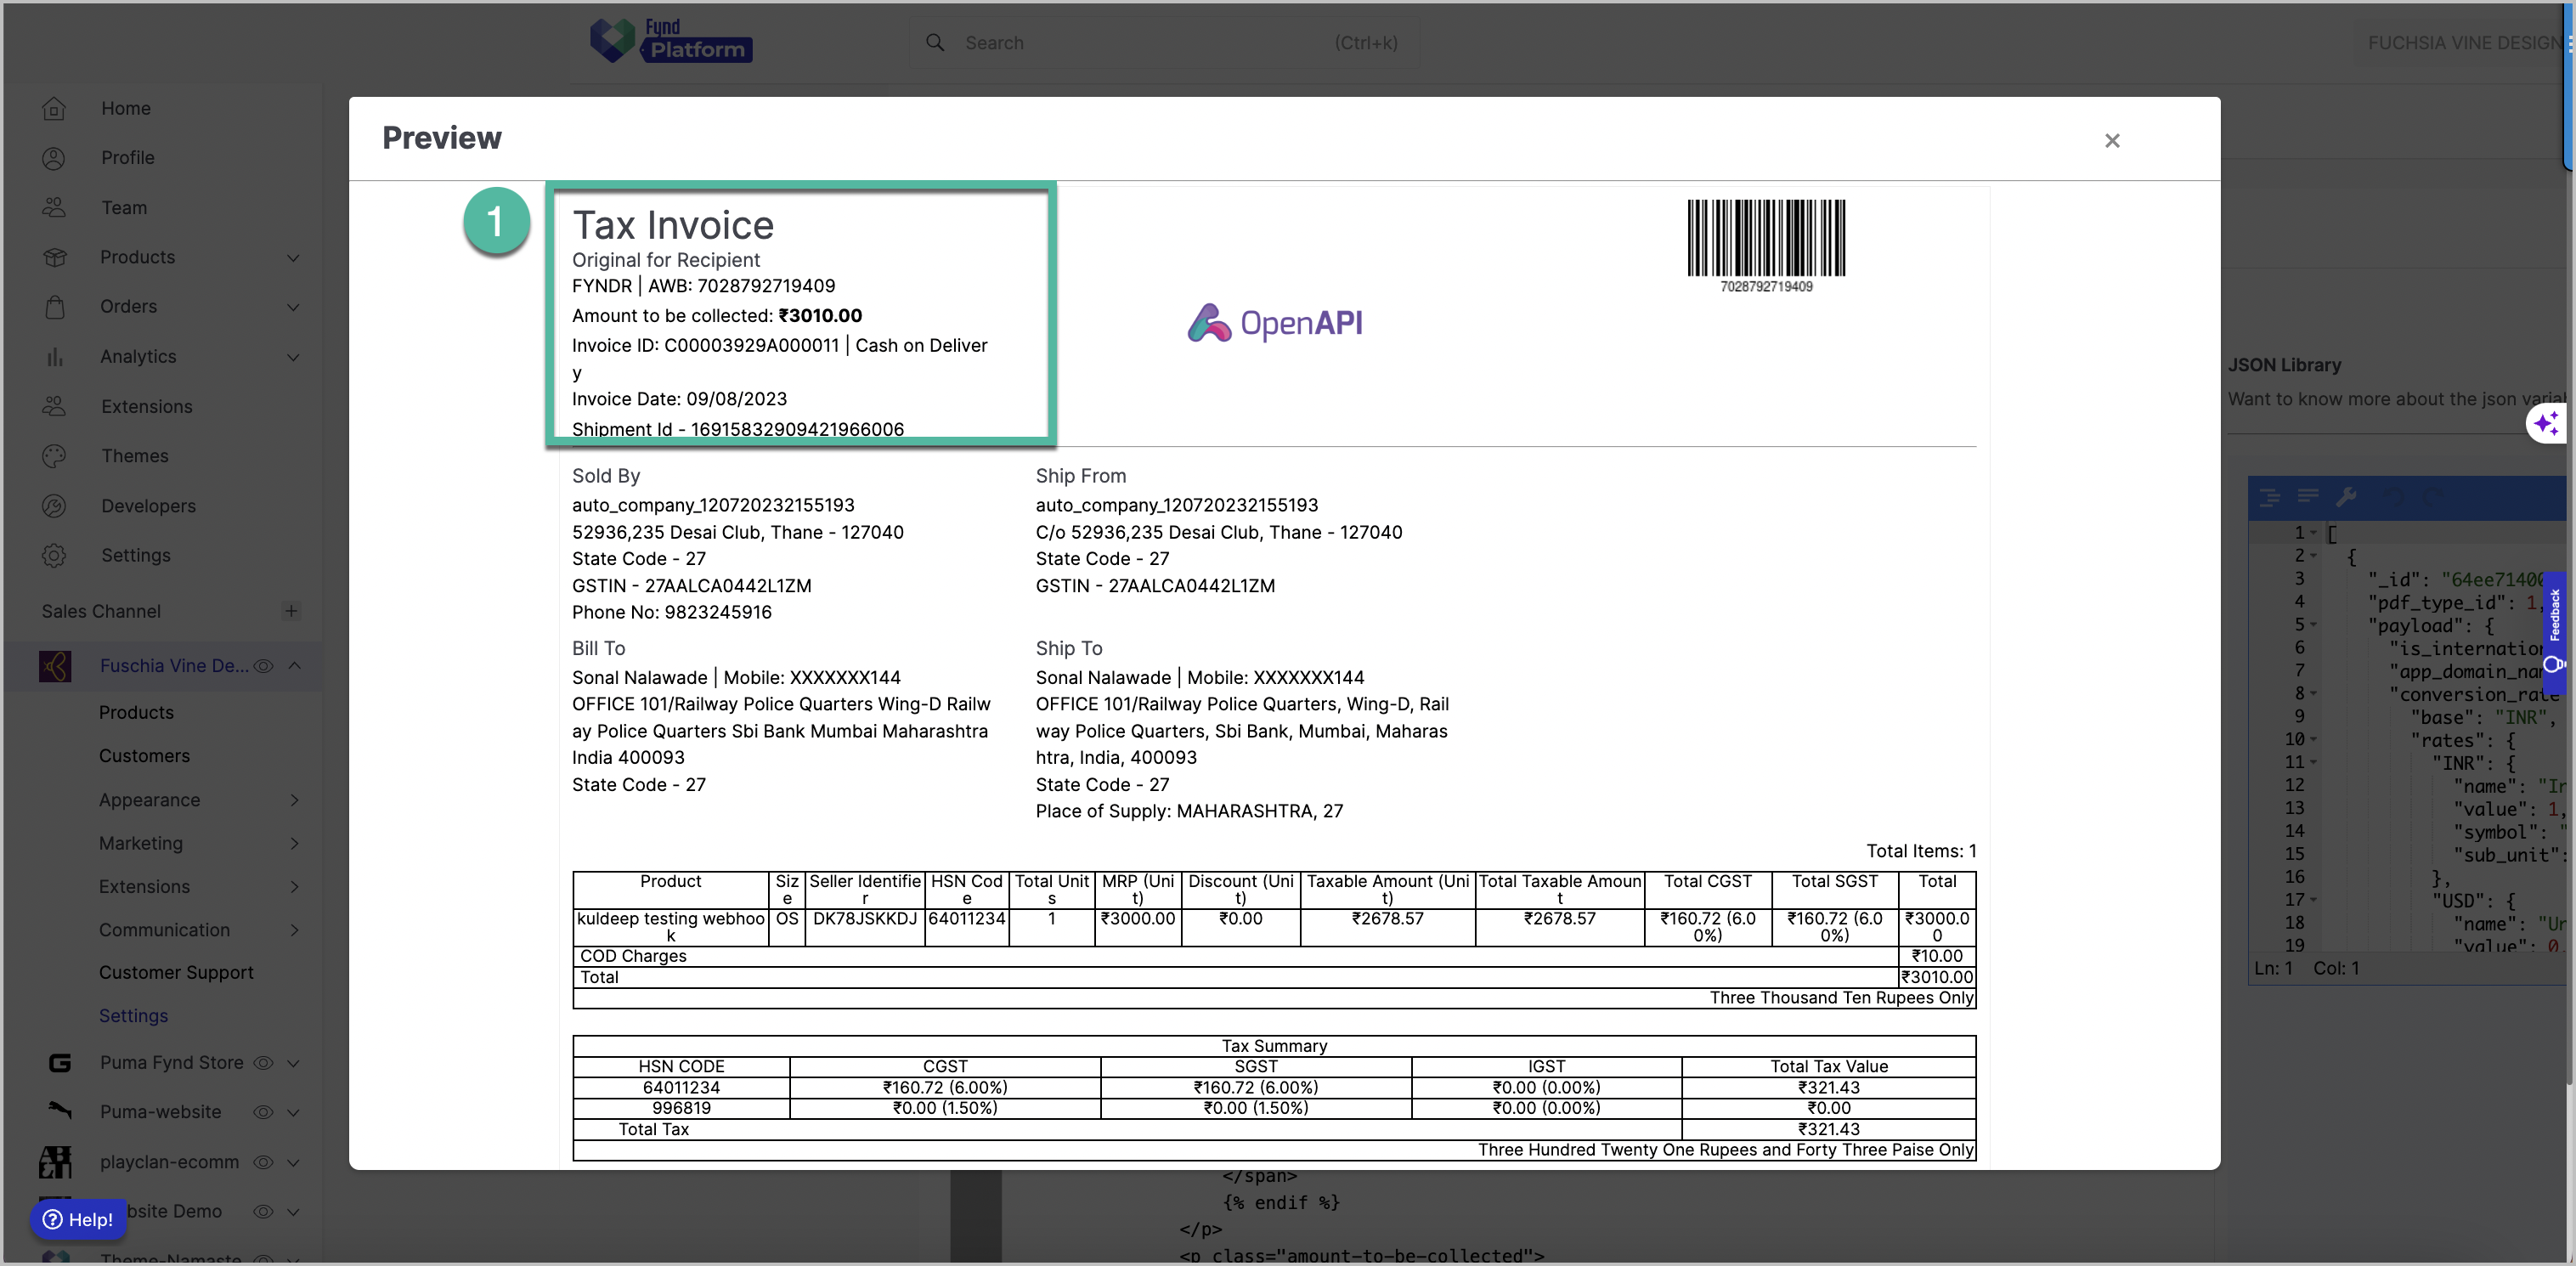
To change the invoice title in your HTML template, follow these steps:
1. Locate the Invoice Title Element:
In your provided HTML code, the invoice title is within an <h1> element with the class "heading." Here's the relevant part of the code:
<h1 class="heading">Tax Invoice</h1>
2. Modify the Invoice Title:
To change the invoice title, simply replace the text "Tax Invoice" within the <h1> element with your desired title. For example, if you want to change it to "Sales Invoice," you would do the following:
<h1 class="heading">Sales Invoice</h1>
3. Save Your Changes: After making this change, save the HTML file.
Here's the modified code with the invoice title changed to "Sales Invoice":
<h1 class="heading">Sales Invoice</h1>
This change will update the title displayed on your invoice. Make sure to customize other parts of the invoice template according to your needs, and then test it to ensure it looks and functions as expected.
2. Edit Header Information
To edit the header information in your HTML invoice template, you'll need to make changes to various elements in the header section. The header typically includes details such as company information, invoice type, and other relevant data. Here's how you can edit the header information:
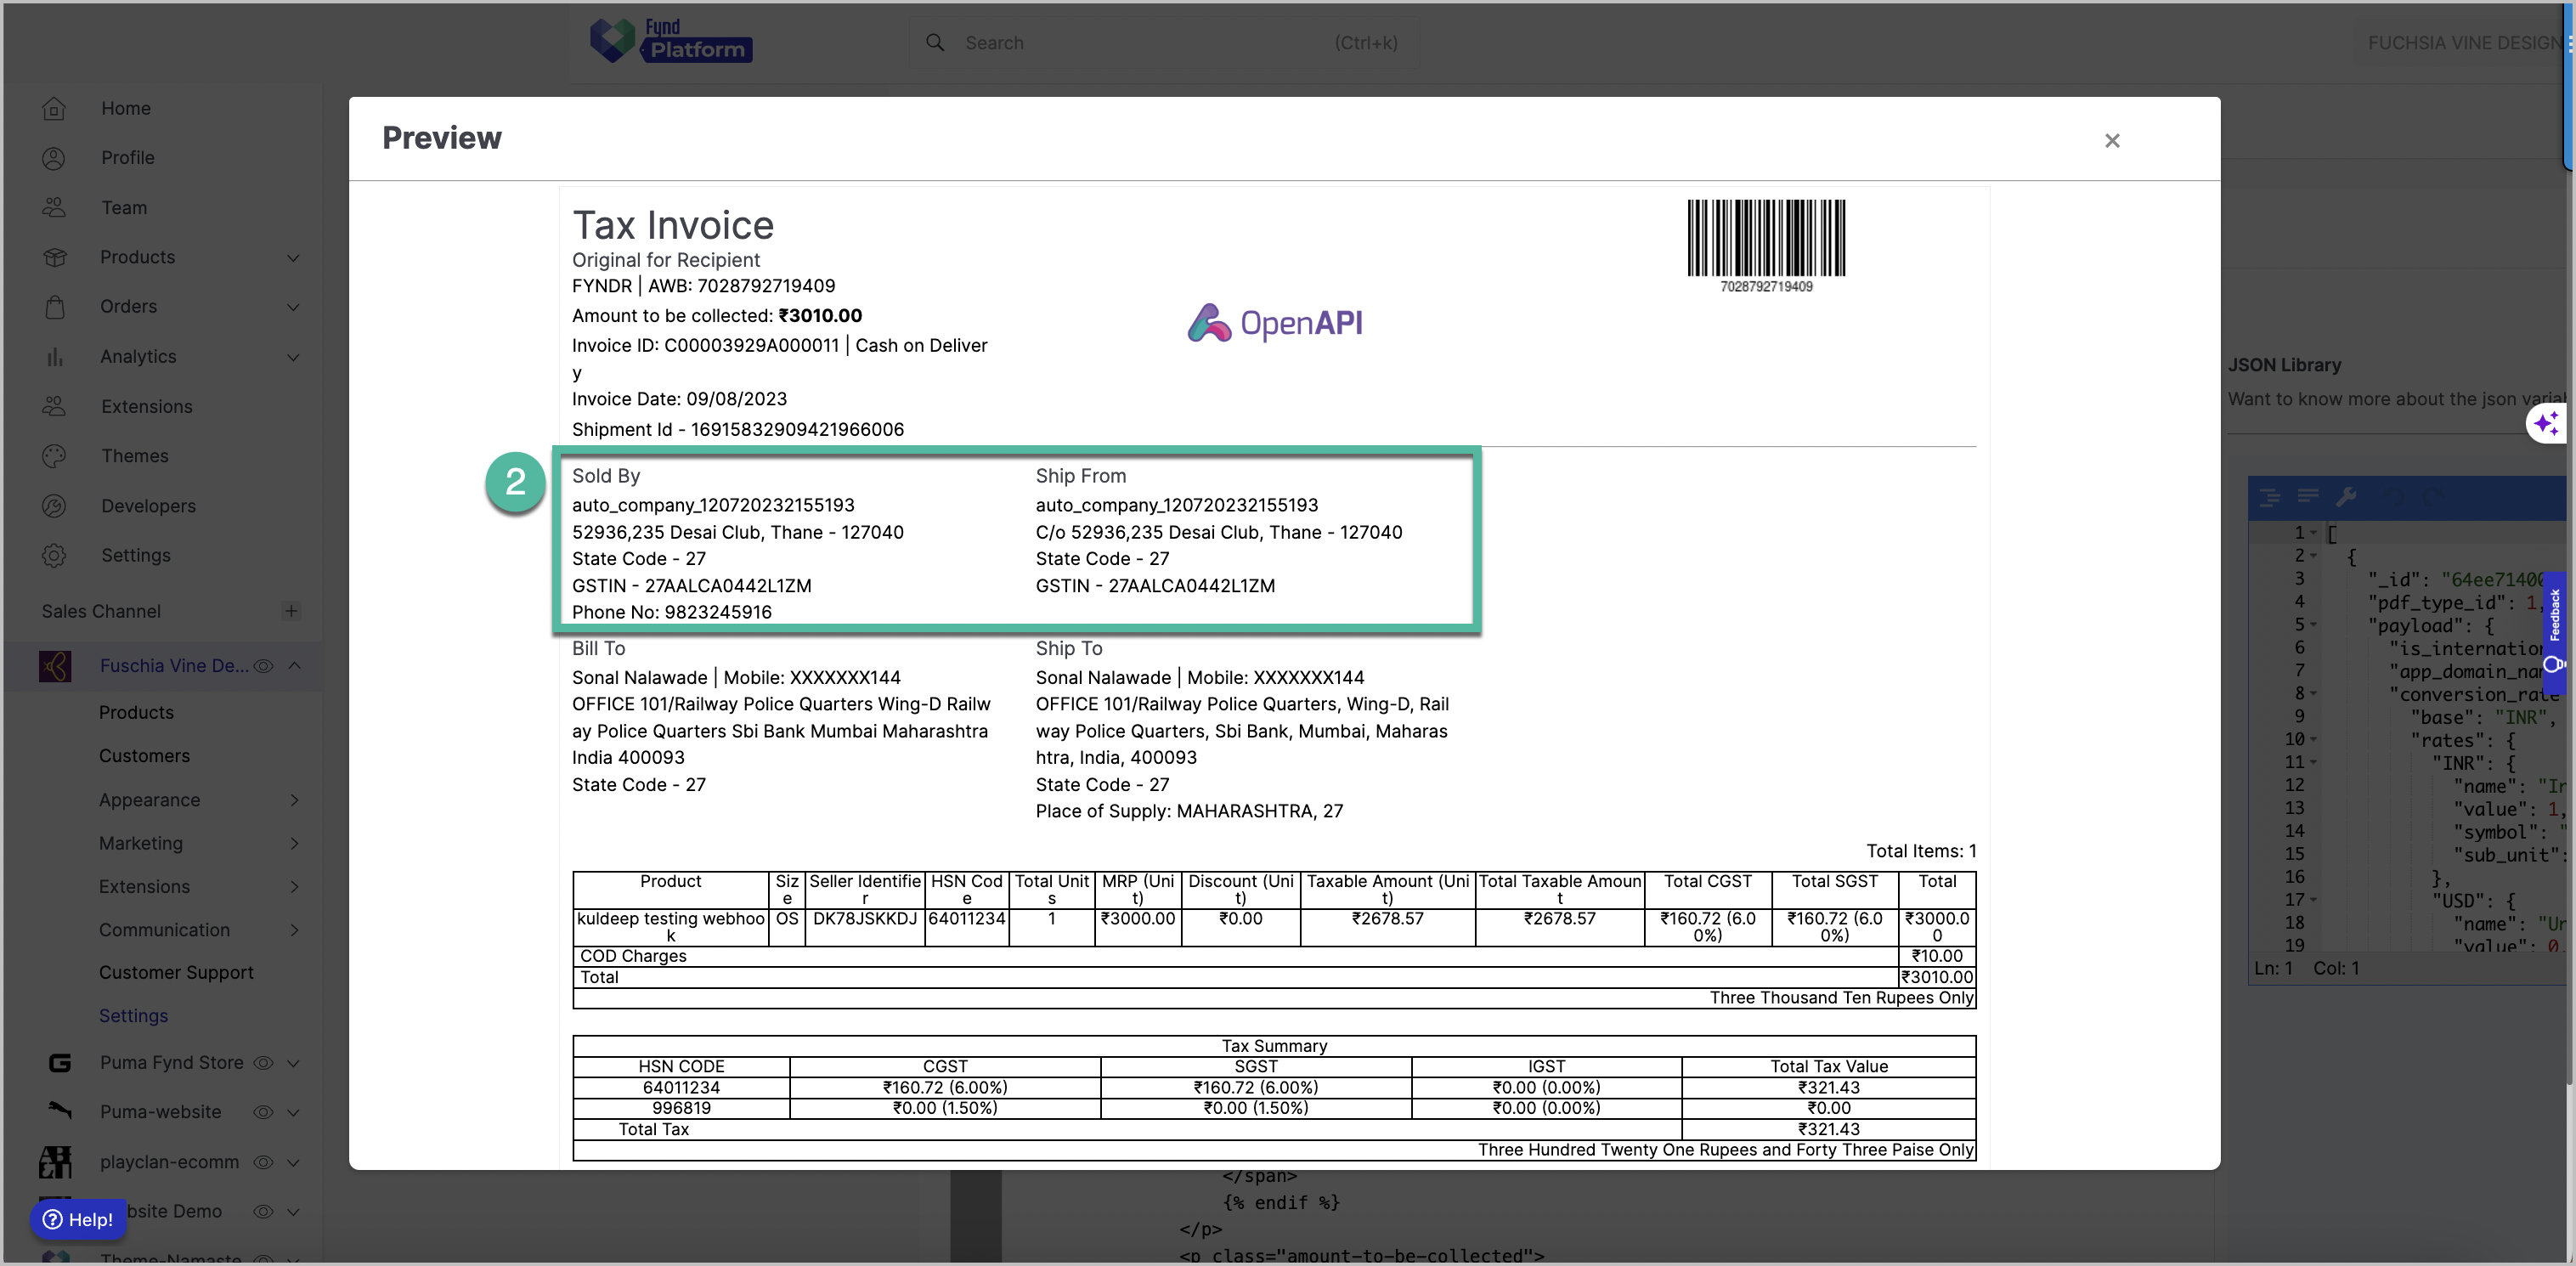
1. Company Information
In your template, the company information is displayed in the "Sold By" and "Ship From" sections. This is where you specify your company's details. You can edit the company name, address, and contact information.
<div class="sold-by seller-details seller-customer-details-block">
    <h2>Sold By</h2>
    <p class="name">{{ company_detail.name }}</p>
    <p class="address">{{ store_detail.address }}</p>
    {% if company_detail.phone_no %}
    <p class="phone_no">Phone No: {{ company_detail.phone_no }}</p>
    {% endif %}
</div>
<div class="seller-customer-details-block fulfilling-store-details">
    <h2>Ship From</h2>
    <p class="company-name">{{ company_detail.name }}</p>
    <p class="address">C/o {{ store_detail.address }}</p>
</div>
Edit the content within the {{ ... }} tags to change the company name, address, and phone number. You can remove or modify any information you want to change.
2. Invoice Type
You can edit the invoice type, which is displayed in the "Original for Recipient" section. This is typically set to "Tax Invoice" but can be customized according to your needs.
<h1 class="heading">Tax Invoice</h1>
Change the "Tax Invoice" text within the <h1> element to your desired invoice type, such as "Sales Invoice."
3. AWB Number and Delivery Partner
In the "Original for Recipient" section, there are details related to the AWB (Air Waybill) number and the delivery partner. You can edit or remove these details if they are not relevant to your invoices.
4. Shipment ID and IRN (if applicable)
The template also includes a field for the Shipment ID and, if applicable, the IRN (Invoice Reference Number). You can customize or remove these elements as needed.
After making your changes to the header information, be sure to save the HTML file. Test your updated template to ensure that the header displays the information you want. Customize other parts of the invoice template as necessary to meet your specific requirements.
3. Change Logo and QR Code
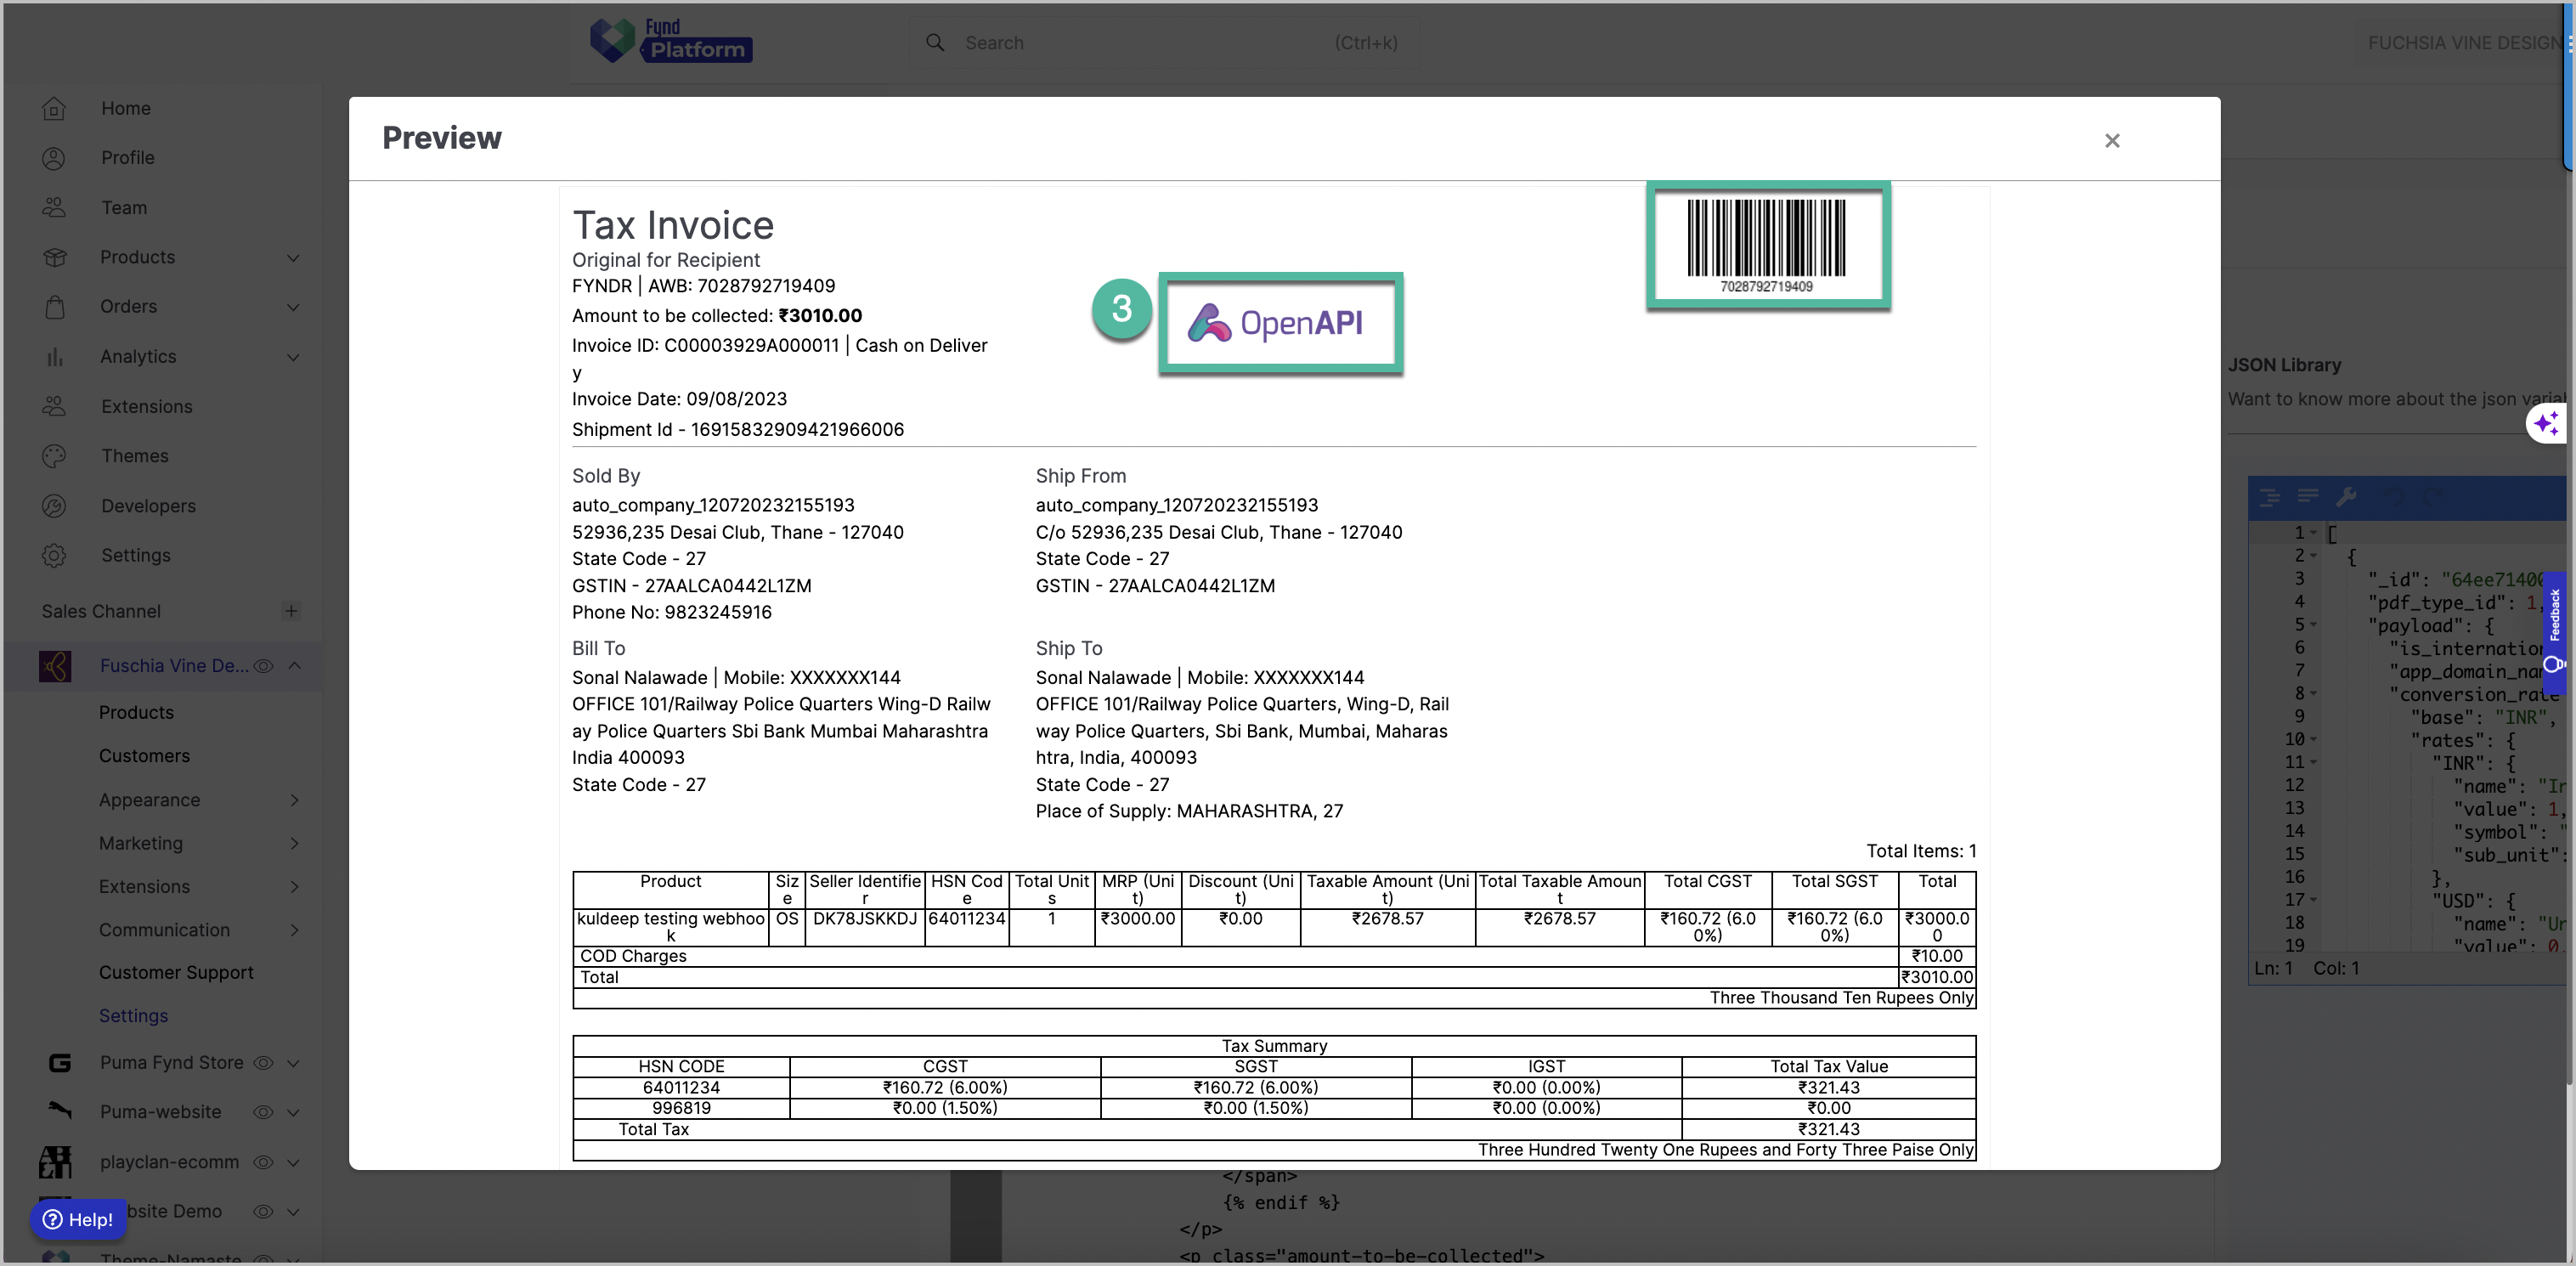
In your HTML invoice template, you have provisions for adding a logo and a QR code. Here's how you can edit or customize these elements:
1. Logo
You can include your company's logo in the header section. To customize the logo, follow these steps:
Find the section where the logo is displayed. It's typically located in the "right-block" div within the "invoice-heading."
<div class="right-block">
    {% if not is_self_ship and not is_self_pickup %}
    <div class="awb-barcode">
        <img src="{{ awb_number_barcode }}" alt="{{ delivery_partner_detail.awb_number }}" />
    </div>
    {% endif %}
    {% if signed_qrcode %}
    <div id="qrcode">
        <img src="{{ signed_qrcode }}" alt="IRN QR Code" />
    </div>
    <div style="text-align: center; margin-top: 5px; margin-left: 10px; margin-bottom: 5px">
        IRN QR
    </div>
    {% endif %}
</div>
To add or change the logo, you'll want to replace the
<img src="{{ logo_source }}" alt="Logo Alt Text" />line with the URL or path to your logo image. For example:<div class="right-block">
{% if not is_self_ship and not is_self_pickup %}
<div class="awb-barcode">
<img src="path/to/your-logo.png" alt="Your Company Logo" />
</div>
{% endif %}
    {% if signed_qrcode %}
    <div id="qrcode">
        <img src="{{ signed_qrcode }}" alt="IRN QR Code" />
    </div>
    <div style="text-align: center; margin-top: 5px; margin-left: 10px; margin-bottom: 5px">
        IRN QR
    </div>
    {% endif %}
</div>Replace
"path/to/your-logo.png"with the actual path or URL to your company's logo image. Make sure the image is accessible from the location specified in thesrcattribute.You can also specify an alternative text for your logo by changing the
"Your Company Logo"text within thealtattribute.
2. QR Code
You have a section for displaying a QR code in your invoice template. To customize the QR code, follow these steps:
Find the section where the QR code is displayed:*
{% if signed_qrcode %}
<div id="qrcode">
<img src="{{ signed_qrcode }}" alt="IRN QR Code" />
</div>
<div style="text-align: center; margin-top: 5px; margin-left: 10px; margin-bottom: 5px">
IRN QR
</div>
{% endif %}To change or update the QR code, you'll need to generate a new QR code image and replace it with the existing one. You can replace the
src="{{ signed_qrcode }}"attribute with the path or URL to your new QR code image.Make sure that your QR code image contains the necessary information that you want to convey. You can use various online tools or libraries to generate QR codes with specific data, such as payment details or links.
Optionally, you can update the alt text to describe the QR code's purpose or content. For example:
    {% if signed_qrcode %}
    <div id="qrcode">
        <img src="path/to/your-updated-qr-code.png" alt="Payment QR Code" />
    </div>
    <div style="text-align: center; margin-top: 5px; margin-left: 10px; margin-bottom: 5px">
        Payment QR
    </div>
{% endif %}- Replace
"path/to/your-updated-qr-code.png"with the actual path or URL to your new QR code image.
- Replace
Once you've made the changes to the logo and QR code, save your HTML file, and ensure that the updated template correctly displays your customized logo and QR code. This allows you to present a professional and branded look for your invoices.
4. Edit Seller and Customer Details
In your HTML invoice template, you have sections for displaying seller and customer details. These details typically include information about your company (the seller) and the recipient of the invoice (the customer). Here's how you can edit or customize these sections:
1. Seller Details
To customize the seller details, follow these steps:
Locate the section in your template where the seller's information is displayed. This section should be under the "seller-customer-details" div.
  <div class="first-row primary-details">
      <div class="sold-by seller-details seller-customer-details-block">
          <h2>Sold By</h2>
          <p class="name">{{ company_detail.name }}</p>
          <p class="address">{{ store_detail.address }}</p>
          {% if company_detail.phone_no %}
          <p class="phone_no">Phone No: {{ company_detail.phone_no }}</p>
          {% endif %}
      </div>
      <!-- ... Other seller details sections ... -->
  </div>`
To edit the seller details, simply replace the placeholder values with your own company's information. For example:
  <div class="first-row primary-details">
      <div class="sold-by seller-details seller-customer-details-block">
          <h2>Sold By</h2>
          <p class="name">Your Company Name</p>
          <p class="address">123 Main Street, Your City, Country</p>
          <p class="phone_no">Phone No: +123-456-7890</p>
      </div>
      <!-- ... Other seller details sections ... -->
</div>- Replace "Your Company Name," "123 Main Street, Your City, Country," and "+123-456-7890" with your actual company name, address, and contact information.
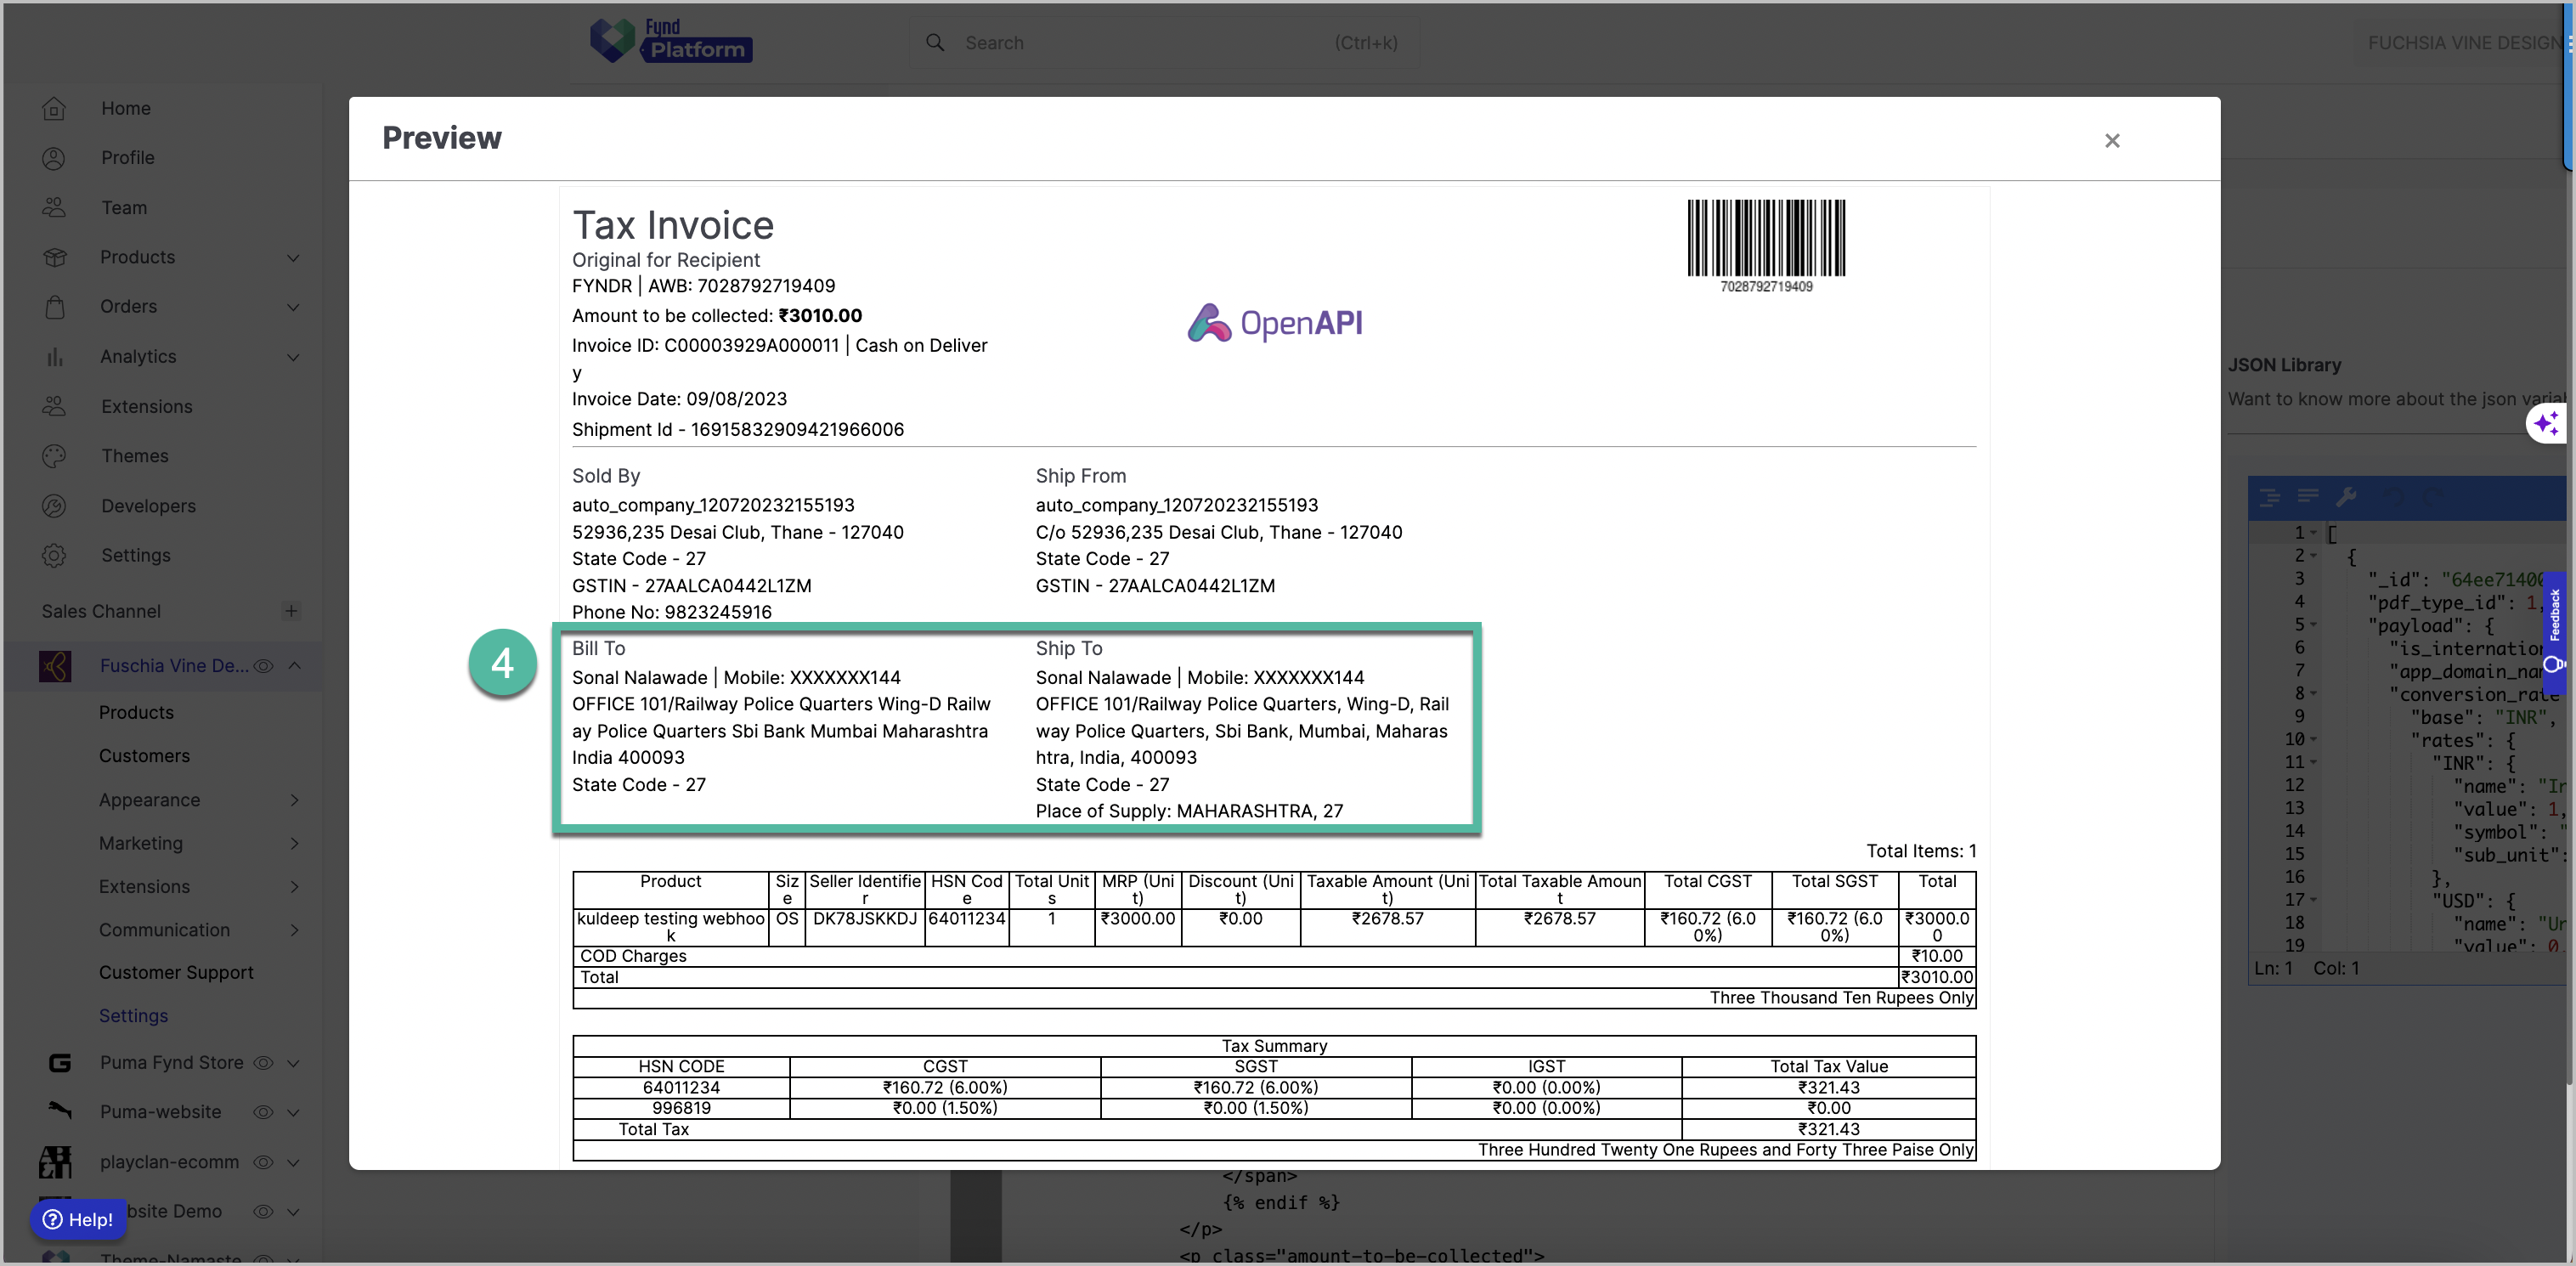
2. Customer Details
To customize the customer details, you can follow similar steps:
Locate the section in your template where the customer's information is displayed. This section should also be under the "seller-customer-details" div.
 <div class="second-row secondary-details">
     <div class="billing-details seller-customer-details-block">
         <h2>Bill To</h2>
         <p class="name">
             {{ customer_billing_detail.name }} | Mobile:
             {{ customer_billing_detail.phone_no }}
         </p>
         <p class="address">{{ customer_billing_detail.address }}</p>
     </div>
     <!-- ... Other customer details sections ... -->
 </div>
To edit the customer details, replace the placeholder values with the actual customer's information. For example:
<div class="second-row secondary-details">
    <div class="billing-details seller-customer-details-block">
        <h2>Bill To</h2>
        <p class="name">
            John Doe | Mobile: +987-654-3210
        </p>
        <p class="address">456 Elm Street, Anytown, Country</p>
    </div>
    <!-- ... Other customer details sections ... -->
</div>
Replace "John Doe | Mobile: +987-654-3210" and "456 Elm Street, Anytown, Country" with the actual customer's name, mobile number, and address.
3. Additional Seller and Customer Details
Depending on your specific needs, you might have additional sections for more detailed seller or customer information. Similar to the steps above, you can edit or add details to these sections to match your requirements.
Remember to save your HTML file after making these changes, and then ensure that the updated template displays the correct seller and customer details. Customizing these details allows you to create personalized and professional invoices tailored to your business needs.
5. Edit Product Details
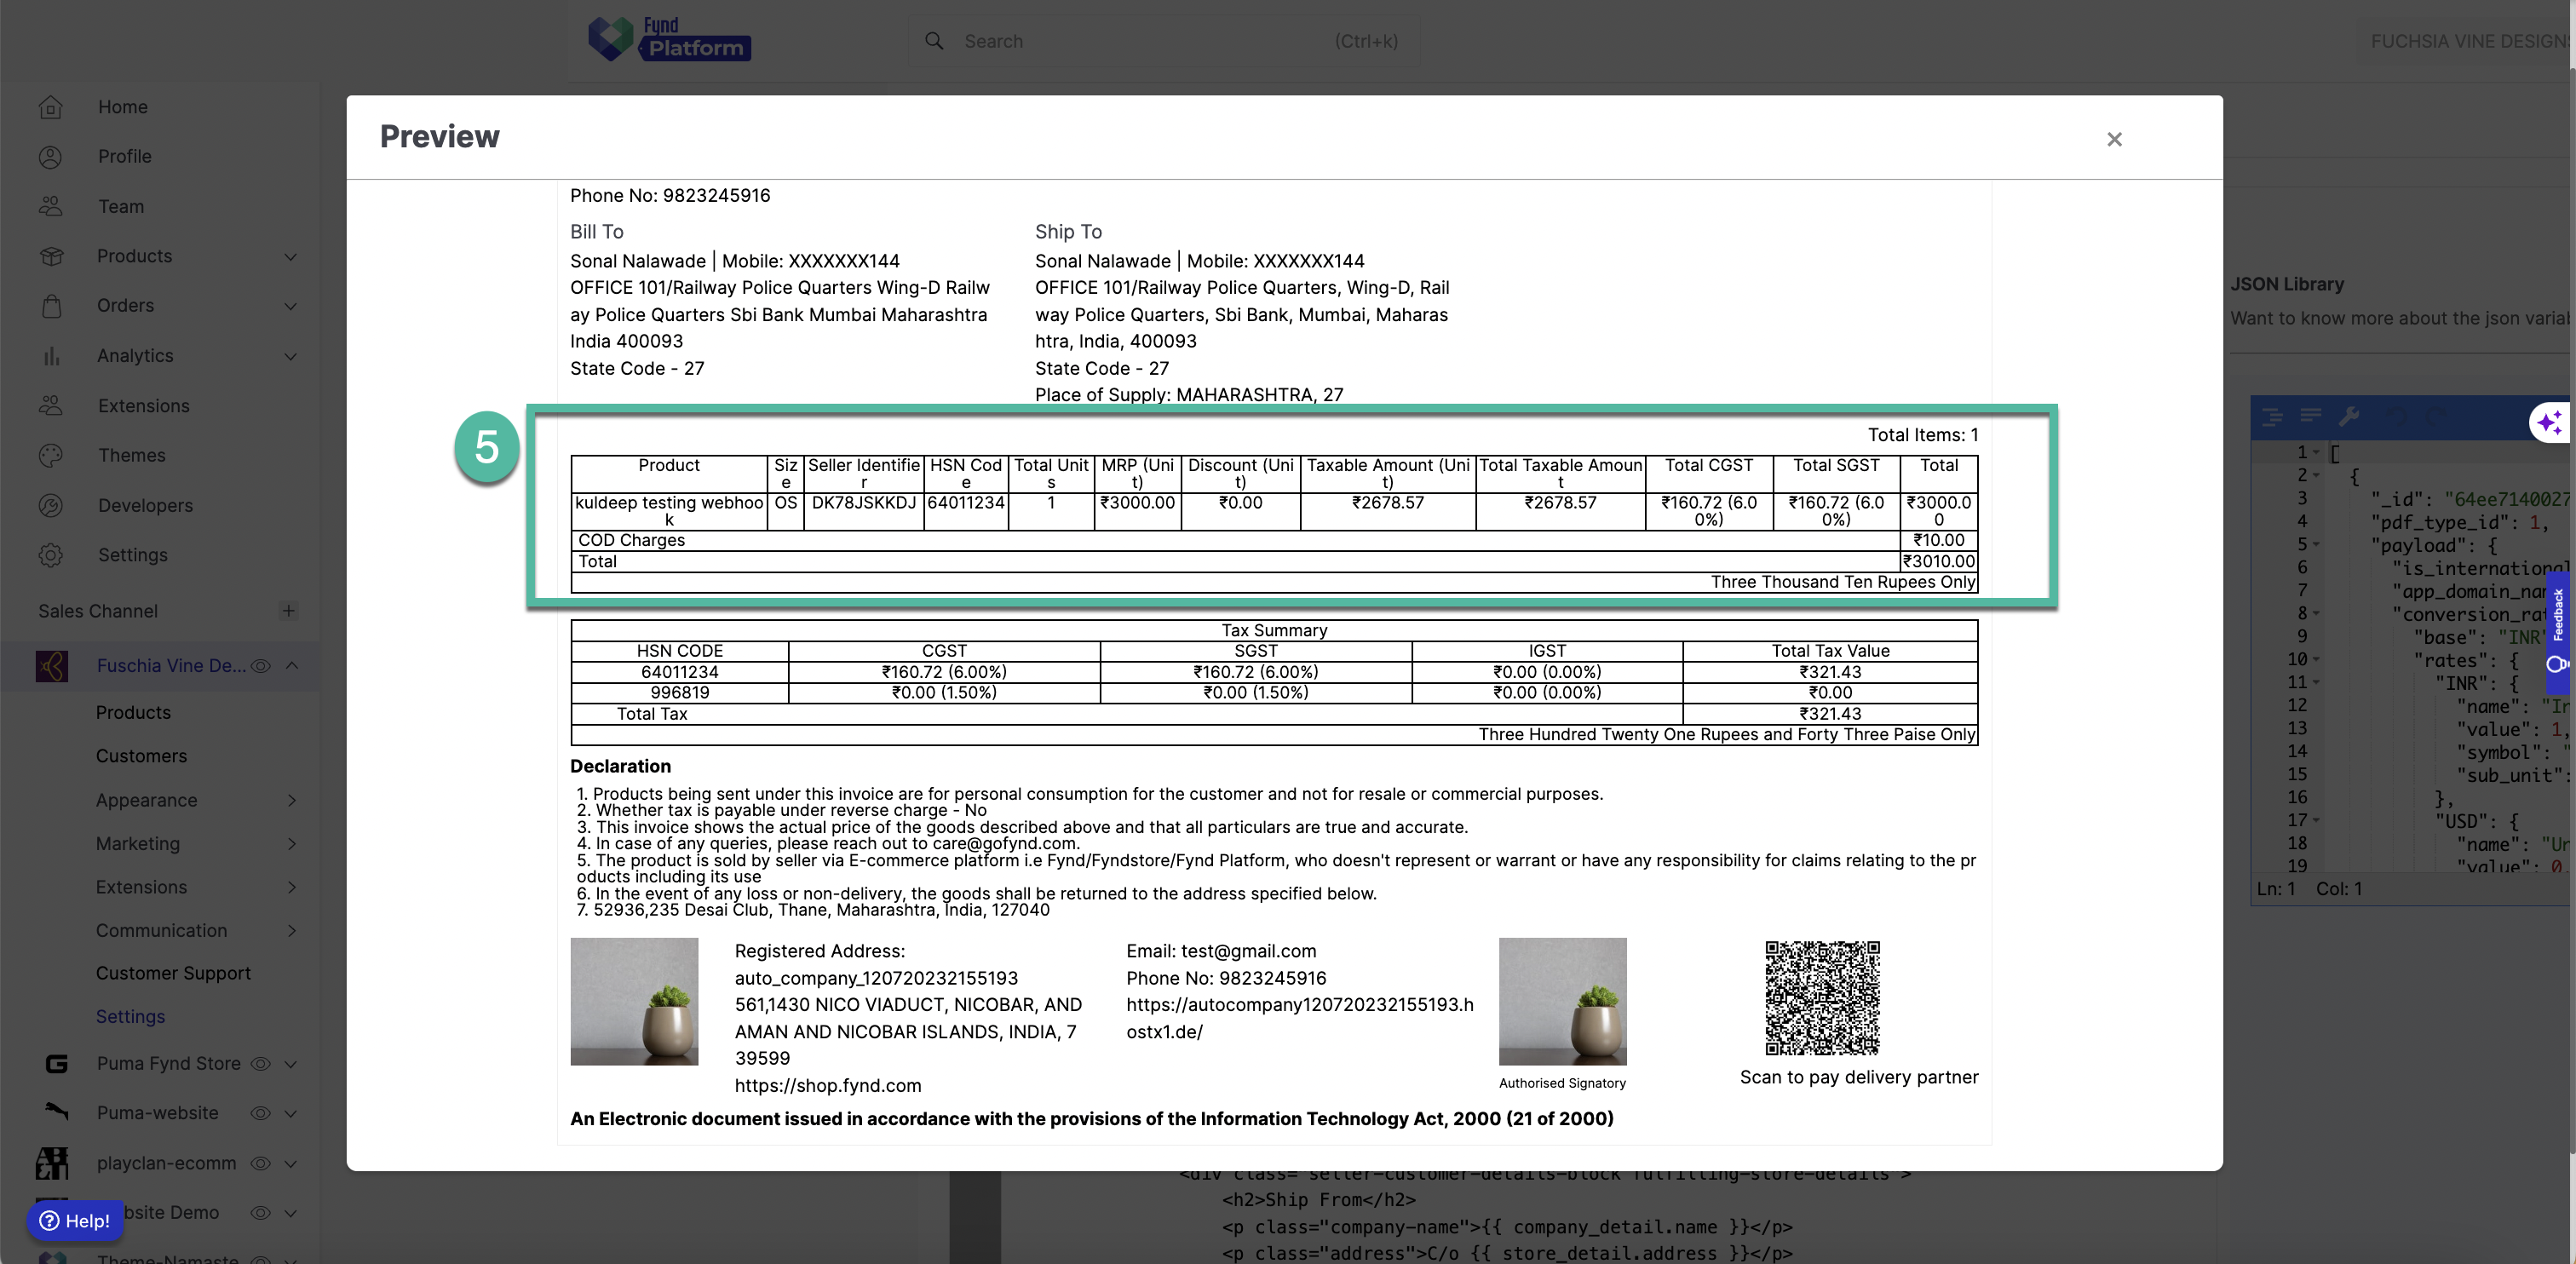
In your HTML invoice template, the "Product Details" section is where you display information about the items or products included in the invoice. This section typically includes details like product names, sizes, quantities, prices, discounts, taxes, and totals. To edit or customize the product details section, follow these steps:
1. Locate the Product Details Section:
Find the section in your template where the product details are displayed. This section should be under the "product-breakup" div and within the <table> element.
  <table class="product-finance-breakup">
      <tr class="heading-row">
          <th>Product</th>
          <th>Size</th>
          <th>Seller Identifier</th>
          <th>Total Units</th>
          <th>Actual Price(Unit)</th>
          <th>Discount (Unit)</th>
          <th>Taxable Amount (Excluding VAT)</th>
          <th>Total Taxable Amount (Excluding VAT)</th>
          <th>VAT</th>
          <th>Amount (including VAT)</th>
      </tr>
      {% for product in product_table.products %}
      <tr>
          <td>{{ product.name }}</td>
          <td>{{ product.size }}</td>
          <td>{{ product.seller_identifier }}</td>
          <td>{{ product.total_units }}</td>
          <td>{{conversion_rate.rates[currency_code].symbol}}{{ product.mrp.toFixed(2) }}</td>
          <td>{{conversion_rate.rates[currency_code].symbol}}{{ product.discount.toFixed(2) }}</td>
          <td>{{conversion_rate.rates[currency_code].symbol}}{{ product.taxable_amount.toFixed(2) }}</td>
          <td>{{conversion_rate.rates[currency_code].symbol}}{{ product.total_taxable_amount.toFixed(2) }}</td>
          <td>{{conversion_rate.rates[currency_code].symbol}}{{ product.tax.vat.value.toFixed(2) }} ({{ product.tax.vat.percent.toFixed(2) }}%)</td>
          <td>{{conversion_rate.rates[currency_code].symbol}}{{ product.total.toFixed(2) }}</td>
      </tr>
      {% endfor %}
      <!-- ... Other rows and totals ... -->
  </table>
2. Edit or Customize Product Information:
Replace the placeholders in the table with actual product information. For each product item, you'll typically have the following details:
product.name: Replace this with the actual name of the product.product.size: Replace with the product size or variant.product.seller_identifier: Customize this with a seller-specific identifier if needed.product.total_units: Set the number of units or quantity for the product.product.mrp: Update this with the actual unit price or MRSP (Manufacturer's Retail Selling Price).product.discount: If there's a discount for the product, update this field.product.taxable_amount: Enter the taxable amount for the product, excluding VAT or taxes.product.total_taxable_amount: The total taxable amount for this product.product.tax.vat.value: Update with the VAT amount for this product.product.tax.vat.percent: Customize this with the VAT percentage.
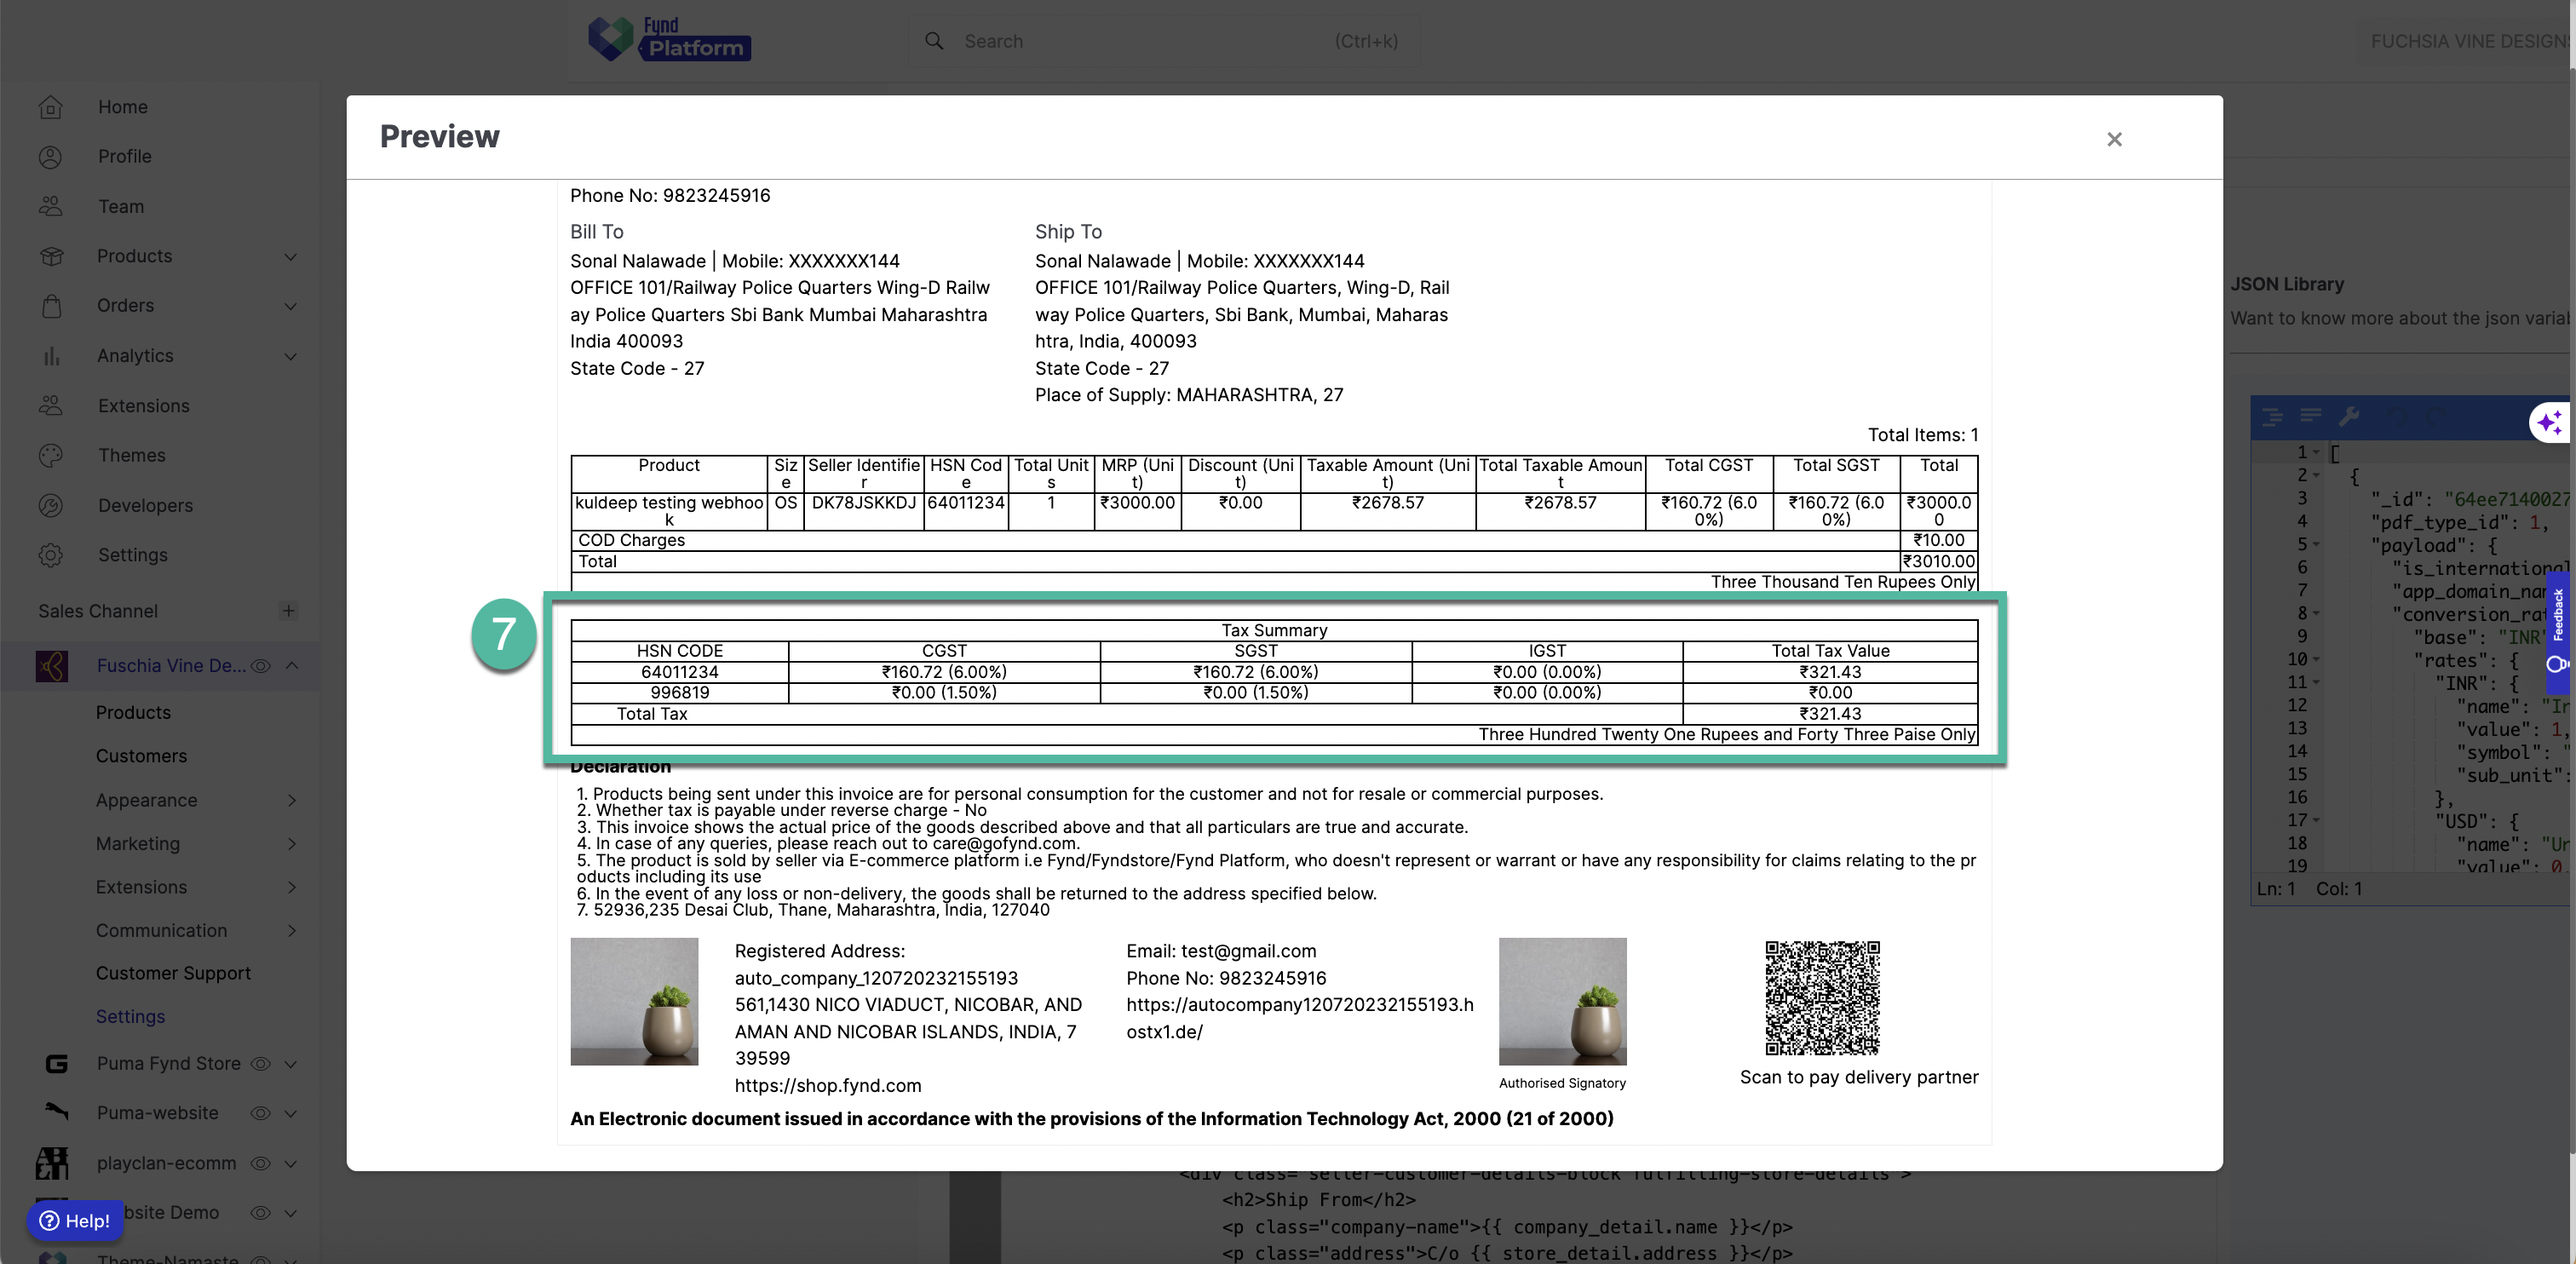
3. Additional Rows and Totals:
Depending on your specific invoice format and requirements, you might have additional rows for details like delivery charges, COD charges, subtotal, and grand total. Customize these sections as needed to accurately reflect your product and order details.
4. Save Your Changes:
After editing or customizing the product details, make sure to save your HTML file. This ensures that your invoice template reflects the accurate product information.
By customizing the product details section in your invoice template, you can create invoices that accurately represent the products or services you're billing for. Ensure that all product-related information, including names, prices, and quantities, matches the details of the specific transaction or order you're invoicing.
6. Edit Footer Information
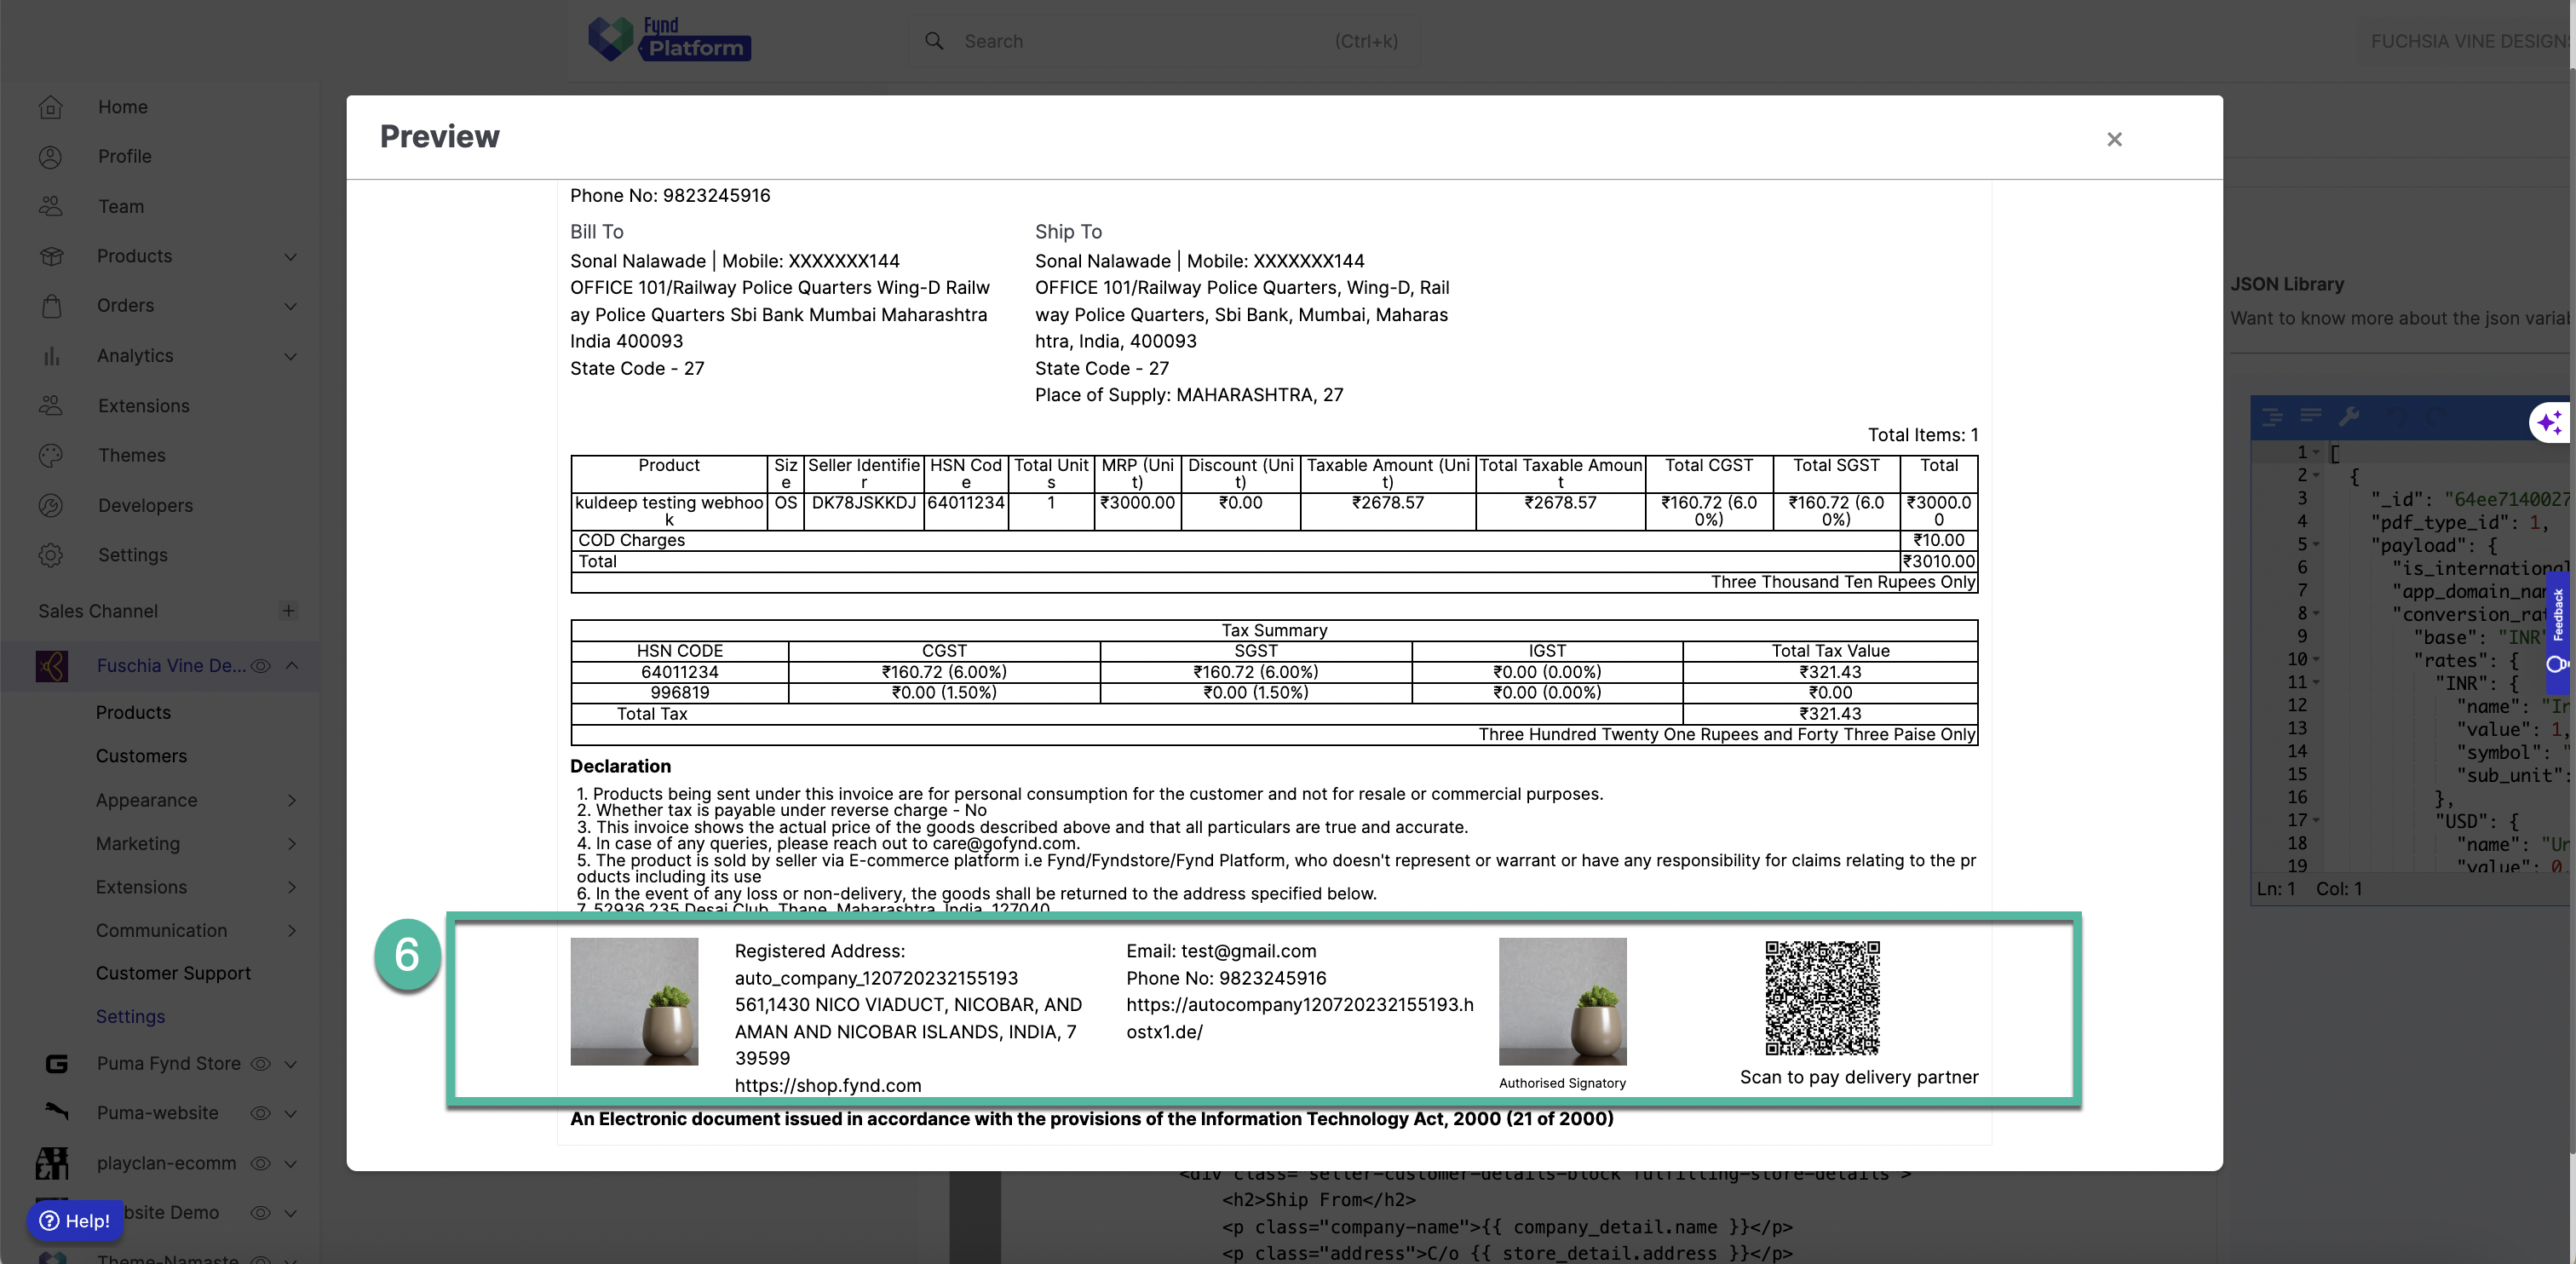
In your HTML invoice template, the "Footer Information" section typically includes essential details about your company, contact information, logos, disclaimers, and digital signatures. To edit or customize the footer information, follow these steps:
1. Locate the Footer Information Section:
Find the section in your template that contains the footer information. This section is usually at the bottom of the invoice, following the product details and the total calculations.
<div class="invoice-footer-section">
    <div class="brand-logo">
        <img src="{{ product_table.products[0].brand.logo }}" alt="Brand Logo" width="100px" />
    </div>
    <div class="company-registered-address">
        <p class="address">
            Registered Address:
        </p>
        <p>{{ company_detail.name }}</p>
        <p> {{ registered_company_detail.address }}</p>
        {% if company_detail.cin %}
        <p>CIN - {{ company_detail.cin }}</p>
        {% endif %}
        {% if app_domain_name %}
        <p>
            {{ app_domain_name }}
        </p>
        {% endif %}
    </div>
    <div class="company-contact-number">
        {% if company_detail.email %}
        <p class="email">Email: {{ company_detail.email }}</p>
        {% endif %}
        {% if company_detail.phone_no %}
        <p class="phone">Phone No: {{ company_detail.phone_no }}</p>
        {% endif %}
        {% if company_detail.website_url %}
        <p class="phone">{{ company_detail.website_url }}</p>
        {% endif %}
    </div>
    {% if digitalsignature %}
    <div class="digital-signature">
        <img src="{{ digitalsignature }}" alt="signature-image" />
        <p class="sign-text">Authorised Signatory</p>
    </div>
    {% endif %}
</div>
2. Edit or Customize Company Information:
company_detail.name: Replace this with the registered name of your company.registered_company_detail.address: Customize this with your company's registered address.company_detail.cin: If applicable, replace it with your company's CIN (Corporate Identification Number).app_domain_name: Include your company's domain name or website URL if necessary.company_detail.email: Update with your company's email address.company_detail.phone_no: Customize this with your company's phone number.company_detail.website_url: If applicable, include your company's website URL.
3. Add Your Brand Logo:
To include your company's brand logo, update the img tag with the correct source (src) and alt text. You can set the width attribute to control the logo's size.
<div class="brand-logo">
<img src="your-brand-logo.png" alt="Your Brand Logo" width="100px" />
</div>
4. Include Digital Signatures:
If your invoices require authorized signatures, you can include a digital signature image and a corresponding text. Replace the placeholders with the correct image source (src) and text.
{% if digitalsignature %}
<div class="digital-signature">
    <img src="your-signature-image.png" alt="Authorized Signature" />
    <p class="sign-text">Authorised Signatory</p>
</div>
{% endif %}
5. Save Your Changes:
After customizing the footer information, save your HTML file to ensure that your invoice template displays the correct company details, logos, and signatures.
By personalizing the footer information in your invoice template, you can create professional and branded invoices that include essential company information and signatures as needed for your business requirements. Ensure that the details are accurate and up-to-date in your invoices.
7. Edit Payment Information
In your HTML invoice template, the "Payment Information" section provides details about the payment associated with the invoice. You can customize this section to display payment-related information as per your business requirements.
Here's how to edit or customize the payment information in your invoice template:
1. Locate the Payment Information Section:
Find the section in your template where payment-related information is displayed. This section typically comes after the product details, totals, and footer information.
{% if payments[0].payment_type | upper !== "CASH ON DELIVERY" and payments[0].payment_type | upper !== "COD" %}
<div class="invoice-details">
    <span>
        Payment Date: {{ payments[0].date }}
    </span>
    <span>
        |
    </span>
    <span>
        Transaction Id: {{ payments[0].transaction_id }}
    </span>
    <span>
        |
    </span>
    <span>
        Payment Amount: {{conversion_rate.rates[currency_code].symbol}}{{ amount_paid.toFixed(2) }}
    </span>
    <span>
        |
    </span>
    <span>
        Mode of Payment:
        {% for payment in payments %}
        {% if loop.last %}
        {{ payment.payment_type }}
        {% else %}
        {{ payment.payment_type }},
        {% endif %}
        {% endfor %}
    </span>
</div>
{% endif %}
2. Edit or Customize Payment Details:
payments[0].date: Replace this with the actual payment date for the invoice.payments[0].transaction_id: Customize this with the transaction ID or reference for the payment.amount_paid.toFixed(2): Update with the correct payment amount. Make sure it's formatted as needed.payment_type: You can customize the "Mode of Payment" section to display the payment methods used. Edit this part to reflect the payment methods accepted by your business. The example code loops through thepaymentsarray and displays each payment method. You can modify this loop to meet your needs.
3. Conditional Display:
The code contains a conditional statement that ensures the payment details are only displayed if the payment type is not "CASH ON DELIVERY" or "COD." You can customize this condition according to your business logic or remove it if you want to display payment information regardless of the payment type.
4. Save Your Changes:
After customizing the payment information, save your HTML file to ensure that your invoice template reflects the accurate payment details.
Customizing the payment information in your invoice template helps you communicate the specific payment details associated with each invoice. It's essential to ensure that these details are accurate and consistent with your business processes.
Miscellaneous (Summary)
For Customizations
Customizing the invoice template is crucial to make it align with your business branding and requirements. In your provided HTML template, here's how you can make various customizations:
1. Change the Invoice Title:
You can change the title "Tax Invoice" to something else by modifying the following line:
<h1 class="heading">Tax Invoice</h1>
Replace Tax Invoice with your desired title.
2. Edit Header Information:
Update or edit the header information, such as the sub-heading, delivery partner name, VAT/TRN number, invoice ID, invoice date, shipment ID, and IRN. These details can be changed within the <div class="left-block"> section of your template.
3. Logo and QR Code:
Replace or remove the logo and QR code sections. If you want to display your brand logo or a different QR code, you can modify or replace the <img> tags within the <div class="center-block"> and <div id="qrcode"> sections.
4. Seller and Customer Details:
Modify the seller and customer details sections to include accurate information. These details are located in the <div class="seller-customer-details"> section. Customize the "Sold By," "Ship From," "Bill To," "Ship To," and "Return To" sections to reflect the actual details.
5. Product Details:
Update product-related information, such as product names, sizes, seller identifiers, unit prices, discounts, taxable amounts, VAT, and total amounts. These details are displayed within the <table class="product-finance-breakup">. Customize the data within the <tr> and <td> elements according to your product listings.
6. Footer Information:
Customize the footer information, including the brand logo, registered address, company contact details, and digital signature. These elements can be modified within the <div class="invoice-footer-section"> section.
7. Payment Information:
Edit the payment details section to display accurate payment information. Adjust the payment date, transaction ID, payment amount, and mode of payment as explained in a previous response. You can also customize how payment methods are displayed.
8. Custom Styling:
Adjust the styling in your CSS to change fonts, colors, spacing, and layout. You can modify the CSS properties, such as font-size, color, and margin, to achieve your desired visual style.
9. Conditional Elements:
If there are conditional elements, like displaying certain information based on the payment method, you can modify or remove these conditions to match your business logic.
10. Testing:
Before deploying the customized template, it's essential to test it with sample data to ensure that it appears as expected and all customized information is correctly displayed.
Once you've made these customizations, save the HTML file, and you'll have a personalized invoice template ready for use in your business. Remember to test it with different scenarios to ensure it meets your invoicing requirements.