Size Comparison
Introduction
Size Comparison extension helps your customers visualize the dimensions of your products. When customers see that the size is right for them, it is easy to feel reassured. You can use this assurance to sell more. Also, it helps you reduce your returns. When customers use size compare feature on PDP, a panel appears that allows them to compare and even purchase more items from your website.
Steps to use Size Comparison Extension
Go to Extensions in Fynd Platform.

Figure 1: Extensions Section - Fynd Platform Click Size Comparison extension.

Figure 2: Size Comparison Extension noteOnce you have installed this extension, it will be available in the list here.
Select desired sales channel. Here, we have selected 'testk'.

Figure 3: Selecting Desired Sales Channel Click Bulk Upload.
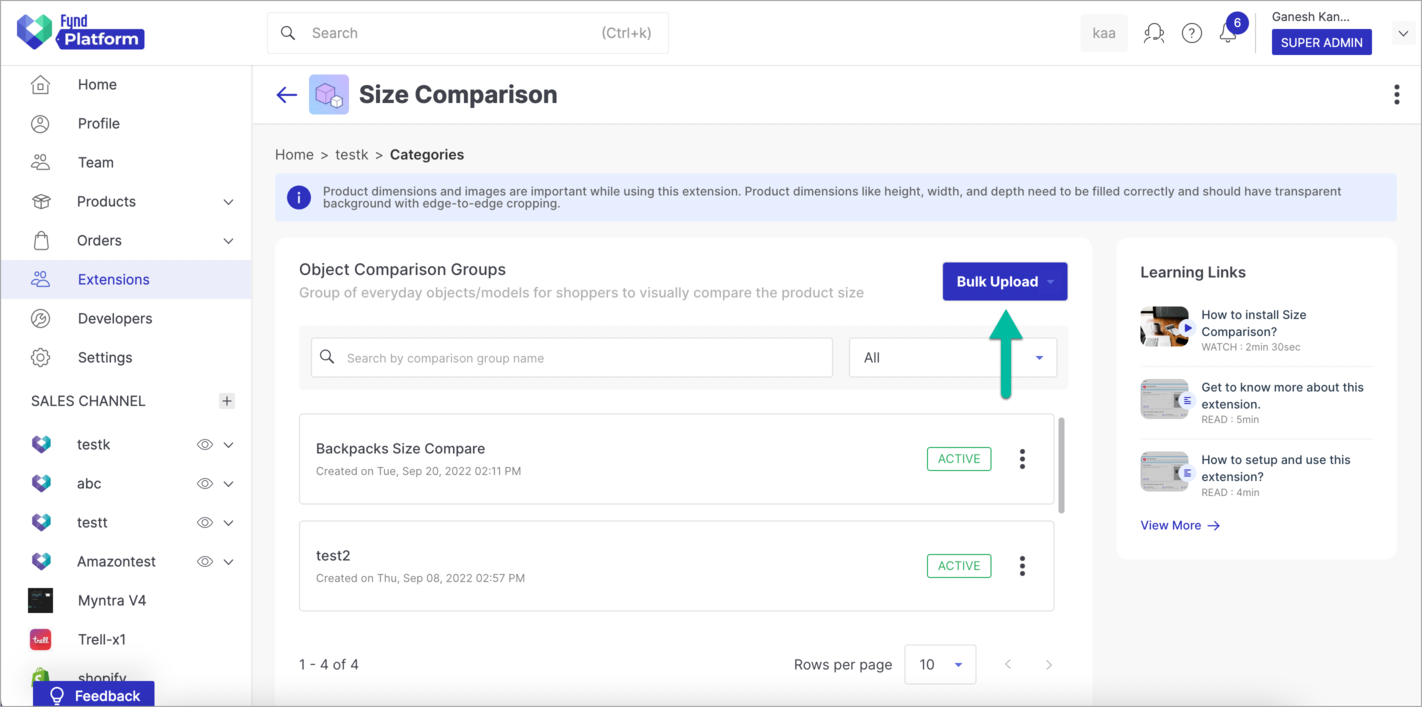
Figure 4: Clicking Bulk Upload Button Go to Template.

Figure 5: Selecting Template Option noteIf you wish to update the existing object comparison group, then please choose 'Existing Group' option.
Click Download File to download the sample file.
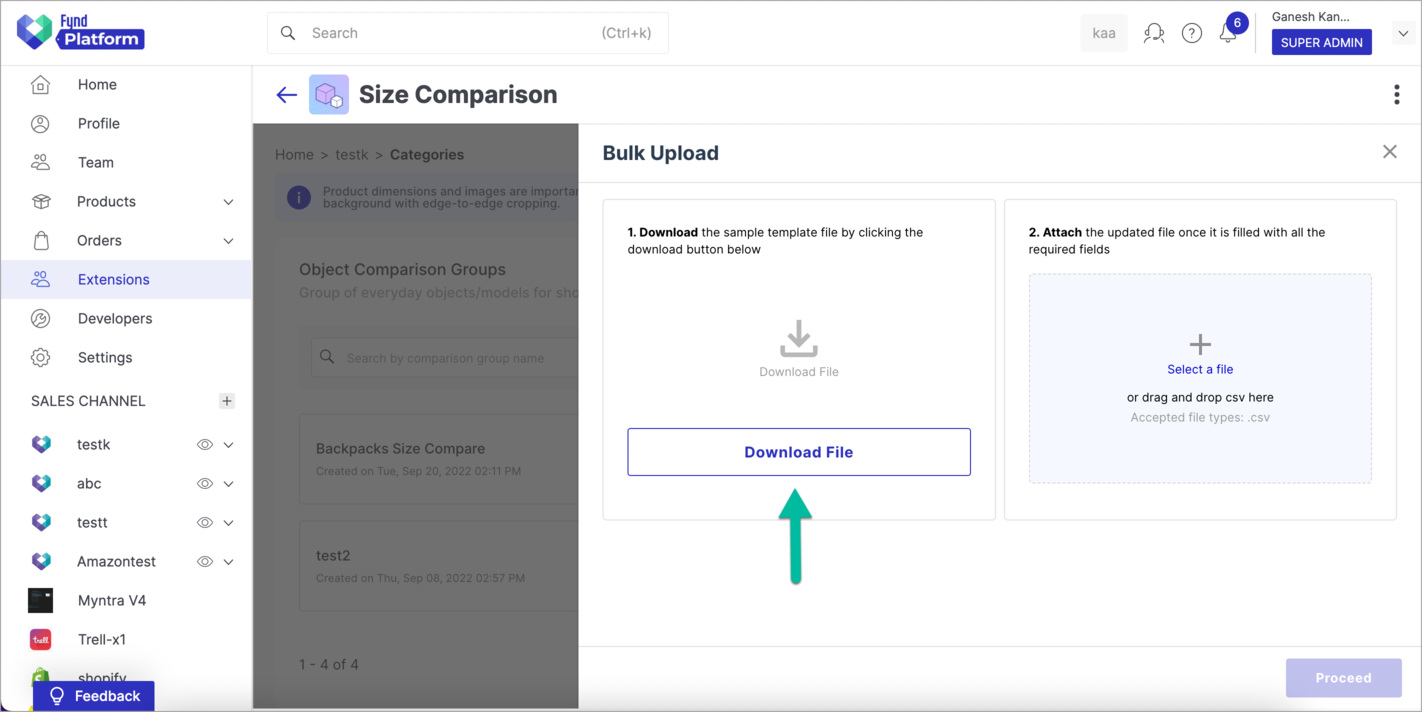
Figure 6: Clicking Download File Button Open the sample file.
Fill details of the products to which you want to add size comparison feature.
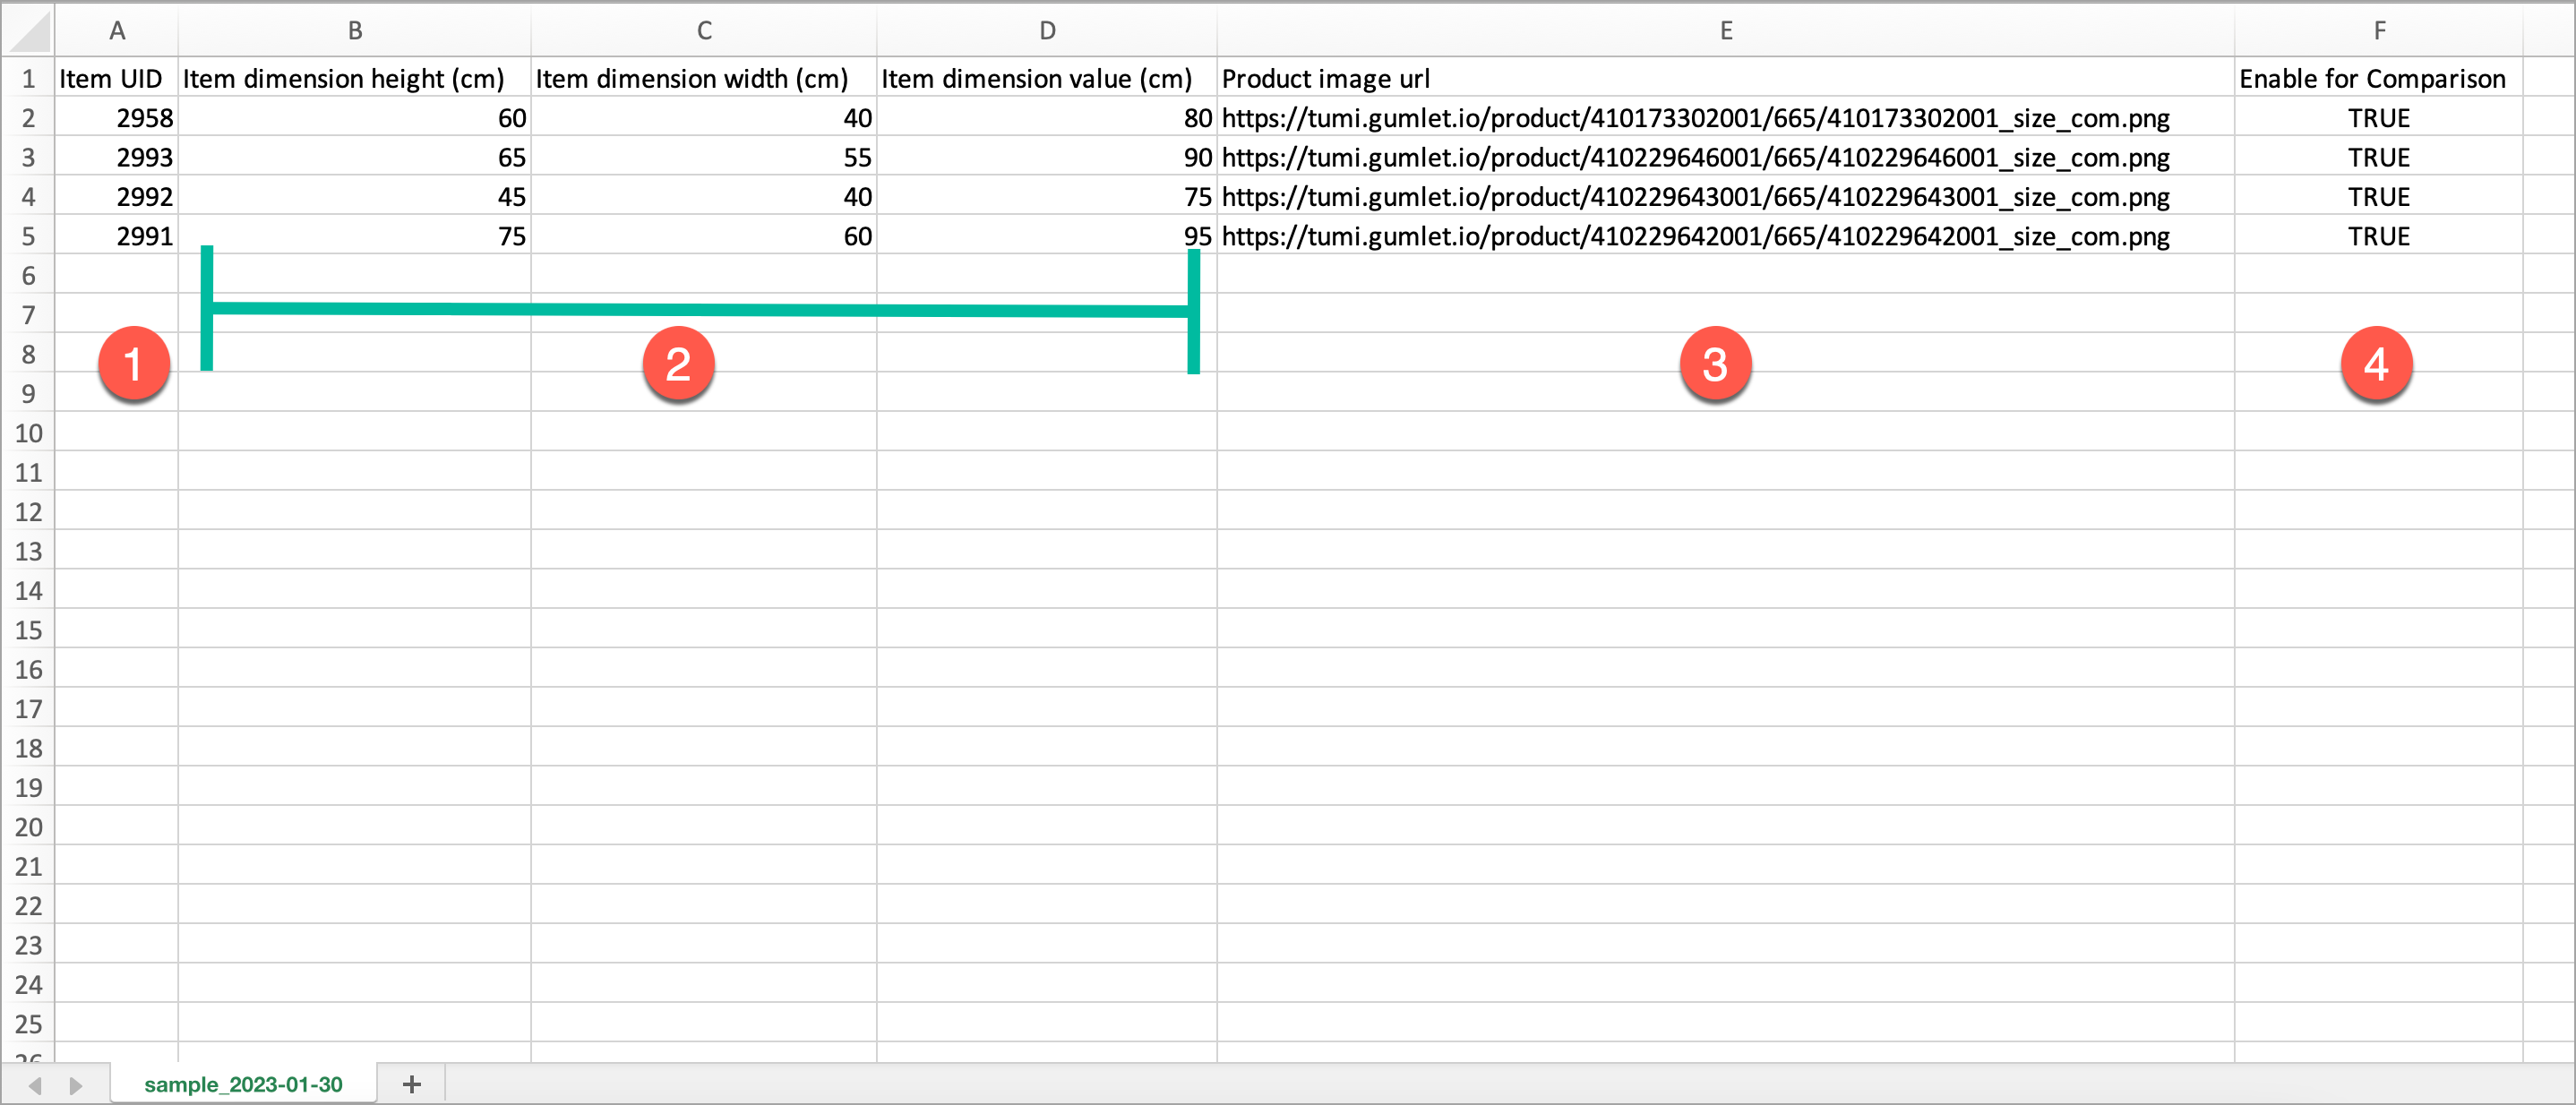
Figure 7a: Details of Multiple Products Item UID - This can be found in exported catalogue of products in Fynd Platform. It is present under column name 'UID' in exported catalogue file (Refer Figure 7b). Click here to learn how to export a catalogue in Fynd Platform.
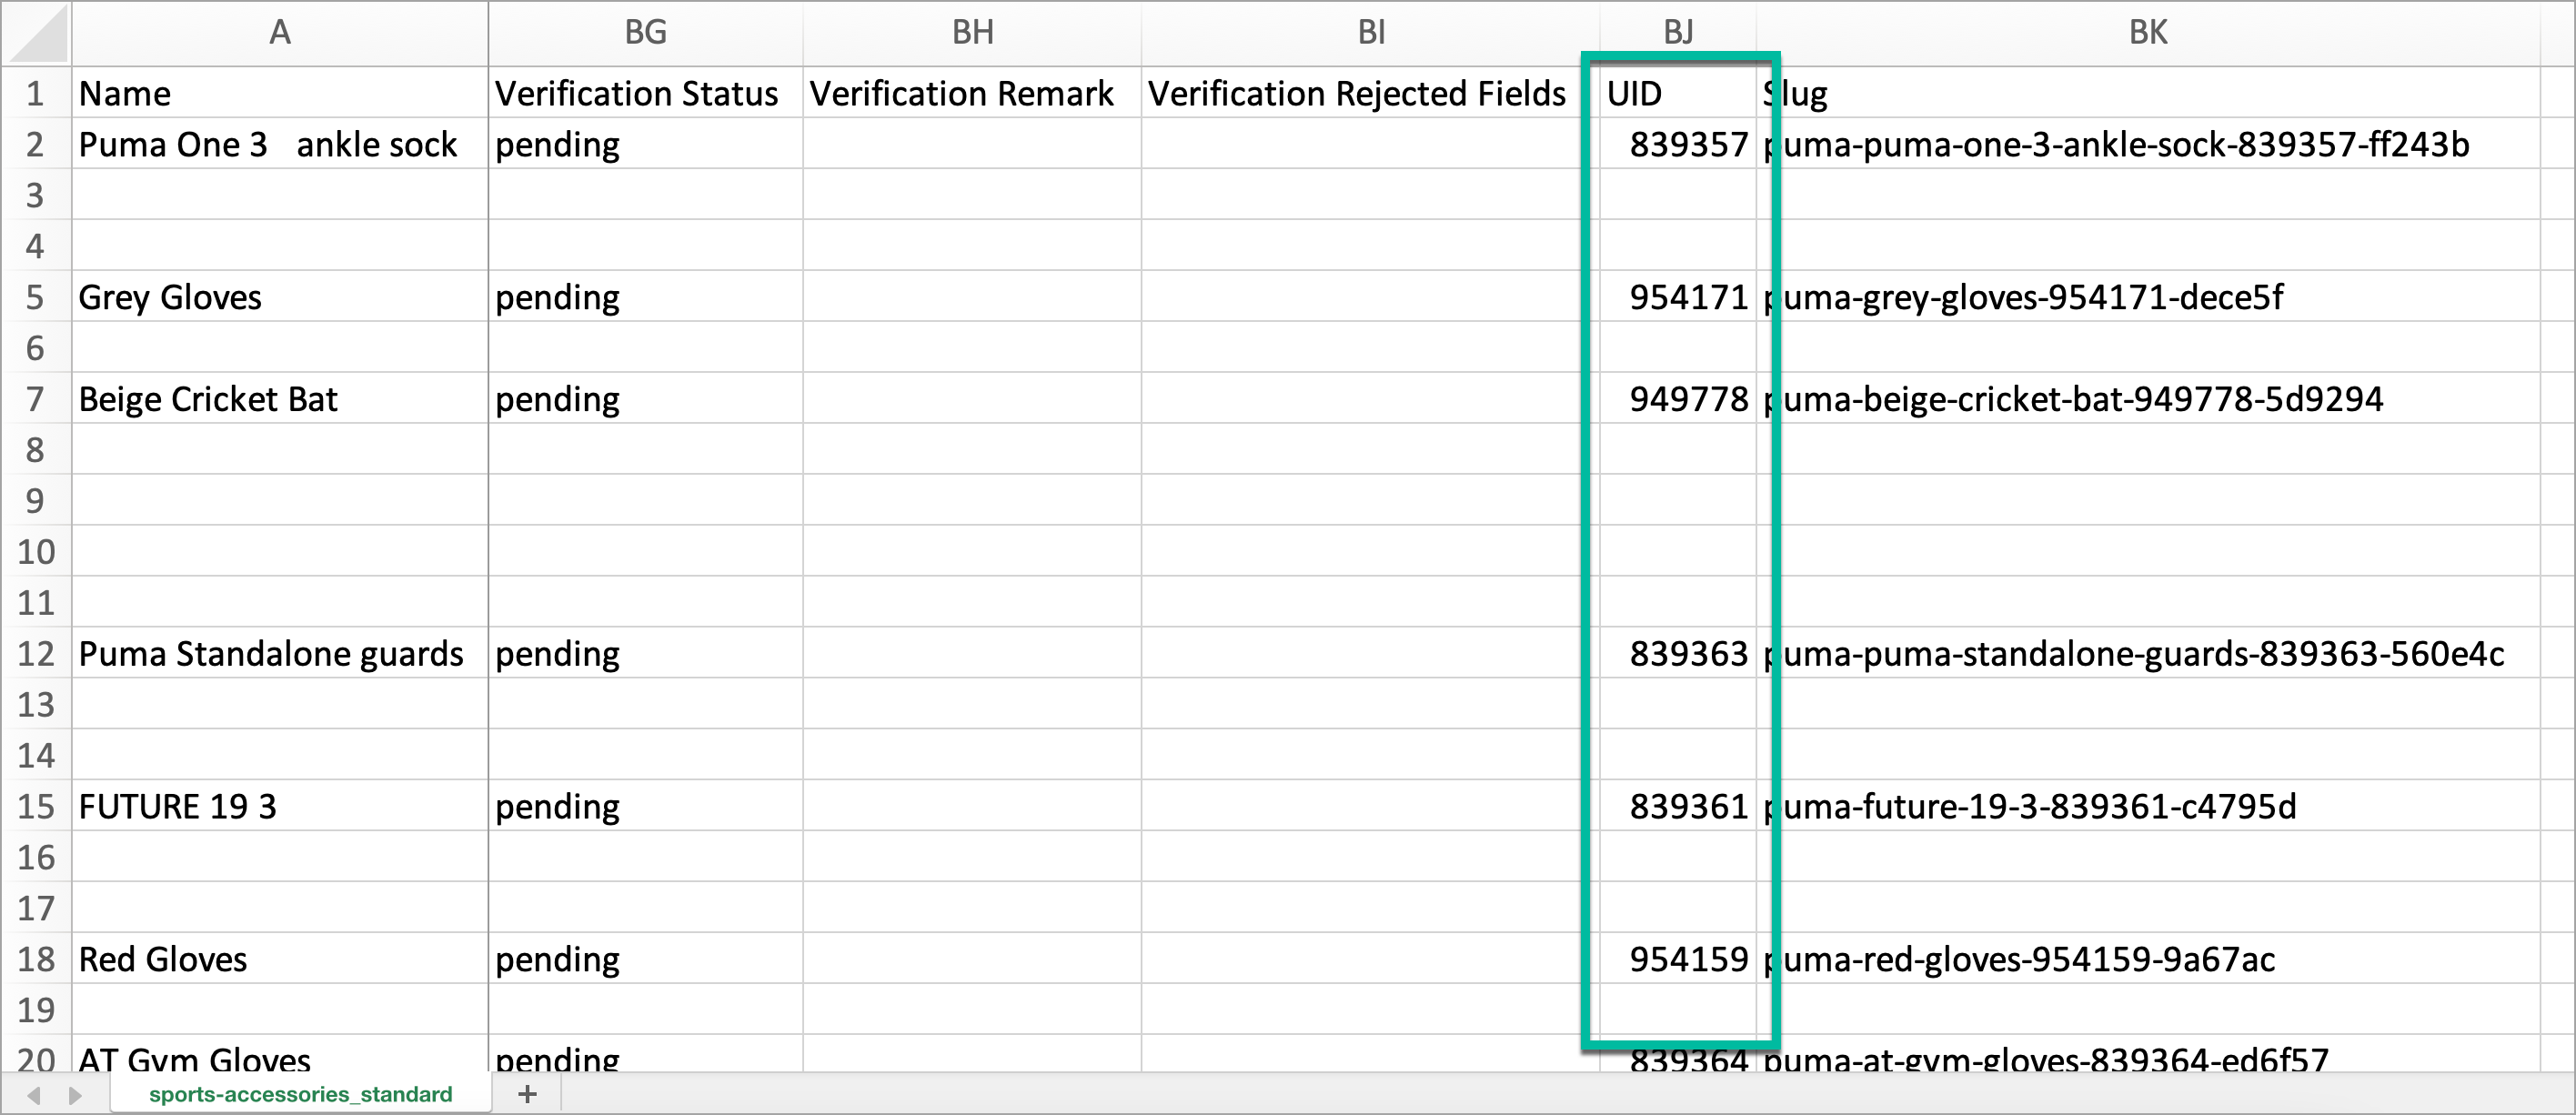
Figure 7b: Item UID in Catalogue Item Dimensions - Fill in the product dimensions like height, width, and depth in the file correctly. These dimensions are the actual dimensions of the product and not the ones which you entered in the catalogue.
Product Image URL - Enter the image link for the products. The supported file format is PNG or JPEG. Also, product images should have transparent background with edge-to-edge cropping. You can use our free image hosting source PixelBin.io to upload your product images with transparent background.
Enable for Comparison - Keep only those products to which you want to enable size comparison and mark 'TRUE'. In future, if you want to disable size comparison, make sure you mark 'FALSE' for that product in the file.
noteAll fields in the file are mandatory.
Save the file.
Click Select a file to upload the saved file.

Figure 8: Clicking Select a File Option Click Proceed.
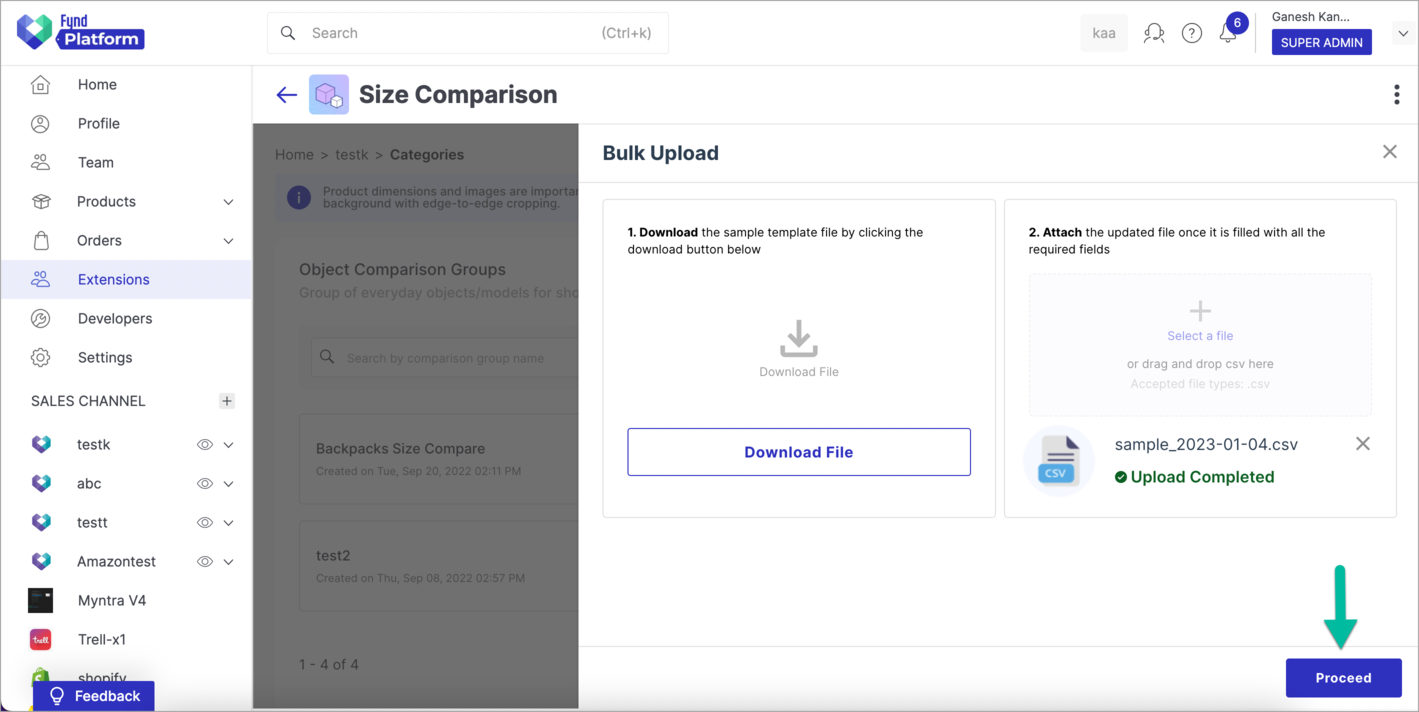
Figure 9: Clicking Proceed Button Enter suitable name to your object comparison group in Group Name field. For e.g., Bags.

Figure 10: Providing Suitable Group Name Click Create Group.
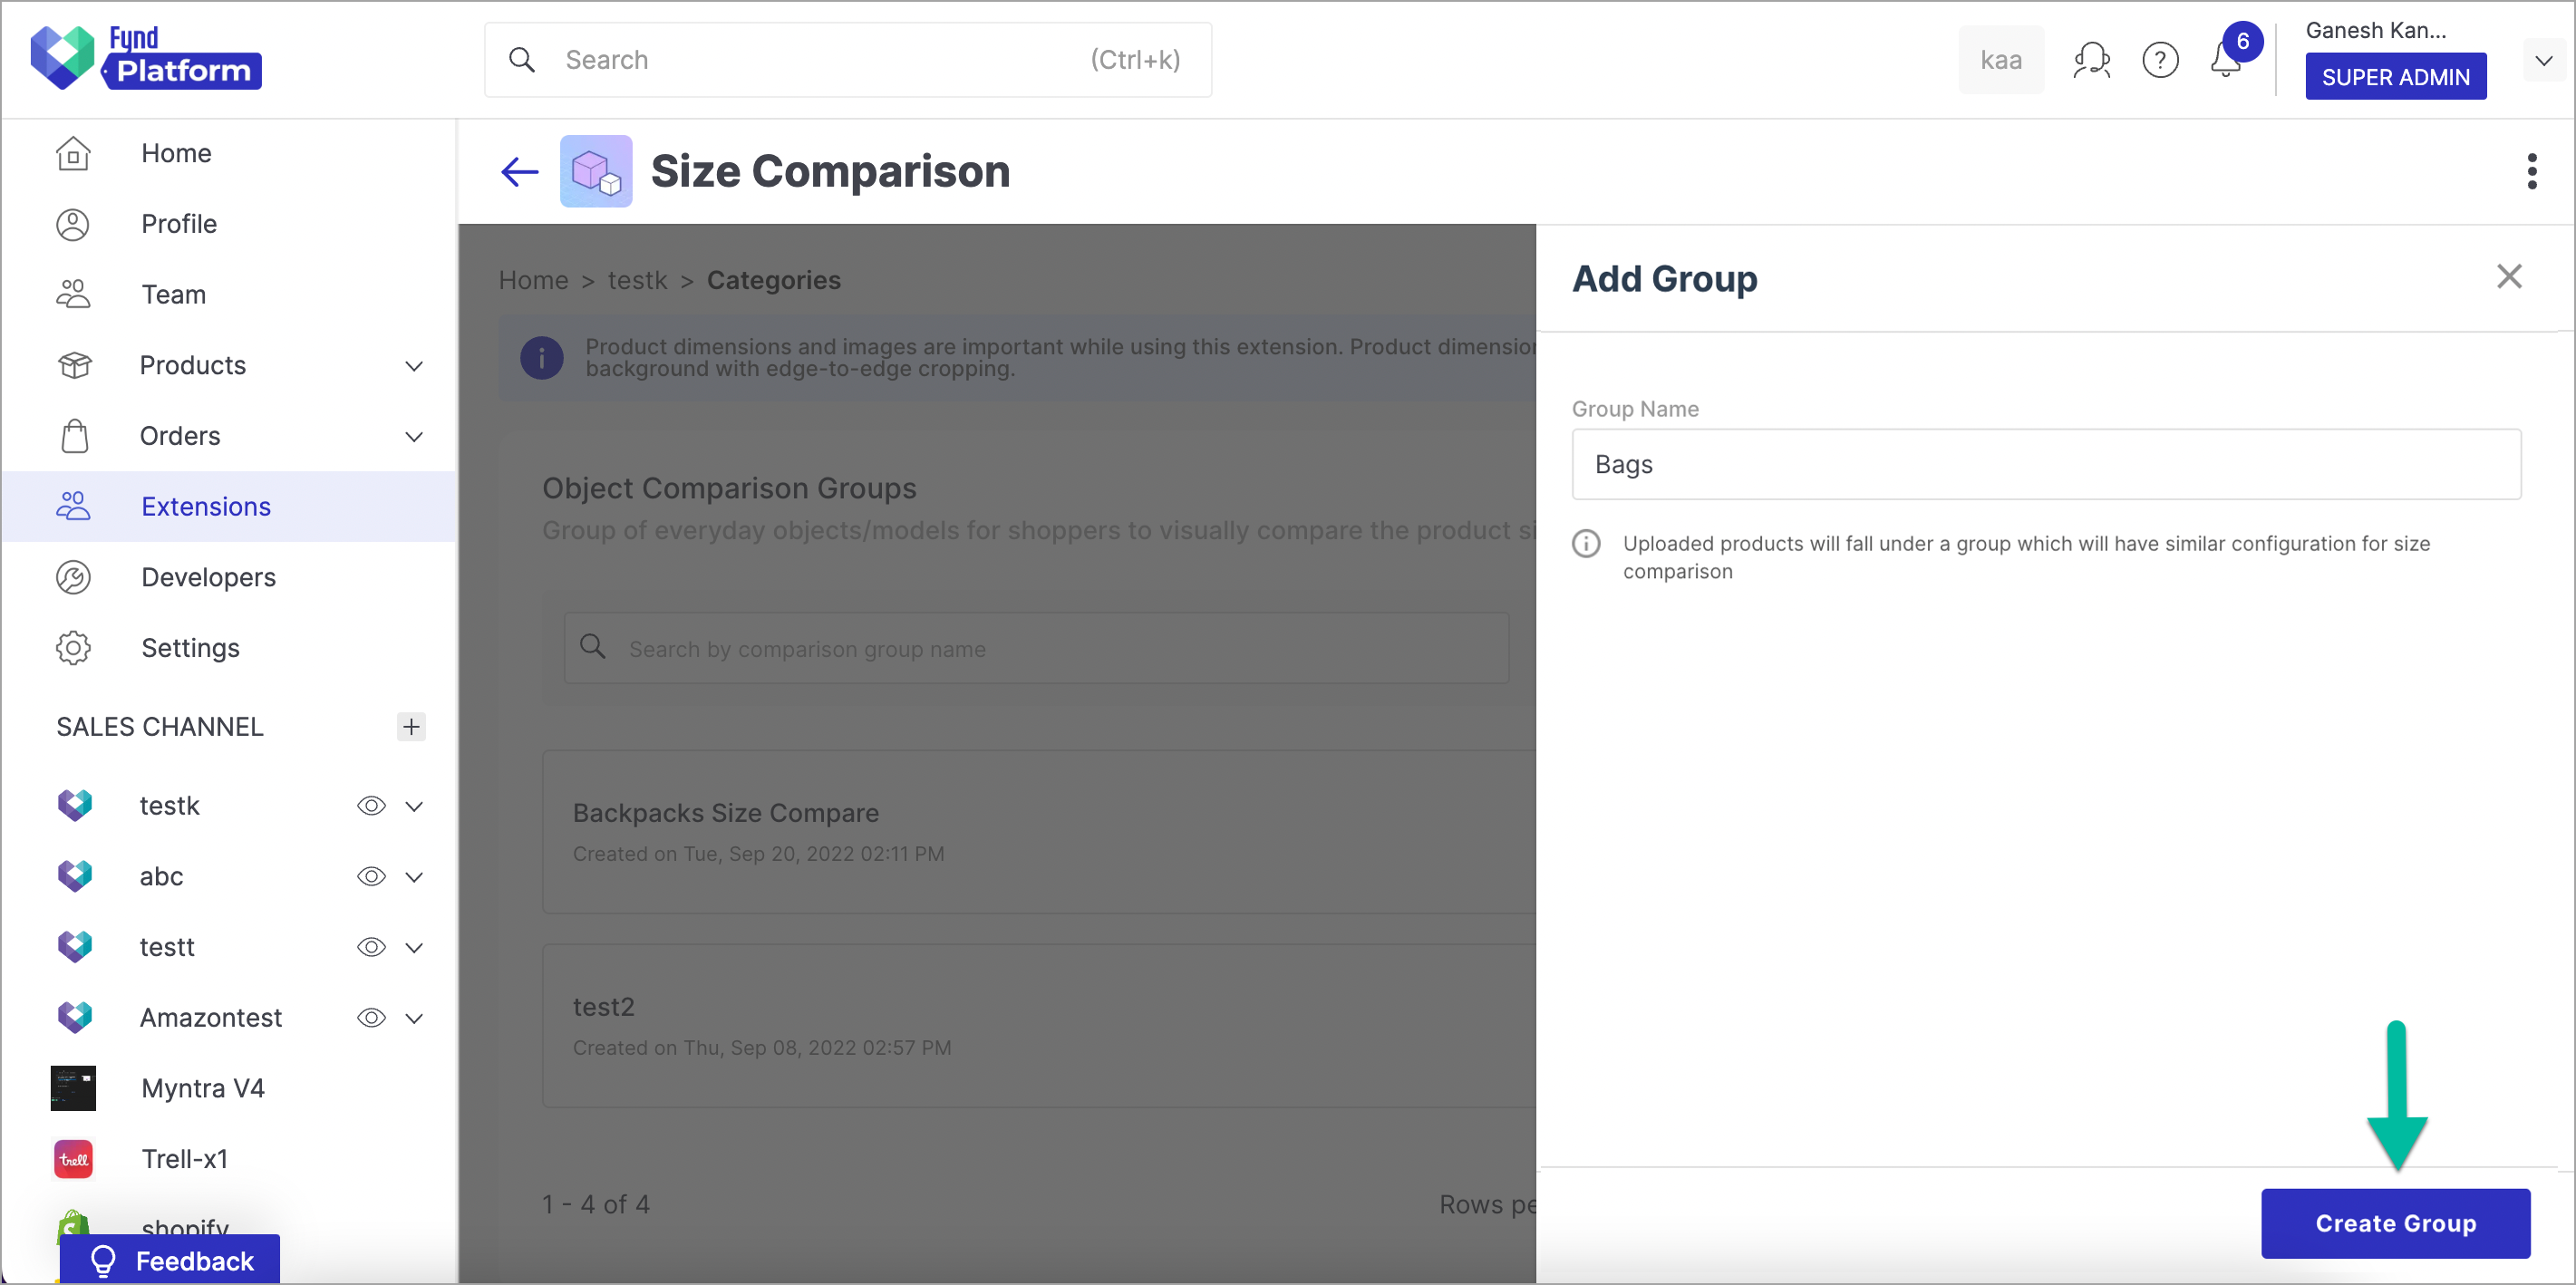
Figure 11: Clicking Create Group Button You will see that 'Bags' group has been created successfully. Its status is INACTIVE initially.
Open the object comparison group that you have created.
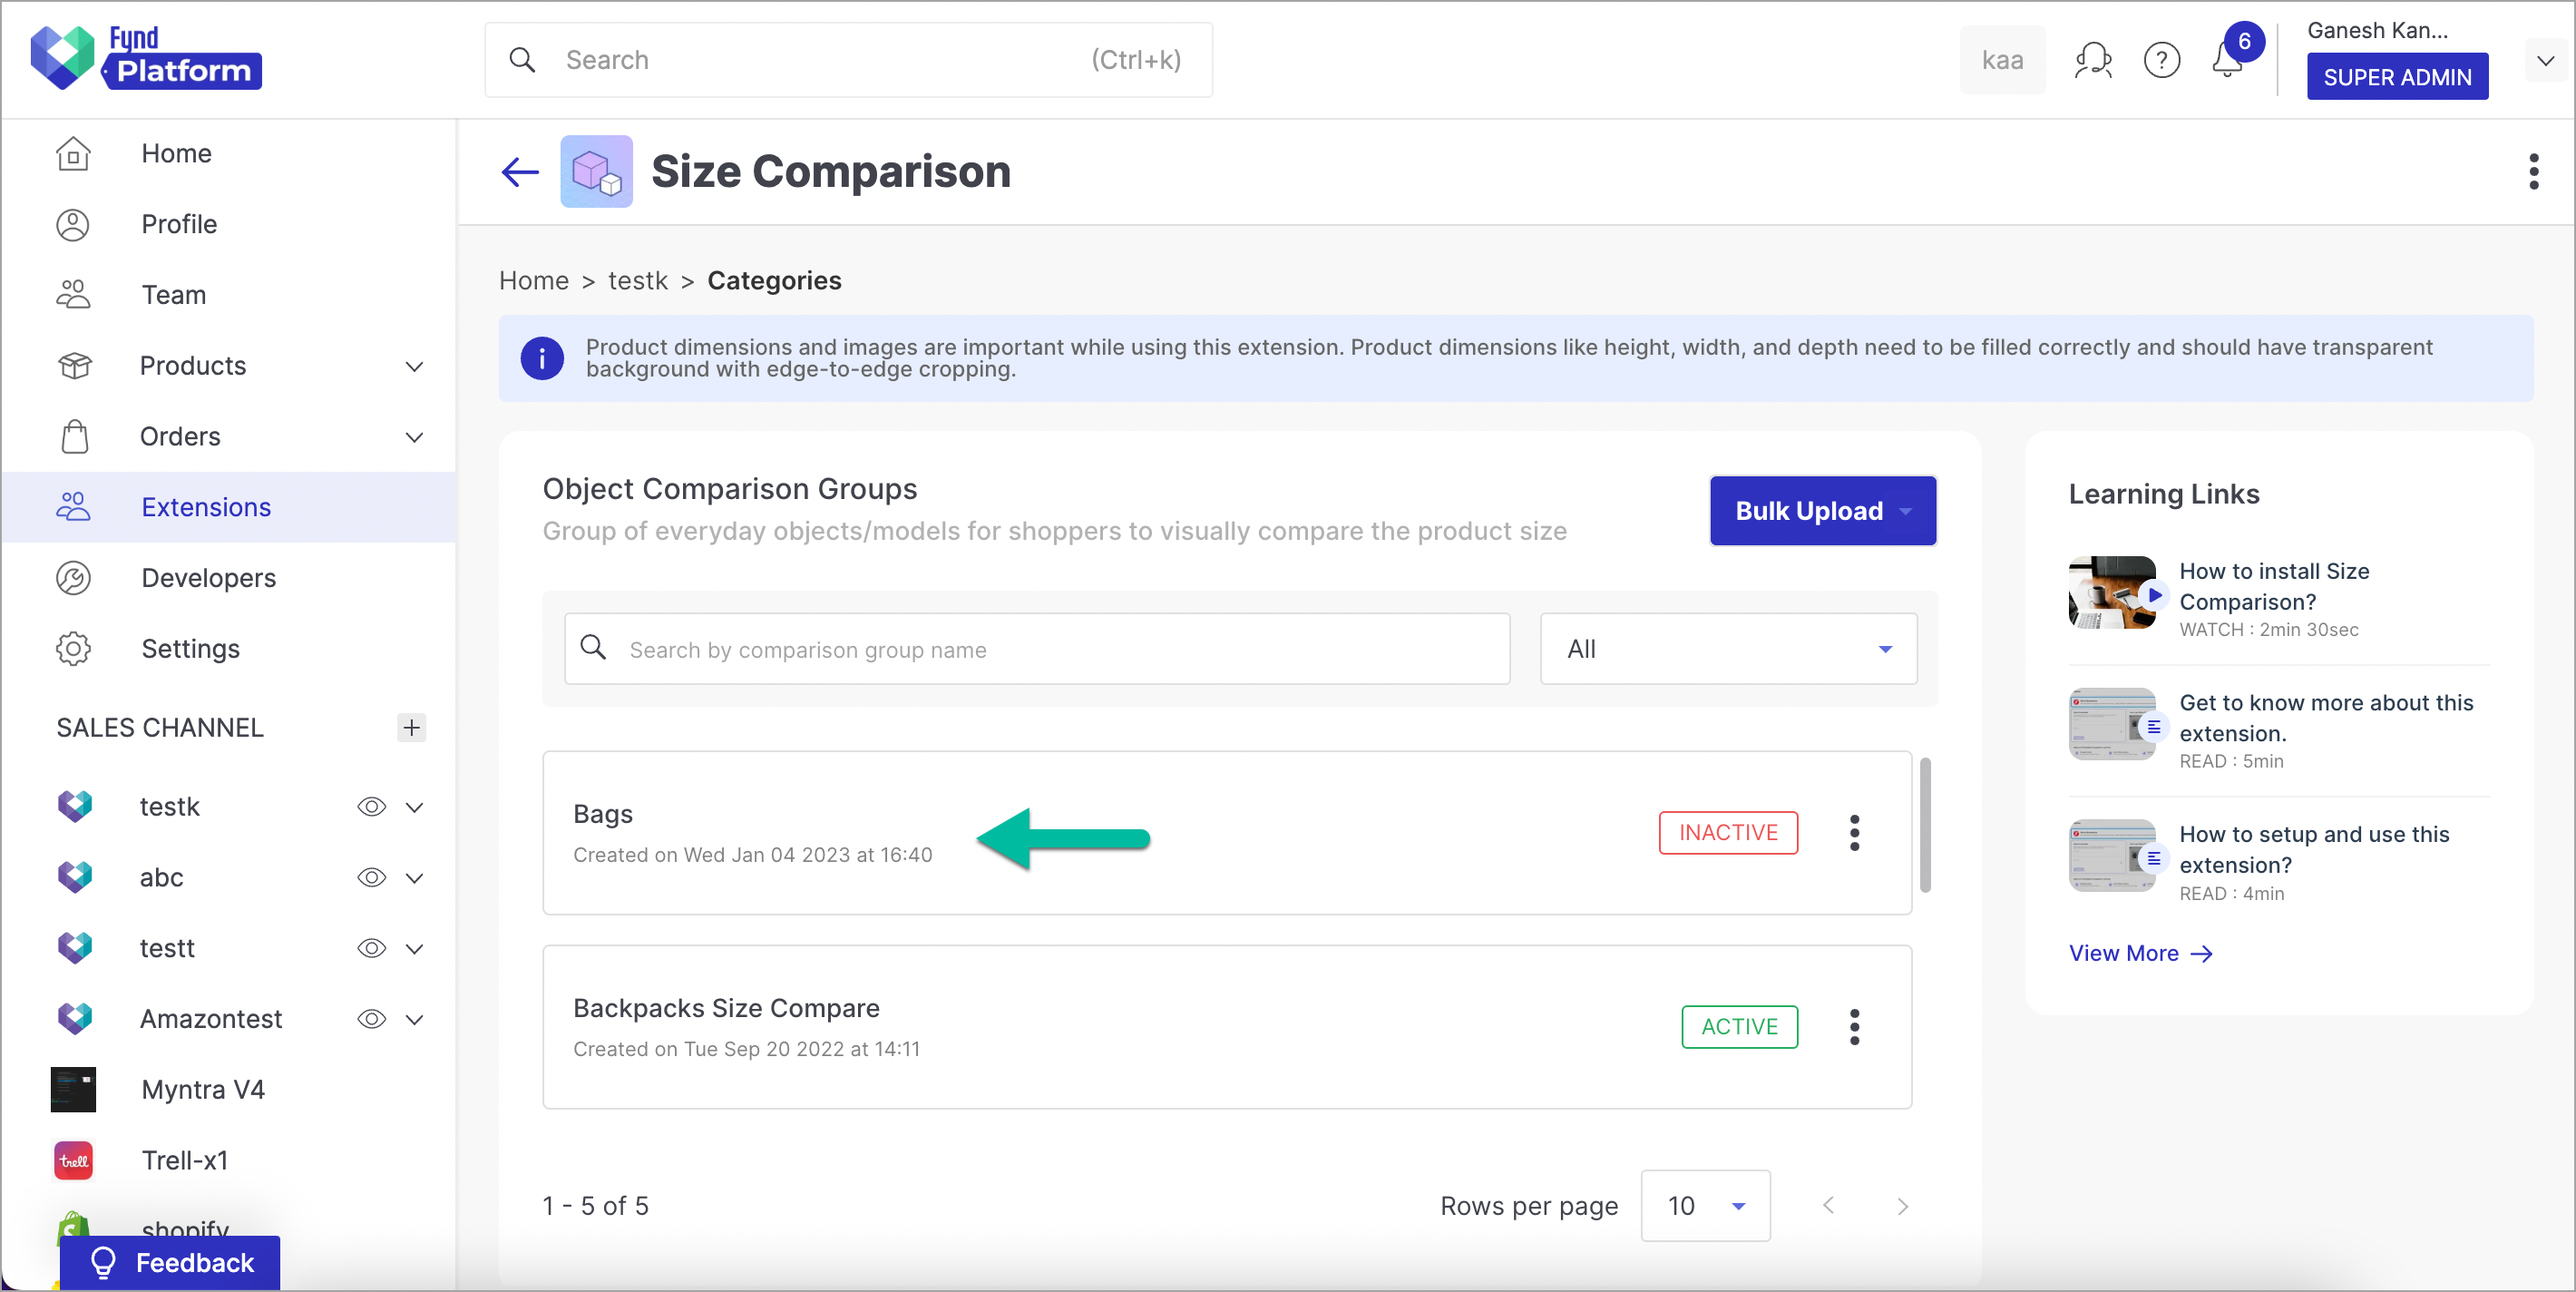
Figure 12: Object Comparison Group (Inactive) Turn ON the toggle button for objects/models that you wish to add in your object comparison group.

Figure 13: Adding Objects/Models Turn ON the toggle button to activate 'Bags' group on PDPs (Refer Figure 14a).
Click Save.
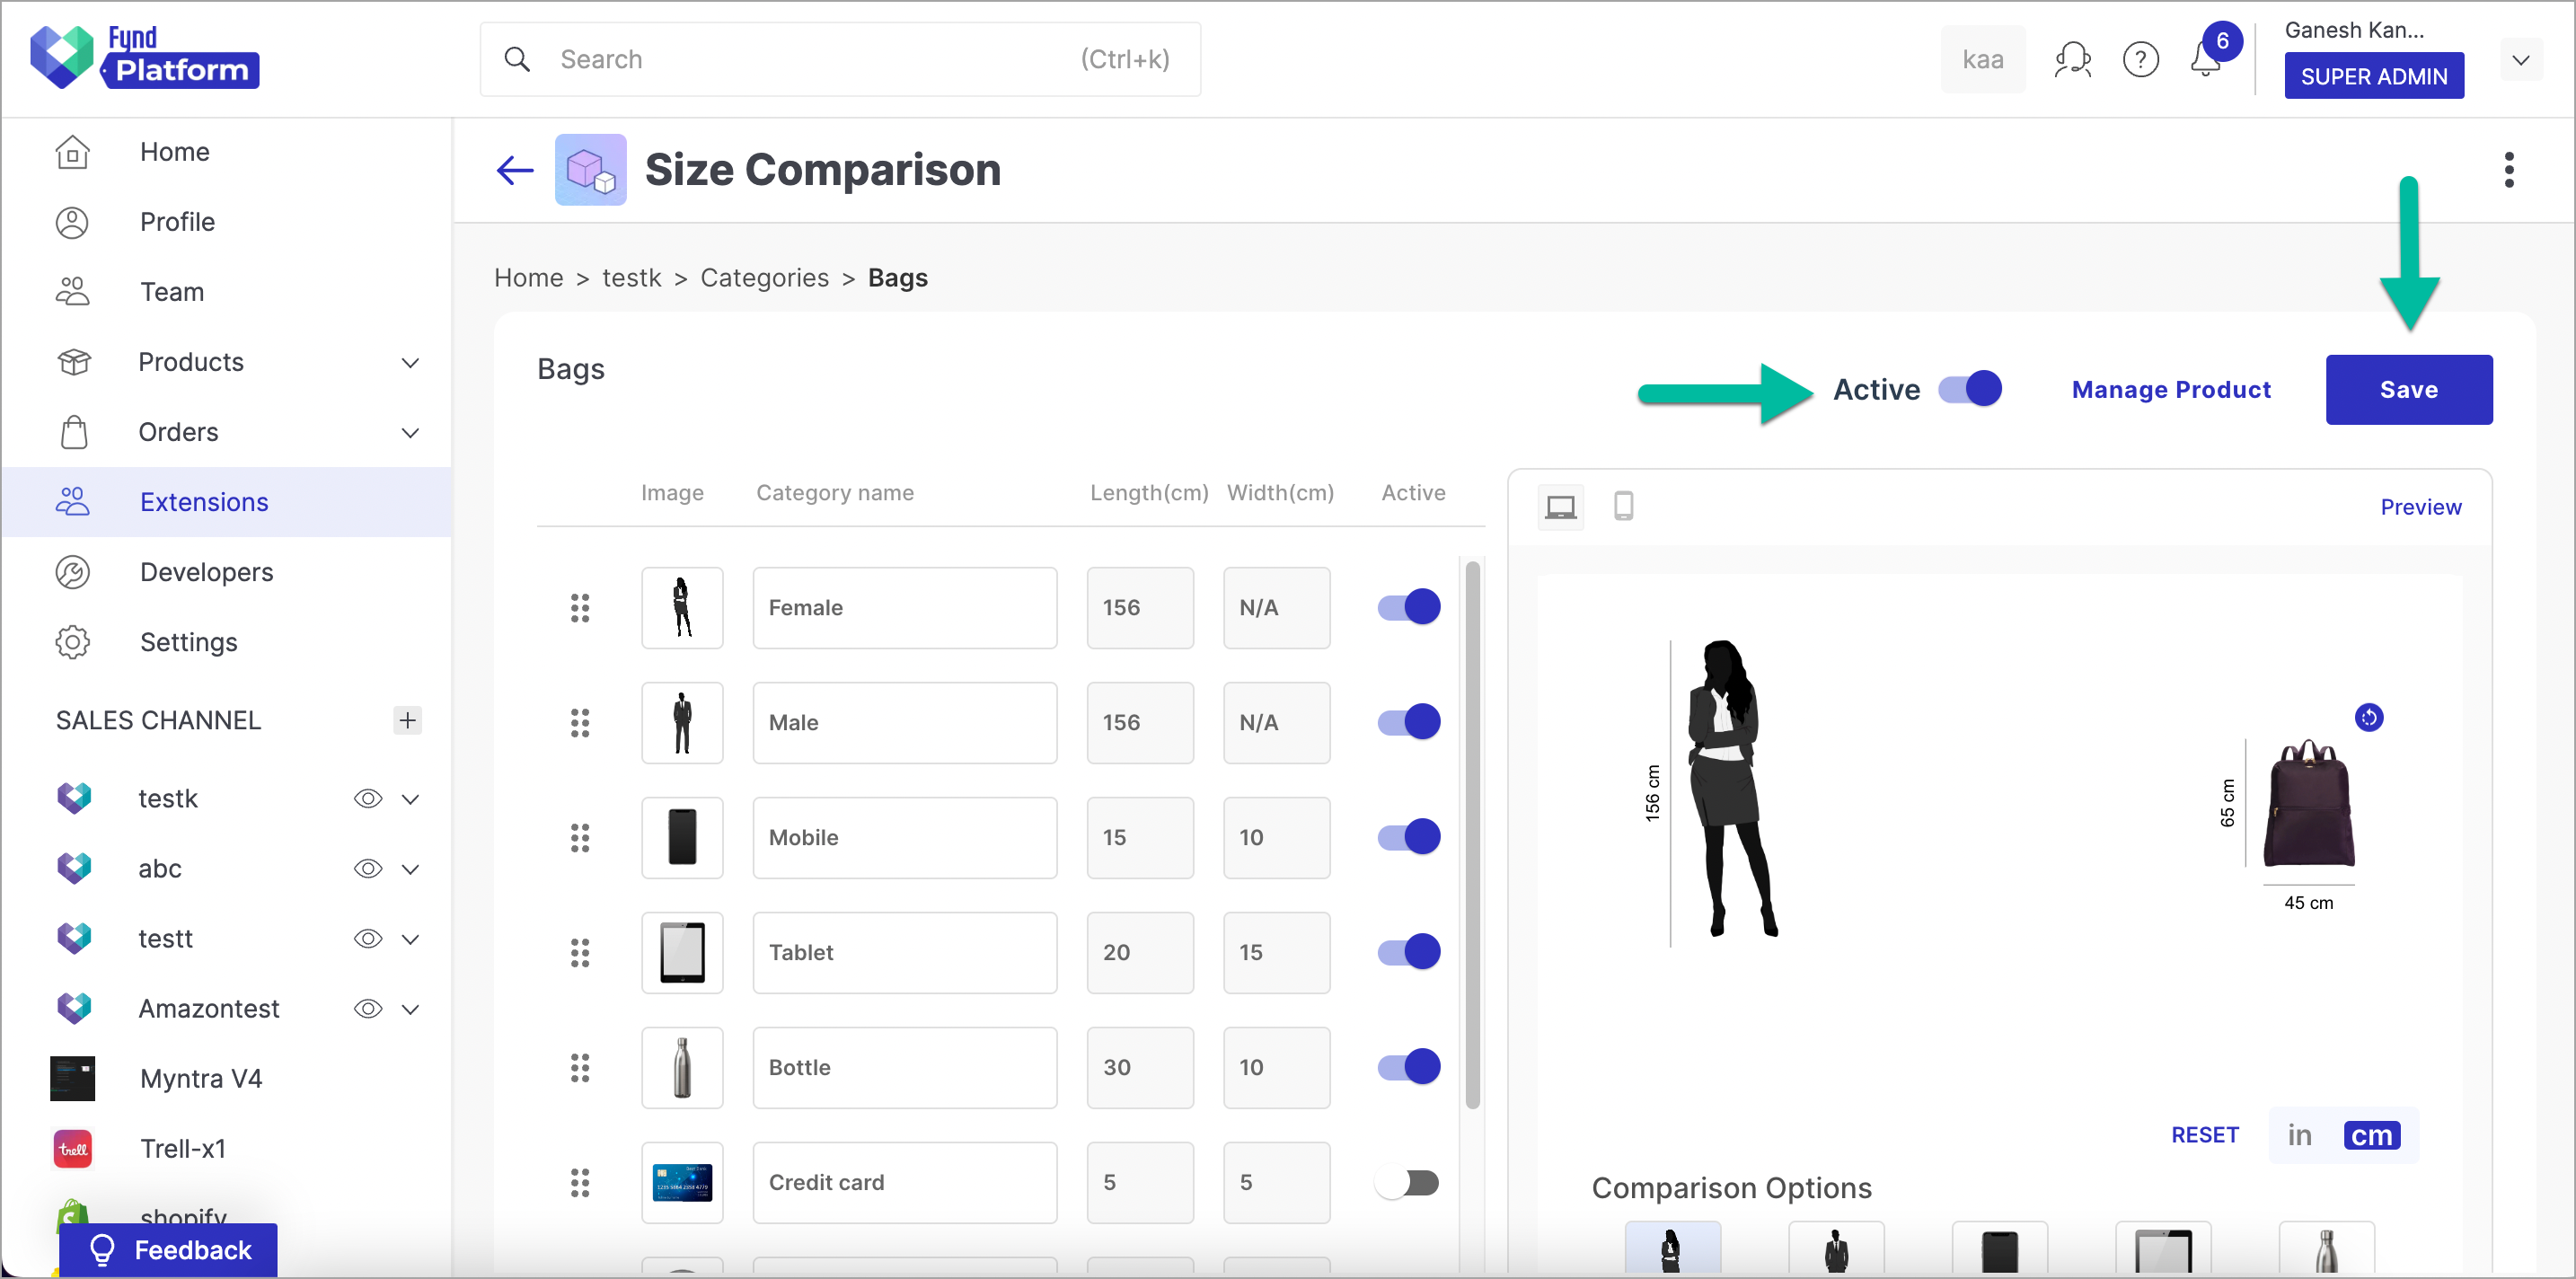
Figure 14a: Clicking Save Button In this way, your object comparison group is activated successfully.
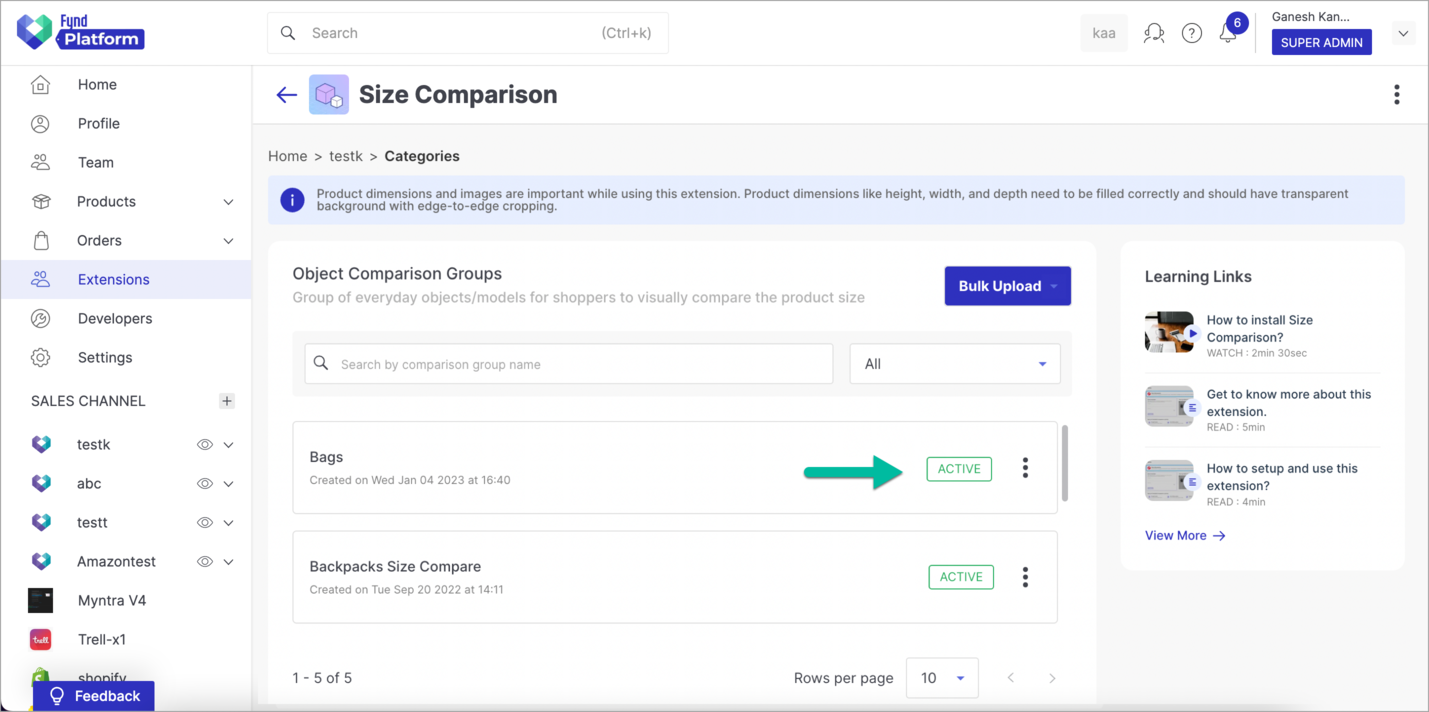
Figure 14b: Object Comparison Group (Active)
Manage Products in Object Comparison Group
Open the object comparison group in which you want to update the details of products.
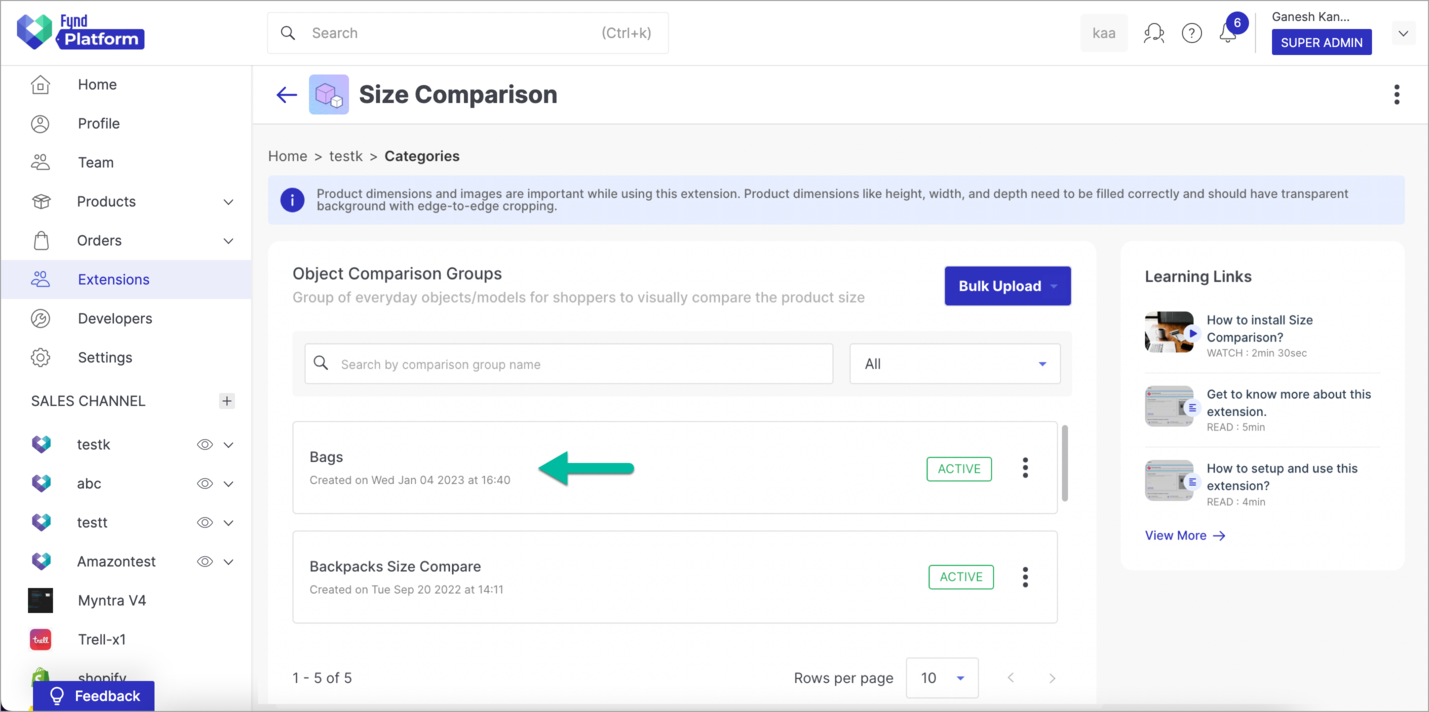
Figure 15: Opening the Object Comparison Group Click Manage Product.
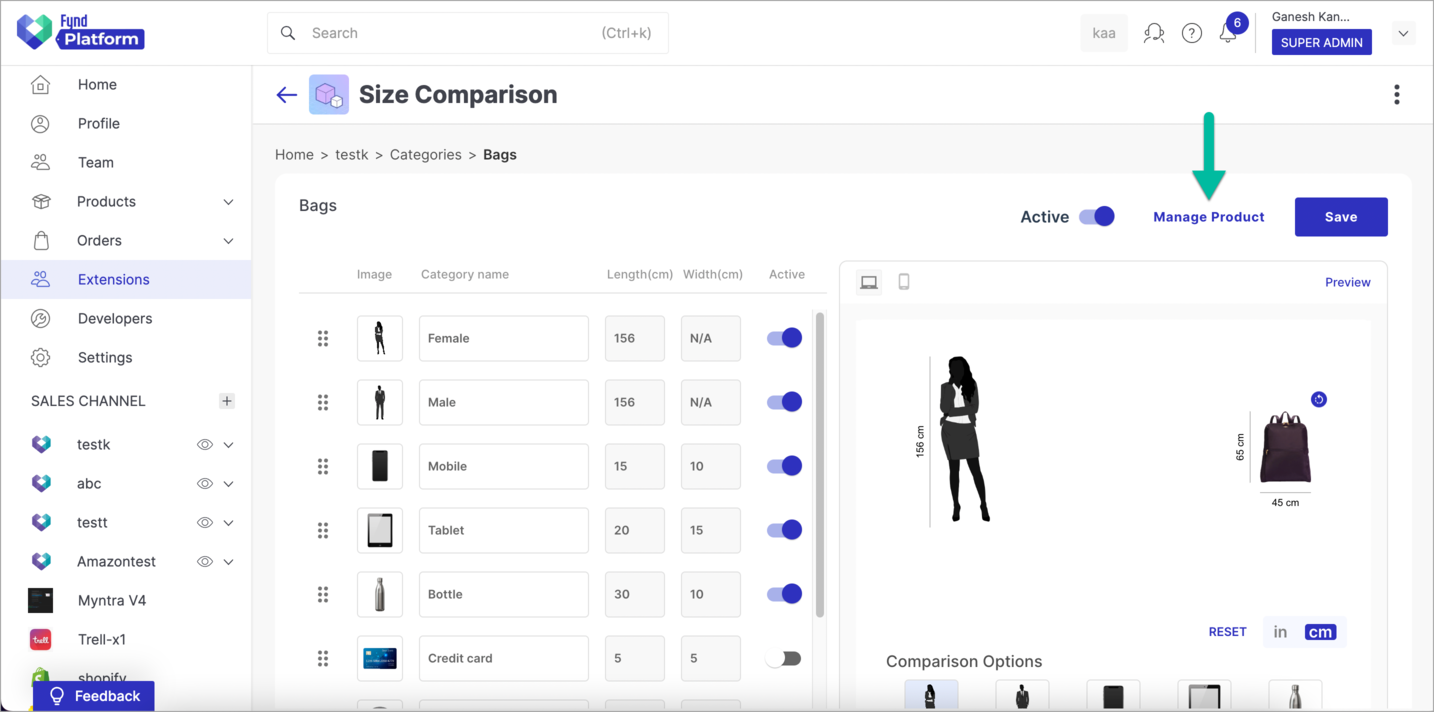
Figure 16: Clicking Manage Product Option Click Edit.
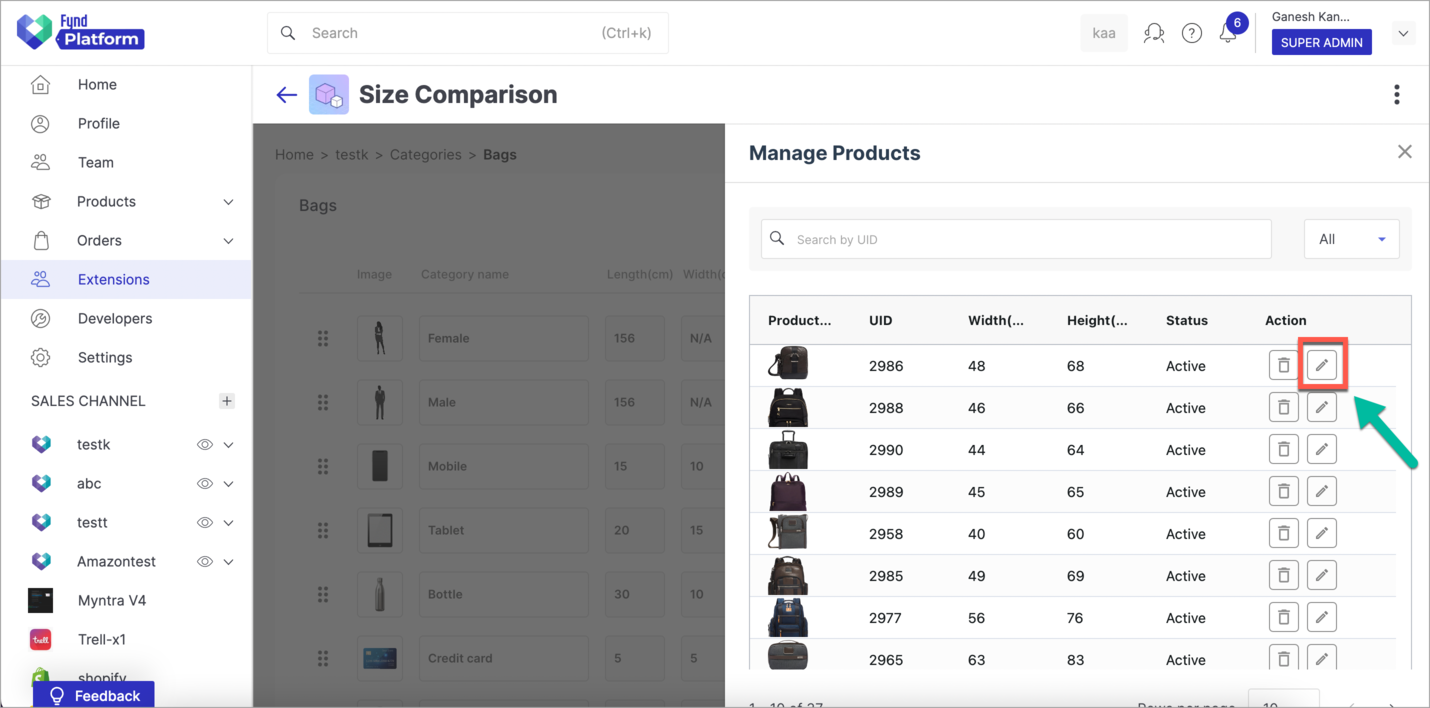
Figure 17: Clicking Edit Option Enter the new Width and Height values (Refer Figure 18a).
Click Save.
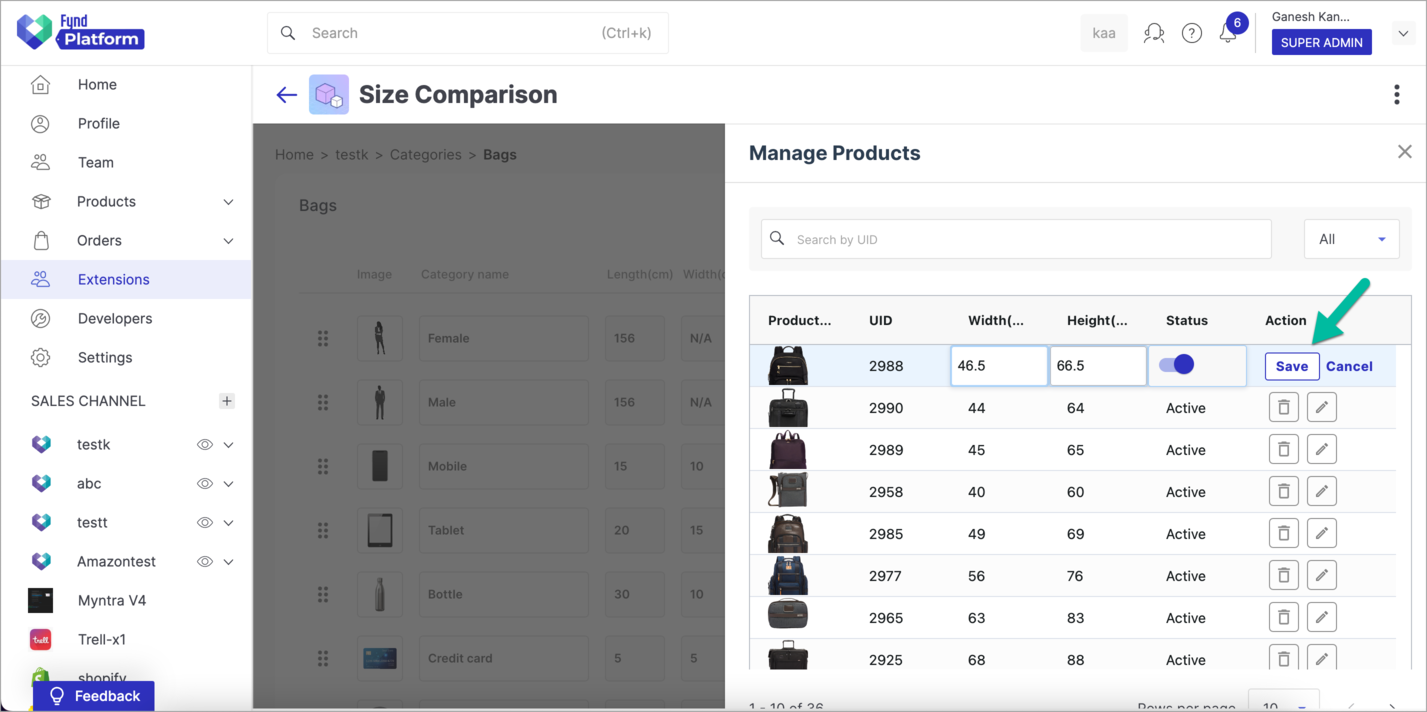
Figure 18a: Clicking Save Button In this way, product details in your object comparison group have been updated successfully.
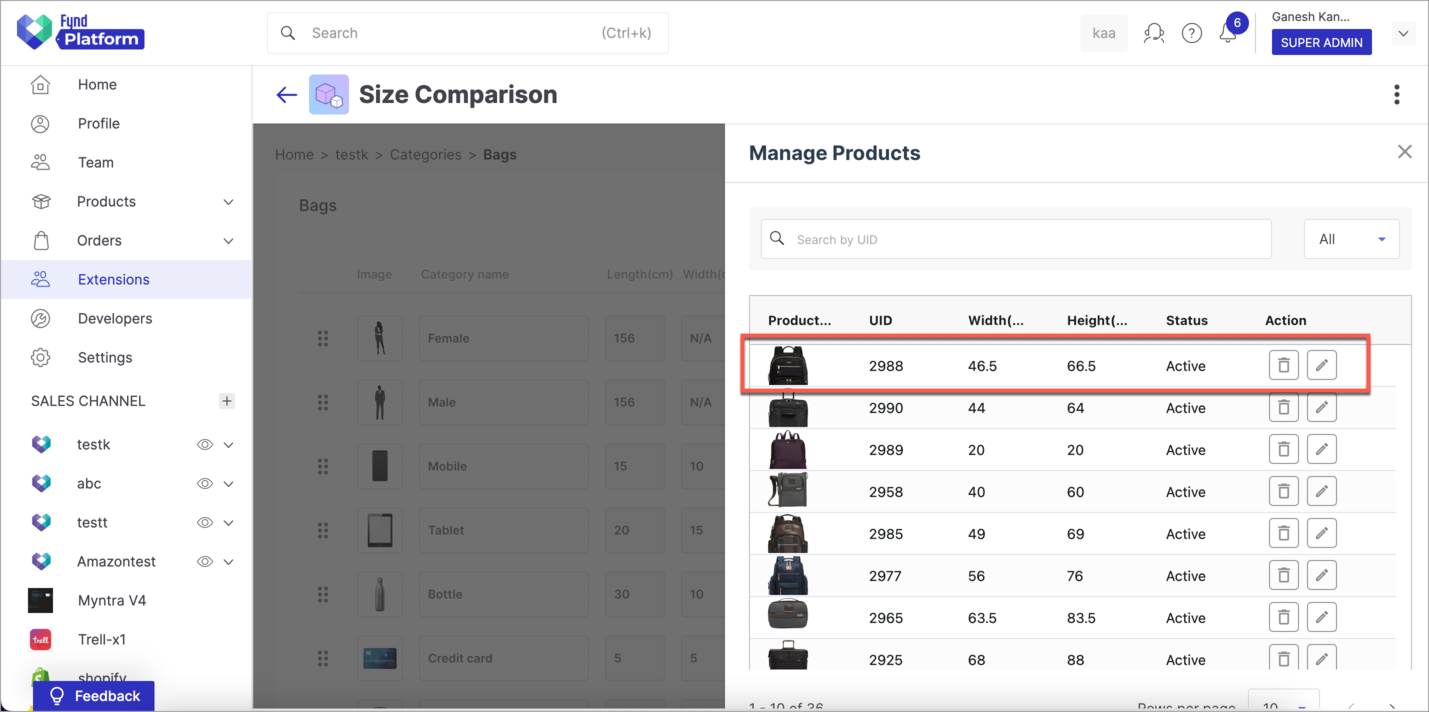
Figure 18b: Updated Product Details Close the Manage Products window.
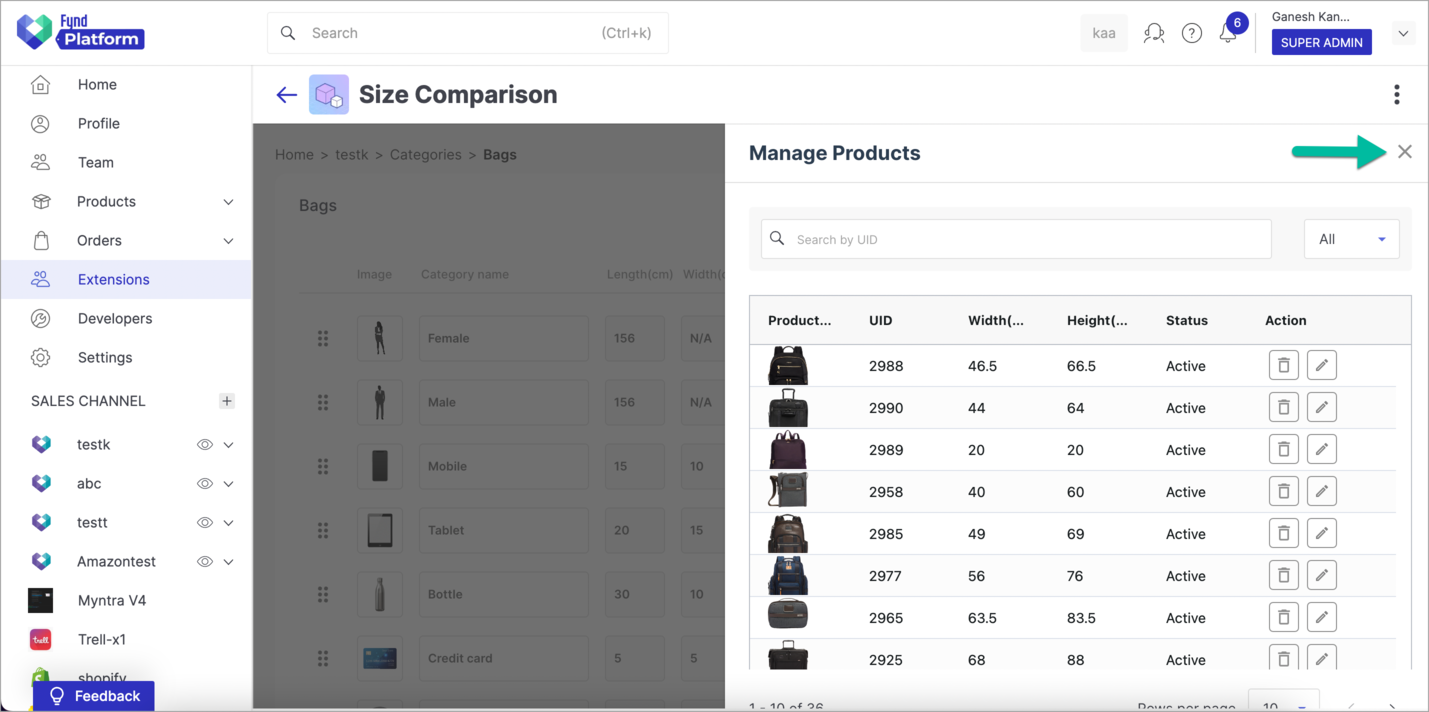
Figure 19: Closing Manage Products Window
Delete Object Comparison Group
Deleting the object comparison group will result in the removal of the size comparison feature for all products within it.
Go to kebab menu
⋮of the object comparison group which you wish to delete.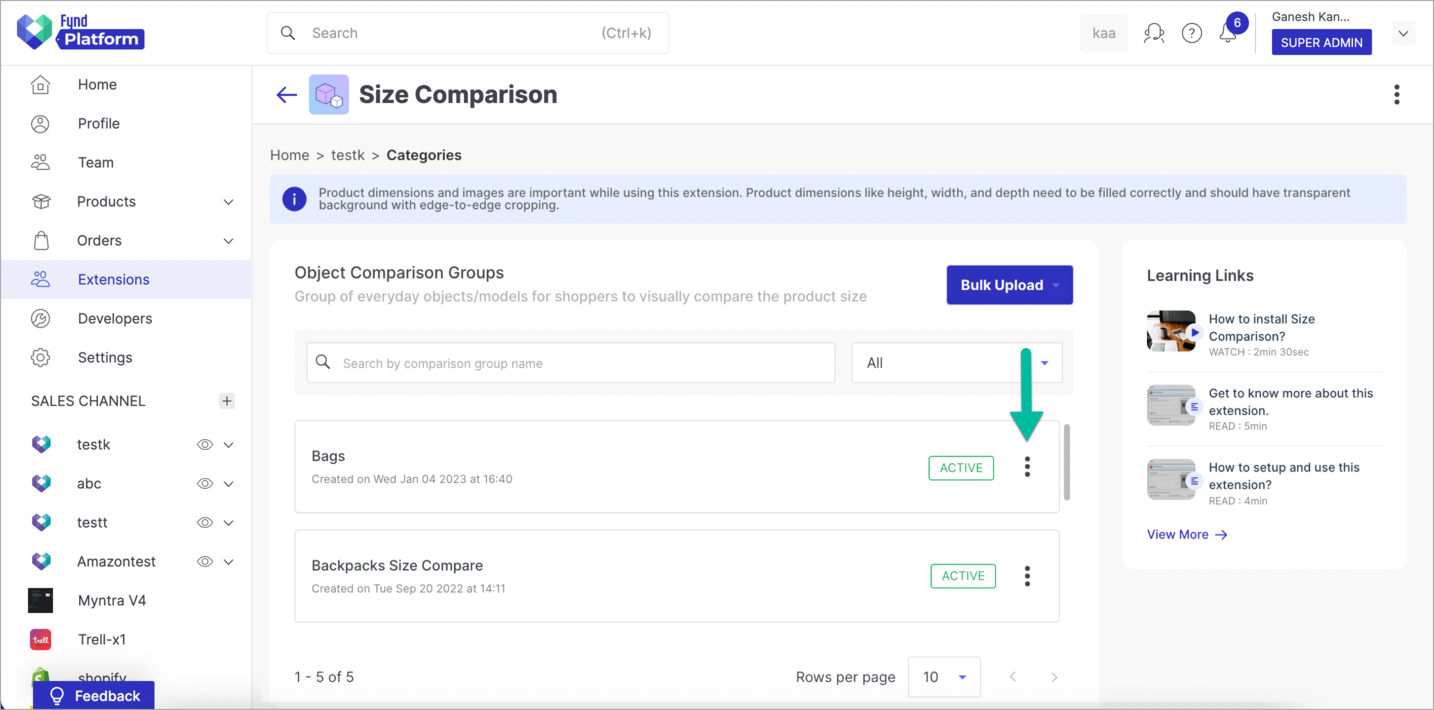
Figure 20: Opening Kebab Menu Click Delete.
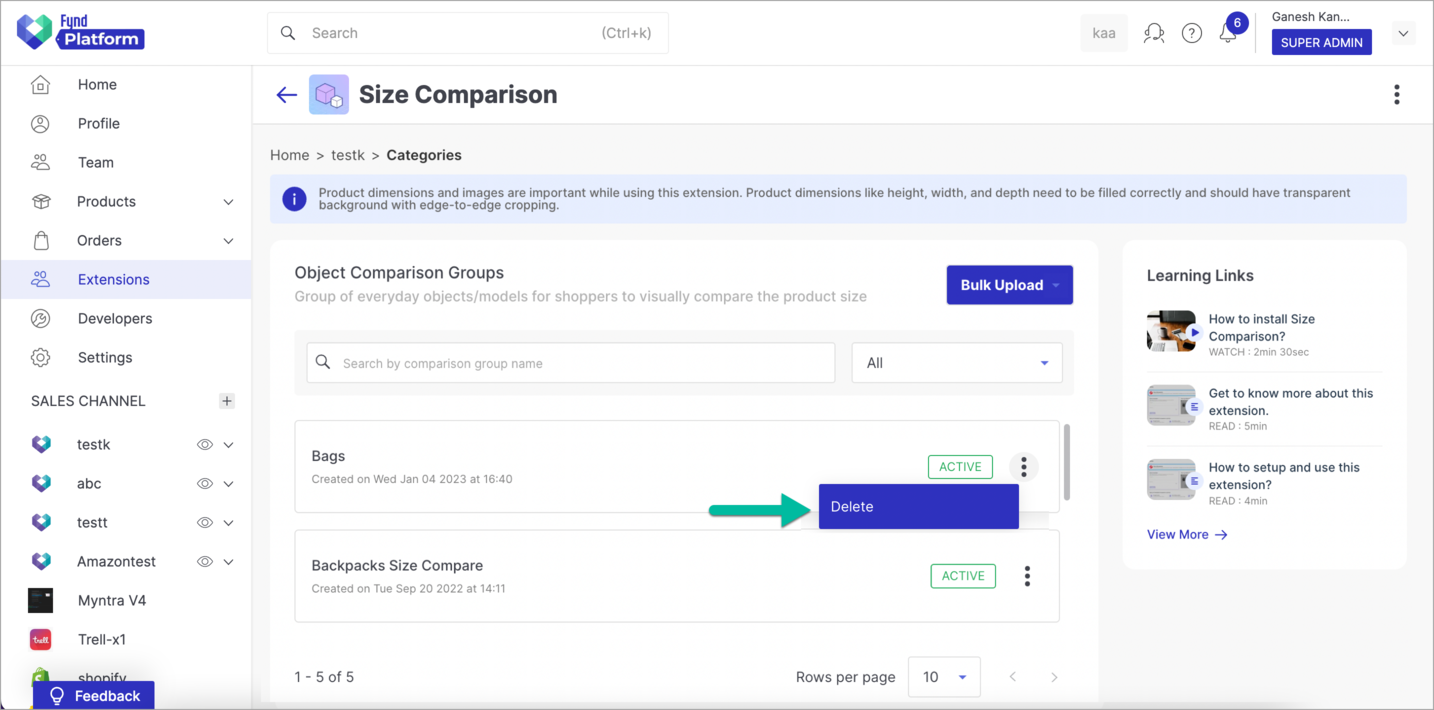
Figure 21: Clicking Delete Option In this way, your object comparison group has been deleted successfully.
Update the Existing Object Comparison Group
Go to Existing Group if you want to update the existing object comparison group for any of the following reasons:
![]()
- Enabling size comparison feature for products that have size comparison disabled.
- Disabling size comparison feature for products that have size comparison enabled.
- Updating image URLs.
Add Size Comparison Extension in Theme
Click Themes in Appearance section of sales channel on Fynd Platform.

Figure 23: Themes - Sales Channel Click Edit.

Figure 24: Clicking Edit Button Select 'Product Description' option from SYSTEM PAGES dropdown.

Figure 25: System Pages Choose a random product from the dropdown list (Refer Figure 26).
Click Ok.

Figure 26: Clicking Ok Button Go to Page tab (Refer Figure 27).
Click + sign of desired position in Extension Positions section. Here, we have selected Below Size Component position.

Figure 27: Clicking '+' Option Click Add Extension dropdown.

Figure 28: Add Extension Dropdown Select Size Comparison extension from dropdown list.

Figure 29: Choose Size Comparison Extension Click Save.

Figure 30: Clicking Save Button In this way, Size Comparison extension is added in your website's theme.
Close the theme window.

Figure 31: Closing Theme Window
It might take up to 10 minutes to view Size Comparison feature. Since these configurations aren't used regularly, the caching duration is active and new changes might take some time to reflect on your website.
Final Output
Now, visit the sales channel and you will see that Size Comparison feature visible on PDP.
![]()
![]()